~~~~~
It's no wonder some collars have their allowances "all in a bunch" ...there isn't enough room in the point!
One way to help collar seam allowances have the room they need to stay nice and flat with no lumps is to "open" the point of the collar pattern.
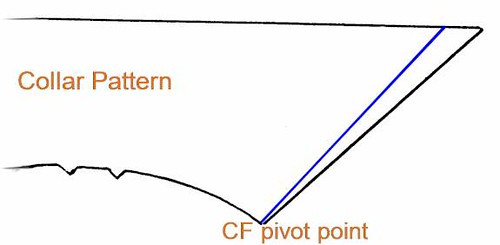
Notice the diagram of the collar pattern shown to the left. The black outline is the original pattern. The blue line shows how to alter the angle of the point.
The method is easy:
- Trace a copy of the pattern, *without* seam allowances.
- Locate the neck-edge Center Front. This will be your "pivot point", as shown.
- Make a mark, 1/8" to 1/4" -IN- from the collar's -TOP- edge point.
- Draw a line from the neck-edge -CF point- up to the mark made at the collar pattern's TOP edge...shown as the blue line in the diagram.
- Cut along this newly drawn line to complete the pattern alteration. Don't forget to add seam allowances!
The length and shape of the neck-edge of the pattern has not changed, all the "parts" will stitch together as usual. This simple method will work with any collar, including shirt collars that are attached to a stand. Changing the angle of the point by such a small increment will not affect the collar's "fall". Remember, all that's been done is a very slight change to the angle of the collar point, giving its seam allowances more room to settle flat and smooth when the collar is stitched and turned.
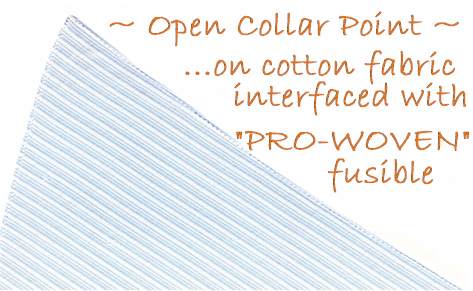
The blue shirt collar shown to the left is an example of how sharp and smooth a collar can be when the angle of the point is opened a bit. Of course, there are other techniques that help a shirt/blouse collar look sharp and professional, but changing the pattern is a good place to start!
SEWING NOTES- Sewn collar shown above is interfaced with Pro-Woven Shirt-Crisp Fusible Interfacing from ~Fashion Sewing Supply~
What a fabulous idea Pam. I'll use this next time!
ReplyDeleteAnn
Thank you for tutorial. I'm going to try it in the very near future.
ReplyDeleteGreat tutorial. Girl, you beat me to posting a note on your blog about the Sisterhood Award nomination.
ReplyDeleteWish I would have seen this collar tutorial before sewing my jacket. :-) Btw, I used your interfacing in the jacket--love the stuff and will need to stock up soon. I've just about used up what I won from Lori.
ReplyDeletePam, Don't know if you still have the pictures, but they don't show up in the tutorial any more. FYI and all that.
ReplyDeleteSueC
So sorry about the missing diagrams...they have disappeared entirely from my flickr phototream, and I cannot retrieve them. So...when I get the time, I will re-write this post with more information and new diagrams and/or photos.
ReplyDelete