Where did the summer go?
This is likely the last short sleeve shirt I'll make for a client this season!
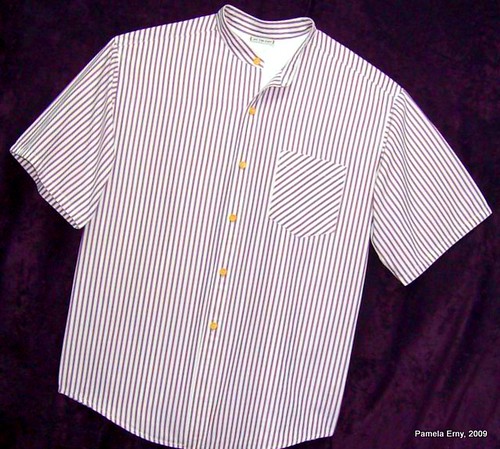
Made from fine Swiss Cotton Shirting fabric,
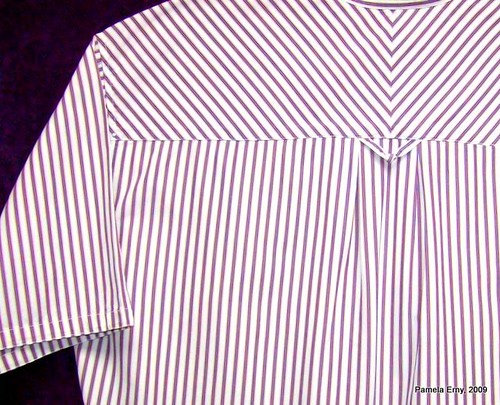
This shirt features a lined bias pocket and a bias back yoke.
As you can see in the photo below, the client also requested a CB "Locker Loop" that I made a bit more interesting by tying a knot in the center.
By the way, these CB loops are making a comeback in fine RTW...
This shirt features a lined bias pocket and a bias back yoke.
As you can see in the photo below, the client also requested a CB "Locker Loop" that I made a bit more interesting by tying a knot in the center.
By the way, these CB loops are making a comeback in fine RTW...
I found that I needed to line the pocket of this shirt. The fabric is very lightweight, and the vertical stripes of the shirt-front clearly showed though the bias stripes of the first unlined pocket I made. Since a seamed lining on a pocket crafted from fine cotton will show ugly ridges when pressed, I prefer to line a shirt pocket without seams.
Here's How:
- First, prepare the pocket by pressing all edges into their finished position, but do not stitch the pocket hem...yet.
- Then, cut a lining from lightweight fabric that is the exact size and shape of the finished pocket. I used Pro-Woven Standard Interfacing #1 Lightweight.
- Next, just tuck the pocket lining into (under) all the pressed folds of the pocket. The photo below shows all but one side of the lining inserted into the pocket.

- After all the edges of the pocket lining are tucked into the folds of the pocket, and the lining is flat and smooth, stitch the pocket hem as shown below.

- Now you are ready to stitch the pocket onto the shirt...where your top-stitching or edge-stitching will "auto-magically" secure the remaining edges of the lining.
What a beautiful shirt, Pam! I just love the interesting touches you add to your shirts.
ReplyDeleteThank you for the tutorial on the lined pocket. Gorgeous shirt. As always.
ReplyDeleteThanks Pam for the tutorial. I love the knot loop idea!
ReplyDeleteCool technique, thanks.
ReplyDeleteAnother great tutorial. Thanks! BTW- You are the featured PR member today.
ReplyDeleteNice to know how a professional does things. Thanks for all your great tutes.
ReplyDeleteHow cool is that pocket lining!!! Beautiful finished shirt. As always, thanks so much for sharing your knowledge and techniques!
ReplyDeleteSuch smart details. Thanks for showing how that pocket is done!
ReplyDeleteVery classy looking shirt. The bias yoke and pocket as well as the back loop just finish this shirt!
ReplyDeleteLynda
Pam I love all the wonderfuldetails; the knot in the yoke loop is my favorite!
ReplyDeleteI love the way you have angled the stripes in different areas of the shirt!! The only thing that would make it cooler in MY mind is if all of the different areas had a different color stripe!!!!! A guy in college way back in the late 80's had a striped oxford cloth shirt made with different colors for each section. I loved that shirt. The sleeves were different colors, the two front sections were different, the back, the yoke on the back, etc. I really envied it!! Your post has brought the image of that shirt flooding back to me!!!
ReplyDeleteKathi, glad you like the shirt, thanks!
ReplyDeleteI often have many different design details that I would like to add to a shirt that I am commissioned to make for a client. However, in the end, the client chooses what details he wants for the shirts I custom design for him :)
Oh, I wasn't suggesting you change that one. I was just dreaming of what I wanted!!!
ReplyDeleteKathi...I know you weren't :)
ReplyDeleteI was just lamenting over my constraints when it comes to clients!
I noticed the knot, too. Beautiful work! Sublime.
ReplyDeletePam - Thank you for the reminder! I did this many years ago, and it will work on a show-through silk that has been waiting in the wings just because of this issue. Sue in MN
ReplyDeleteBrilliant!!!
ReplyDeleteAZ Barbara
Pam - I love the tips and techniques which help make my sewing more professional. The items you make for the little girls in your life are so cute.
ReplyDeleteYou truly are inspirational - thanks again.
Bryden