
I had some slightly distressed lightweight denim and some striped chambray in my "shirt-making stash". The fabric was stacked together on the shelf, and I liked the combination...now I had to decide how to combine them. I knew right away that I wanted to make a contrasting right center-front placket with the striped chambray cut on the bias. But was that going to be enough "jazzy style" for my client? Hmm...so I cut the inner yoke and inner collar stand from the chambray, and added a strip of it to the pocket. (Side thought--You may notice that the pocket, collar, and cuffs are a bit "oversized". My client is a big man, and smaller design details tend to look childish on his shirts.)
Was it "jazzy" enough yet? Before sewing further, I sent a photo to my client. His reply was, "Do more with that stripe, I like it." So throwing caution to the wind, I added a wide bias-cut sleeve placket, and "wrapped" the edge of the cuffs with the chambray.
After the buttons were sewn and threads snipped, I boxed up the "jazzy shirt", and delivered it to my client, leaving it with his wife...hoping he would like it. Then I went to the bank and cashed his check. I heard from him later that day...he is very happy with the design...always a thrill for me. And a good thing...because I had already spent the money :)
SEWING NOTES: The shirt is finished with the wooden buttons that we carry at www.FashionSewingSupply.com . I turned them over and used the back side of the buttons as the front. The denim "parts" of the shirt that needed to be reinforced were interfaced with our 60" wide Pro-Weft Supreme Lightweight The chambray was interfaced with 62" wide Pro-Sheer Elegance to stabilize the bias cut pieces, inner collar stand, and the inner cuff.
Here is the quick sequence of how I wrapped the edges of the cuffs--
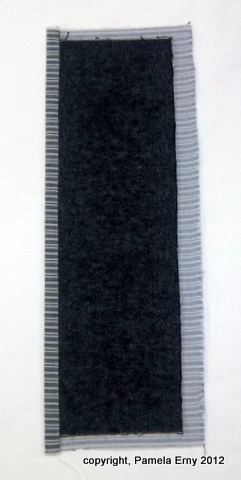
-- Cut the outer cuff the size of the pattern piece. Using contrasting fabric, Cut the inner cuff about an inch wider and about an inch longer than the outer cuff (interface wrong sides of both inner and outer cuff). Right sides of cuff pieces are shown below.

--Center the smaller outer cuff on top of the larger inner cuff, Right Sides Together, align (match) one side of the long edges, and stitch a 1/4" seam along that one long edge, as shown below.

--Open the cuff, and Press the Seam Allowances toward the contrasting inner cuff. This is how it will look from the right side....

And this is how the pressed seam allowances will look from the wrong side...
(remember--the wrong sides have been interfaced)

--Now, trim the excess contrast fabric so that the RAW edges are even...

--DONE! This is the finished wrapped cuff, (the outer "public" side) ready to be sewn to the shirt sleeve...

and this is how the wrapped cuff looks from the inner (back) side (the side that will touch the wrist when the cuff is sewn to the shirt)...

Nothing like a happy customer and I can see why. This is a great shirt and talk about custom!
ReplyDeleteIt's always very interesting to see how you walk that really fine line between 'hey, that's neat!" and "too much for me." I love the stripe treatments - especially the cuffs!!
ReplyDeleteOh Pam, I just love the cuff treatment! I'll be using it on my next shirt.
ReplyDeleteDefinitely jazzy. Thank you for showing us how you did it.
ReplyDeleteWOW! You rock! Love, love, love it. Jazzy and yet classy at the same time! Lynn B in Manassas
ReplyDeleteLove how you jazzed up this shirt. Thanks for explaining the subtle changes you made to allow for your customer's size. These little hints are gold!
ReplyDeleteNew to your blog and I am really enjoying it. THis shirt rocks! Clever design.
ReplyDeleteYou nailed it Pam! Thanks for the wrapped edge tutorial - so effective.
ReplyDeleteThat is so fantastic Pam! Yet another technique I have got to try some time soon. Thanks!
ReplyDeleteWhat a neat technique. The clothes you make always have such special details. Thank you for sharing. Kitty
ReplyDeletePam, that is one fabulous shirt. I LOVE it! Thanks for sharing that cuff treatment; I'm going to use it on my next shirt (whenever I make one :) ) You are just so talented and creative!!!
ReplyDeleteThanks for taking the time to show us how to do those cuffs, Pam. That shirt is fantastic. And aren't you glad I took a moment to correct my typo by adding the "R" in shirt? Almost ooooops...
ReplyDeleteAmazing shirt, Pam, thanks for the tutorial on the cuffs. You are so talented.
ReplyDeleteLove it! I will have to keep those clever ideas in mind when I get to my chambray shirt this year. Nice that you have a client who trusts you to "design something".
ReplyDeleteAwesome shirt. I'll be making that cuff too. Thanks for sharing.
ReplyDeleteAs a musician, the title caught my eye and as one who sews, the photos caught my eye. Your post is entertaining and educational - I love the shirt and your blog!
ReplyDeleteThank you for showing how you wrapped the cuff. I can see myself using this technique on blouses as well. Very Clever!
ReplyDeleteThank you
Marie
That is an amazing shirt! Thanks for the tutorial, too.
ReplyDeleteGood tutorial, Pam, and I love the shirt as well.
ReplyDeleteTheresa in Tucson
Oh, I LOVE it! My favorite part is the little bit of stripe on the pocket. Thanks for the tutorial.
ReplyDeleteI never know what kind of interfacing to use, so I appreciate you including that tidbit of knowledge.
LOVE the placket! I'm so going to do that on my next shirt.
ReplyDeleteGreat job Pam, this is a beautiful shirt!!
ReplyDeleteI really, really, really like this shirt!
ReplyDeleteWhat a great shirt, especially the cuff. I'd love to try something similar.
ReplyDeleteGreat, unique shirt! Also, thank you for the tutorial!! I am really interested in becoming great at making men's shirts so all your tips are extremely helpful. Thanks!!
ReplyDeleteAnother great tutorial!! When are you going to publish them all ??
ReplyDeleteVery nice interpretation of jazzy but not too casual. Thank you for sharing!
ReplyDeleteI love it, even for a girl on summer with a mini short it can look so trendy!
ReplyDeleteYou make it sound so easy...collars and cuffs I dread!
ReplyDelete