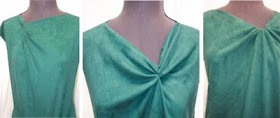
So, now I'll show you how quick and easy it is to make countless variations like these shown below from a basic draped cowl neckline...that can be done in mere minutes!
First, start with a drape-front cowl (photo #1 below) already in your wardrobe, or make one with the many patterns that exist for this style.
 As shown In photo #2, turn the garment inside out and flip the front facing up to expose the wrong side of front of the top.
Next, for the most basic variation, pinch some fabric near center front, twist it a bit, and hold the “twisted pinched” fabric with a rubber band, as shown in photo #3. I am showing this with a regular rubber band so it shows up in the photo, however a small clear "ponytail" band works best. Later, if you want to make this design change permanent, the 'twist' can be stitched. Or just remove the band, and you have your original draped cowl back again :)

Now turn down the facing to cover the banded fabric, as shown in photo #4.

As shown in photo #5 below, when the garment is turned right-side-out, the twisted detail becomes a new interesting design feature of the top.

Where you pinch and band the fabric is totally up to you: higher, lower, to the left or right of center, using 2 or 3 twists, etc. There are infinite possibilities for design variations like these.... Have fun!


Great tutorial! I really love the draped necklines! Have you had a chance to make the Hot Pattern Mighty Aprodite draped t-shirt yet? I'm still confused on how to do those draped pleats! Can't wait to see your version.
ReplyDeleteThanks! Never thought of using the rubber band.
ReplyDeleteBrilliant! Thanks for bringing this back.
ReplyDeleteGreat tutorial! Thank You.
ReplyDeleteI bookmarked this immediately, thanks for the tips.
ReplyDeleteWe just found your post for cowl necks...what a wonderful idea! We just added a link to your tutorial on our Facebook page.
ReplyDeleteRegards,
The McCall's Patterns Team
Very helpful. Thanks
ReplyDelete