OTC-011 Off The Cuff ~Sewing Style~: August 2010 <body><script type="text/javascript"> function setAttributeOnload(object, attribute, val) { if(window.addEventListener) { window.addEventListener('load', function(){ object[attribute] = val; }, false); } else { window.attachEvent('onload', function(){ object[attribute] = val; }); } } </script> <div id="navbar-iframe-container"></div> <script type="text/javascript" src="https://apis.google.com/js/platform.js"></script> <script type="text/javascript"> gapi.load("gapi.iframes:gapi.iframes.style.bubble", function() { if (gapi.iframes && gapi.iframes.getContext) { gapi.iframes.getContext().openChild({ url: 'https://www.blogger.com/navbar.g?targetBlogID\x3d10604511\x26blogName\x3dOff+The+Cuff+++++++++~Sewing+Style~\x26publishMode\x3dPUBLISH_MODE_BLOGSPOT\x26navbarType\x3dTAN\x26layoutType\x3dCLASSIC\x26searchRoot\x3dhttps://off-the-cuff-style.blogspot.com/search\x26blogLocale\x3den\x26v\x3d2\x26homepageUrl\x3dhttp://off-the-cuff-style.blogspot.com/\x26vt\x3d-8803809636534965068', where: document.getElementById("navbar-iframe-container"), id: "navbar-iframe" }); } }); </script>

8/30/2010

TUTORIAL- Pre-shrink Wool...Fast and Easy at Home! (revised)


(This is a revised version of one of the most popular tutorials I have written. Since I have so many new blog followers since it was first published here in 2009, I thought it was time to revisit it :)

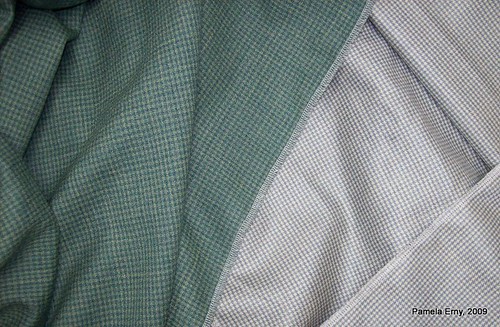
First...the fabric! This luscious yardage is from my stash. One of the pieces was purchased from Gorgeous Fabrics a few seasons ago. The green check yardage is 100% tropical wool crepe, the gray check yardage is a medium weight blend of wool and silk.

Why pay big bucks to take this fabric to the dry-cleaner to steam shrink it, when we can do it so easily at home?

Wool Yardage

Now the method:

  • Serge or zig-zag the raw cut edges of the fabric.
  • Next, wet 2-3 clean thick towels with very HOT water. Then wring them out until they are a little more than "damp" but NOT dripping wet. Use towels you have had for a while, so that lint will not be transferred from the towels to the fabric ;)
  • Now toss the hot steamy towels and the fabric into your clothes dryer.
  • Set the dryer on HIGH heat, and tumble the fabric and very damp hot and steamy towels for 30-40 minutes.   (If you are using a high napped wool, or are just unsure about this method with your particular fabric, test on a 6"x6" swatch of your fabric before committing the entire length.)
  • If you have a steam setting on your dryer...skip the towels and tumble with steam for 20-30 minutes on high heat. If your fabric is still damp after 20-30 minutes, dry without steam for about 10 more minutes.
  • Lay the fabric flat until it is cool. 

  • Why it works--- Tailors regularly use  high heat and steam during the construction process, and also use precise "spot" applications of water and hot irons when making suits of the finest wools. Tumbling wool yardage with a few hot damp towels is much less intense than the heat and steam used during wool garment construction. Moreover, the yardage is being "fluffed/tumbled" in the dryer with steam...NOT twisted or agitated in the washer with water.
Align CenterThat's it! Your wool yardage is now ready for the needle.
The appropriate interfacing for most wool and wool blends  
is PRO-WEFT Supreme Lightweight Fusible or 
PRO-WEFT Supreme Medium-weight Fusible

Wool Yardage After SteamingAlign Center

As you can see above, this Dryer "Machine Steam Shrink" method did not visibly change the fabric at all, and it's hand is still soft and smooth. However it did shrink. Each piece was 60" wide and 2 yards long before steam-shrinking. After, the green 100% wool piece measured 59.5" wide and was 2.5" shorter in length. The gray wool/silk blend was still 60" wide but 1.75" shorter in length.

Labels:

What do you think? Please add a comment by clicking here--> 21 comments

8/22/2010

TUTORIAL-- How to "Distress" Silk

 ~Casual Mens "Distressed" Silk Shirt  ~

I love to work with silk when making shirts for men or women. I prefer to use Dupioni Silk...a shiny silk fabric woven with crosswise irregular threads that form uneven "slubs" across the fabric's width. Dupioni silk can be quite hefty in weight or very light-weight.  Directly off the bolt, Dupioni silk is too shiny and crisp for my designs. While fine "as is" for garments like prom gowns and wedding dresses, it is much too formal for my purposes.  So I wash it in a specific way until it softens and fades.

Oh yes, there can be surprises along the way, but to me that's part of the fun !  The slubs will swell, the color will fade, cross-dyed silk may become a totally new color, and it will definitely shrink. When purchasing silk to distress, I try to buy the 54" wide dupioni, and I buy more than I need. If I need 2 yards, I buy 3. If I need 3 yards, I buy 4.5.  Better to have a little more, than not enough...I can always make a scarf ;)

Here are some lengths of Silk Dupioni  as they came off the bolt.

^ CLICK to enlarge and see details ^
Each piece is 4.5 yards long. Notice the high sheen of the fabric and how the colors are very saturated.

My distressing process of these silks was to wash and dry each piece separately in a particular order, using different laundry products along the way. Here is how I "distressed" the silk pictured above, based on their unwashed lengths of 4.5 yards.

1. Wash the fabric on a regular cycle in HOT water this way--Place a length of dupioni into the washer, along with a scant tablespoon of a special textile detergent called Synthrapol   .   Synthrapol cleans the fabric very thoroughly, suspending any "free" dye in the water so it goes down the drain and does not settle back onto the fabric.
2. Place the washed fabric into an empty clothes dryer set on HOT, until thoroughly dry. (Note--this is the ONLY time during this process that you will dry the silk on the HOT dryer setting)

3. Look at your fabric in good light.  If it has the "hand", drape, and color that you like, it is time for step 4.
If you want a more faded look, repeat the washing directions in step 1 & 2...however this time wash in HOT water, BUT DRY on LOW.
Keep washing (hot)/drying (low) until your silk looks the way you want it to...this is not exact science :)  As a frame of reference, I rarely choose to "Hot wash/dry Low" (after Step 1)  more than 4 times.

4. Shampoo and condition your silk. Yes, really!  Use a good quality shampoo and conditioner, because after washing as described above your silk will look nice, but it might be scratchy if you have put it through more than 2 of the wash/dry cycles.  I like to use the products pictured below, because I can usually find them on sale.  This last time, Wash your silk on the DELICATE cycle in COLD water with a teaspoon of shampoo. Dissolve a Tablespoon of conditioner in some water, and add it to the COLD water of the final rinse cycle.
^ CLICK to enlarge and see details ^

This is what my silk lengths looked like after 1 cycle of  "Step 1" and 2 cycles of "Hot wash/ dry Low --
^ CLICK to enlarge and see details ^

The colors had changed and/or faded, the slubby grain was raised, and the silk was less shiny.  It shrank between 18" to 27" in length and 2" to 4" in width (each piece was a little different).

But I wanted to roughen it up even more. So I put it through 2 more cycles of  "Hot wash/ dry Low" (for a total of 4 wash/dry cycles after step 1).   After "shampooing" as described in Step 4, this is what my beautifully distressed silk dupioni looks like...soft, supple, and ready for the needle !
^ CLICK to enlarge and see details ^


These silk pieces did not shrink any more after the first 2 wash cycles or after their "shampoo". When sewing with distressed silk dupioni, you can cut it on the cross-grain like I prefer (so the slubby grain-line runs lengthwise on the finished garment). When possible, use french or felled seams to discourage "seam slippage". 
Wash the finished garment by hand, or on a very delicate machine cycle using shampoo in cold water. I usually dry distressed silk garments in the dryer on a very low/delicate setting until just slightly damp, and then hang until completely dry.  Distressed silk dupioni is surprisingly strong, and can take the heat and steam of an iron set to wool to high wool.

Other Sewing Notes-- Use regular sewing thread (silk thread is not necessary).  Use the best quality interfacing on your silk-- Pro-Sheer Elegance Fusible Interfacing for the softest, most supple results on light to medium weight silks you plan to use for blouses or dresses, or 
Pro-Weft Fusible Interfacing for the best flexible stability on medium weight silks that you plan to use to for jackets, etc.

Labels: ,

What do you think? Please add a comment by clicking here--> 20 comments

8/09/2010

Tutorial: Perfect Chevron Pockets...Every Time !

I was asked how I get stripes to match perfectly when making a Chevron Pocket.
Here is my method (and please forgive the strange blue cast of the photos, my camera is on its last legs)--

 You may click each photo to enlarge and see more detail.

First, start with a piece of fabric that you have cut on the bias. In this example, I used scrap fabric and was able to cut a bias triangle that was about 17" on each side.  The size of your bias piece for an adult size pocket, must be at least 16" on each side.  After it is cut, you will have a piece of fabric that is Straight Grain on TWO sides, and ONE side that is on BIAS.  Position your fabric piece on your table as shown, with the bias edge on the "bottom".

Next, holding the bottom-right point of the triangle, fold the piece in half. It doesn't have to meet perfectly, as you can see in my example below--


Now,  turn your piece so it is easy to trim off a scant 1/4" (or less) along the folded side.

What you want to get are 2 separate triangles like the ones shown below...after trimming off a bit of the folded edge, and then turning the top piece right side facing up,

This next step may sound odd in written directions, but it very easy.  KEEP BOTH TRIANGLES RIGHT SIDES UP. Then rotate just ONE of the triangles clockwise, until your rotation results in the two inner edge stripes lining up like a V-shape Chevon.  It's easy, just keep rotating JUST ONE piece until the edges meet and look like this--
Yes, it is likely that your edges may be quite off-set like these are, if your stripes are wide.  If this step confuses you, draw some stripes on 2 triangles of paper and practice this step before cutting your fabric.

Ok...Now you have 2 pieces of fabric that are right sides up, and meet in the middle forming V-shaped chevron stripes.  Next, flip one piece over so that they are right sides together. THIS NEXT STEP IS VERY IMPORTANT--slide the top piece over a little bit, and adjust the the pieces until the stripes match up, as shown below.  By off-setting the pieces like this, you are SURE the stripes will match when you sew the pieces together in the next step.
Pin your pieces together so that they will not shift, and sew the matched edges together with about a 3/8" seam allowance. Your sewn piece will look like this, the seam-allowances still off-set--
It's all VERY easy from here to your finished perfect Chevron Striped Pocket !  Next, press your seam allowances open.  This is how your piece will look from the wrong side--
And this is how it will look from the right side. Because the edges were off-set and perfectly matched before sewing, you have perfect chevron stripes !

Now all you have to do is place your pocket pattern so that the center of the pattern runs along the seam, as shown below, and then cut out your Perfect Chevron Striped Pocket !
 For a precise way to hem and turn the edges of any patch pocket to prepare it to be sewn onto a garment, you may be interested in another tutorial I wrote, Perfect Pockets Every Time


Labels: ,

What do you think? Please add a comment by clicking here--> 12 comments

8/04/2010

Shirt with Chevron Pocket...and Bias Details


This shirt is one of my original designs, 
and is made from cotton seersucker fabric. 

Sometimes working with seersucker fabric sucks is not easy. This particular seersucker fabric was a challenge because it was quite loosely woven, and because I chose to add bias details to this design. So I needed a way to reinforce them properly. Luckily, I was able to stabilize the bias details on the front button placket and sleeve bands with one of the custom-milled Interfacings I developed...a very light and flexible interfacing that can be applied with lower heat settings, PRO-SHEER Elegance Fusible Interfacing from Fashion Sewing Supply.  My client wanted a casual shirt that would look slightly "crushed" and that would be very lightweight and comfortable to wear. The unique features of PRO-SHEER Elegance Interfacing made it possible to control the bias without making it stiff.  If I had used  virtually any other interfacing, the bias bands would have prevented the sleeves from draping naturally, and the shirt would have lost the soft casual look I wanted for my client.

Here is a close-up of the Chevron Pocket, Bias Button Placket, and Bias Sleeve Bands. I apologize for the quality of the photos...I really need a new camera :)
CLICK PICTURES TO ENLARGE and see more detail.


Labels:

What do you think? Please add a comment by clicking here--> 8 comments


Site Meter