OTC-011 Off The Cuff ~Sewing Style~: June 2009 <body><script type="text/javascript"> function setAttributeOnload(object, attribute, val) { if(window.addEventListener) { window.addEventListener('load', function(){ object[attribute] = val; }, false); } else { window.attachEvent('onload', function(){ object[attribute] = val; }); } } </script> <div id="navbar-iframe-container"></div> <script type="text/javascript" src="https://apis.google.com/js/platform.js"></script> <script type="text/javascript"> gapi.load("gapi.iframes:gapi.iframes.style.bubble", function() { if (gapi.iframes && gapi.iframes.getContext) { gapi.iframes.getContext().openChild({ url: 'https://www.blogger.com/navbar.g?targetBlogID\x3d10604511\x26blogName\x3dOff+The+Cuff+++++++++~Sewing+Style~\x26publishMode\x3dPUBLISH_MODE_BLOGSPOT\x26navbarType\x3dTAN\x26layoutType\x3dCLASSIC\x26searchRoot\x3dhttps://off-the-cuff-style.blogspot.com/search\x26blogLocale\x3den\x26v\x3d2\x26homepageUrl\x3dhttp://off-the-cuff-style.blogspot.com/\x26vt\x3d-8803809636534965068', where: document.getElementById("navbar-iframe-container"), id: "navbar-iframe" }); } }); </script>

6/25/2009

The Vintage Shirt....Completed

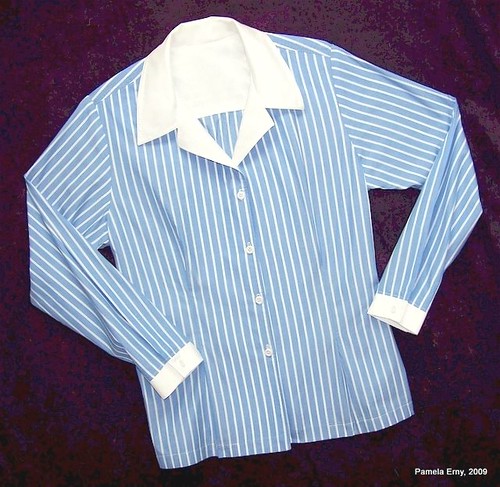
Here it is...my husband Roger's "Birthday" shirt,
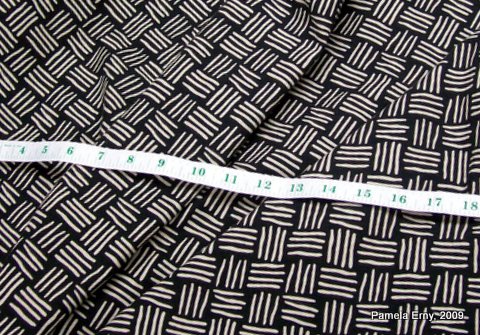
made with a vintage Butterick pattern (#1481)
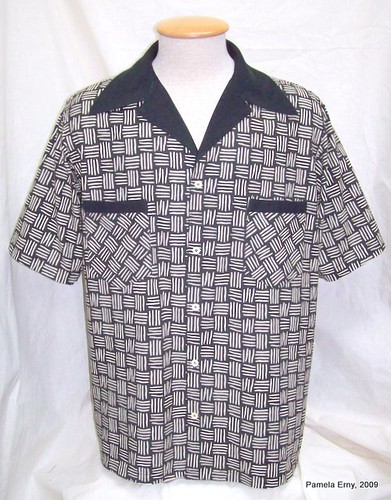
Roger's ShirtAlign Center


Here is Roger wearing his new shirt
. He decided he liked the flat collar better than when it was folded with a "roll." Tee-hee...he looks so happy doesn't he ? He really is a nice guy and does love the shirt...really. Modeling? Not so much!
Roger Wearing New Shirt

As I said in previous posts, I had high hopes for this pattern because of the way it is drafted. And the proof was in the sewing...it went together beautifully, each piece meeting its match perfectly. Further proof is the terrific fit...right out of the envelope. I really like the way the collar lays, the fit at the shoulders, and how the sleeves do not have that awful "wing-out".

I will definitely make this shirt again, and use it for clients. Even though Roger and I both like the funky retro vibe of this particular version of this shirt, for future versions I may change the collar (making it less pointed/ more narrow), to reflect current style trends.


SEWING NOTES: All seams are Flat Felled. Interfaced with PRO-SHEER ELEGANCE Interfacing from ~Fashion Sewing Supply~, Cotton fabrics from my stash.

Nancy K asked, "Did you do the flat fell seams in the body of the shirt the same way as you did the sleeves?"


Yes Nancy, I did....well almost the same way. When I was cutting out the shirt, I used 1" seam allowances on the side seams of the body and sleeves. Then I trimmed the back allowances to 1/2", and proceeded to fell them as I did the sleeve cap seams.

Labels:

What do you think? Please add a comment by clicking here--> 25 comments

6/22/2009

Vintage Shirt - Felled Seam Technique

Progress on the Vintage Mens Shirt continues!


Now the sleeves are sewn...and I thought you might be interested in seeing how these sleeves are drafted and set. It is done differently than most methods seen in modern printed patterns.


(Click Pic to enlarge, use browser "back button" to return)


Take a look at these pattern pieces. I've marked the stitching lines so that you can see that the sleeve seam allowance is twice as wide as the corresponding seam on the shirt back (and front, not shown). The seam allowance of the sleeve is 1", and the armscye seam allowance is 1/2".

(Click Pic to enlarge, use "back button" to return)


As you can see in the photo below, when the stitching line of the sleeve and armscye are matched (right sides together), the sleeve cap allowance extends beyond that of the shirt. The sleeve is set by stitching along the stitching line of the armscye. It's much easier to do if you first mark the 1/2" seam allowance as you can see by the blue lines. When you've set sleeves this way several times, you can just do it by sight. In fact, when I hand-draft shirts, I almost always draft the sleeve allowance at twice the width of the armscye allowance.

(Click Pic to enlarge, use browser "back button" to return)


Here is the sleeve set into the armscye, from the wrong side. Because the sleeve seam allowance is wider, it is "auto-magically" ready to be felled...with no trimming needed!

(Click Pic to enlarge, use "back button" to return)


To begin felling the seam, just fold and press the larger sleeve seam allowance over the smaller one, enclosing it. In the photo below, the allowance is pressed at the bottom of the photo, and still open near the top of the photo.

(Click Pic to enlarge, use browser "back button" to return)


When the sleeve allowance is completely pressed over the armscyce allowance, next press BOTH allowances towards the shirt. Look...an "instant" felled seam !

(Click Pic to enlarge, use browser "back button" to return)


All that remains to finish setting the sleeves is to topstitch a scant 1/2" away from the well of the seam from the RIGHT SIDE, through all layers....as shown below.

(Click Pic to enlarge, use "back button" to return)

And this is how the felled sleeve seam looks from the wrong side, after the topstitching is complete. Nice and smooth, neat and easy...with no raw edges.


Now I just have to choose buttons, sew the side seams and hem, and talk Roger into modeling the shirt...along with the 100 other things I have to do today. But the laundry can wait, can't it? :)

Labels: ,

What do you think? Please add a comment by clicking here--> 27 comments

6/19/2009

Vintage Shirt....So Far, So Good!

I am very pleased with the way the vintage mens shirt pattern I chose to make for part of DH Roger's Birthday present is coming along. Although his birthday was yesterday....age is just a number, right? :)

So..here is what I have completed so far: Pockets attached, Back Yoke and Shoulder seams sewn, Collar made and attached and the Facings attached.

Below are 2 "looks". The collar is laid flat in the first photo, and in the second photo, the collar is "rolled". Please bear in mind as you look at these photos, that this is a "work in progress" and hasn't yet had a final press. Yes, the collar is the same length on both sides...it appears longer on one side because the point of the collar is right against the black of the print fabric.

So which look do like the most? The flat collar, or the one with a roll?


SEWING NOTES : Pockets cut on Bias, Collar and Facings interfaced with PRO-SHEER ELEGANCE Fusible Interfacing from ~Fashion Sewing Supply~

Amy asked an interesting question:

"...I like both collars, but I think I favor the rolled. Is there a difference in the way they will be sewn or can he choose which way he wants to wear it?"

If he decides he likes the rolled look, all it will take is a few stitches. But not at the place you might expect. :) Unlike a "button down shirt" where small buttons hold the collar roll, this type of collar is secured at center back to "hold the roll".

Here's why and how: When a convertible collar like this one lays flat, it sits slightly below the seam that attaches it to the neckline of the shirt-back. To hold a roll in a convertible collar, a ShirtMaker (this time little ole me, lol) matches the bottom edge of the collar to the stitching line EXACTLY where the "well" of the seam that attaches the collar to the back neck is located (at center back). Then from the wrong side of the shirt, a few stitches are taken to hold it there. And that's all it takes to "hold the roll."


Karla also asked a thoughtful question:

"...if one were to conceal a tiny snap at the CB of the collar, with the other side of the snap at the seamline on the shirt, would that have the same effect as taking those few stitches? Another possibility - thread loop concealed in the collar seam and a tiny hook on the underside of the collar? The advantages (IMO) would be leaving the collar style up to the wearer and allowing the collar to be ironed while it was flattened - and I am all about making ironing easier."

Sure Karla...that can be done. I'd probably go with a very small snap, rather than a thread loop/hook/eye...I think it would be more stable. Of course, care would have to be taken when pressing the shirt and collar so that an imprint of the snap would not be transferred to the collar.
If Roger decides he likes the roll collar...I'll make sure to take it out of the dryer as soon as it's dry. Then I'll put the shirt on a hangar, button the top button, and shoot some steam into the rolled collar and immediately smooth it with my hands.

Labels: , ,

What do you think? Please add a comment by clicking here--> 17 comments

6/14/2009

Vintage Shirt...A Little Progress

Writing an article for a sewing publication among other things, has kept me so busy that I've only been able to make a little progress on Roger's Shirt.

I decided to make banded pockets, cut on the bias. Here's what one looks like on the shirt front, ready to be sewn (I'll adjust the position a bit before stitching).


Pocket on Shirt


This is the pocket from the wrong side. This pocket is cut on the bias, and because I know how rough Roger is on pockets, I needed to stabilize the stretch of the bias cut fabric or they'd be hopelessly stretched-out in no time!

I fused Pro-Sheer Elegance Interfacing (cut on the straight grain) to the wrong side of the pocket. This interfacing is so sheer and flexible that you can barely tell that it's there...yet it completely stabilizes the bias cut fabric.

Labels: ,

What do you think? Please add a comment by clicking here--> 3 comments

6/11/2009

The BETTER Pattern...and Why

This is the pattern I chose for Roger's shirt.

Winning Pattern

And here's why....

It is the most "elegant" draft among the group of patterns shown in yesterday's post (below). What do I mean by "elegant" ? It has to do with the shape of the pattern pieces.

The separate facing piece gives me the option of using a contrast fabric.

The yoke is curved enough to flow smoothly against the body, but not so much to "ripple" when it is joined to the back.

Now take a close look at the yoke piece (#5). Do you see the very subtle curve of the shoulder line? When joined to the straight front shoulder, it will raise the back of the shirt ever-so-slightly, allowing it to flow smoothly over the body's shoulder-blades.

Next, the sleeves...those beautifully drafted sleeves! A nice slope down in front, and just enough of a rounded shape along the back 2/3 of the cap. Why does this matter? For the short sleeve shirt I plan to make, this higher cap will mitigate a short sleeve's tendency to "wing out". With the coarse cotton fabric I've chosen to use for this shirt, this is very important because I cannot count on the drape of the fabric to help the sleeves fall in soft folds.

Finally, the collar. Notice its delicious curves! It will lay smoothly against the body's neck and collar-bone...and eliminate the tendency that some shirt collars have to "stack" (ride up on the neck).


Contrast the "elegant" draft above to this draft,
which is OK...but just OK.


Not Chosen

The main reason this shirt pattern was not chosen, is because it is "flat".
Flat yoke, flat sleeve cap, flat collar. In my opinion, the first shirt pattern is superior. While there is nothing really "wrong" with this pattern, the first one shown is just more "elegantly" drafted.
---------------------------------------------------------------------------------

I was asked, "
Pam, If we take a "flat" pattern and add the little refinements you mentioned - curved front yoke seam, curved shirt back, more sleeve cap height - will we improve an ordinary pattern, or just make a serious mess of it?"

While you can make changes to a pattern that is already drafted, you need to be careful.
"LESS IS MORE." Small changes, like very gently curving the back seam (where it joins the yoke) can be done successfully. Bear in mind that this particular change will lengthen that part of the seam, and you will need to ease it to the yoke, or take up a bit more in the back pleat so that it fits the yoke. Adding height to the sleeve cap is possible, again if done with restraint. If drastic changes are made to the shape of the sleeve cap, changes need to be made to the armscye...and that's where making refinements to patterns can quickly get out of hand. Lastly, curving in the shoulder seam of the back yoke can be done, again, with restraint....it needs to be a very shallow (no more than 3/16") "scoop"...otherwise the back will pull up oddly from the underarm point to the shoulder after the shirt is completely sewn.

Labels: ,

What do you think? Please add a comment by clicking here--> 21 comments

6/10/2009

Too Many Choices....

It's about time I sewed a shirt for my husband, Roger...especially since his birthday is coming up! So from my collection of well over 100 vintage menswear patterns, I've managed to narrow my choices to these....

A few Vintage Menswear PatternsAlign Center

While of course I already have a hand-drafted shirt pattern for him, working with vintage patterns is fun...and always spark ideas for my own original shirt designs. So now I need to decide. I'll flip through these patterns between packing interfacing orders, and come up with a final choice by the end of the day.

Here is the fabric I'll be using...a cotton print.

Black Print Cotton Shirt Fabric

I'll be working on the shirt this evening, and within a day or so I'll show you what pattern I chose, and why...along with some pics of the instruction sheets.

What do you think? Please add a comment by clicking here--> 6 comments

6/06/2009

MOP Buttons....a quick tip!


MOP Buttons? Of course I mean "Mother of Pearl".

And I just love the look of them on shirts and blouses!

Unfortunately, unless you buy the thin decorative ones (usually found in a bulk bag near the regular buttons), they can be really expensive.

And the thin decorative ones usually don't survive the washer and dryer.

Here's a quick way to strengthen these thin but beautiful decorative buttons :


Using a liquid glue made to attach embellishments to fabric, coat the back side of the button, being careful to avoid filling in the holes. The glue will look "milky" when wet.


Let the glue-coated buttons dry overnight, or until the glue is clear and hard. Now your lovely Mother-of-Pearl buttons are ready to use...and will be able to survive the washing machine !

Labels:

What do you think? Please add a comment by clicking here--> 16 comments

6/01/2009

A Shirt for Me ! ...with Release Tucks

Pam's Blue Stripe Shirt with front "Release Tucks"

OK, I promise...
This is my last version of the Brensan Sew Simple Shirt...for a while.

On this shirt I added cuffs to the sleeves, and instead of sewing the vertical darts, I made "Release Tucks". Making release tucks is very easy to do...even on a shirt or blouse that does not have marked darts. And it can be done after the shirt is completely finished!

Just try the shirt on...inside out. Now pinch out about a 1/2-3/4 inch "tuck" near the waist area on each shirt front, and pin it vertically. Turn the shirt right side out and try it on, making adjustments if necessary. Next, from the wrong side stitch each tuck, with a simple straight line of stitching that is about 2-4 inches long.

Here's a quick photo of the shirt from the wrong side, showing one tuck sewn and pressed towards the center front.


SEWING NOTES: Collar, Cuffs, and Front Facing
interfaced with
PRO-SHEER ELEGANCE Fusible Interfacing from ~Fashion Sewing Supply~, Italian Cotton Shirting Fabric from my stash, Buttons from ~Fashion Sewing Supply~.

Labels: , ,

What do you think? Please add a comment by clicking here--> 15 comments


Site Meter