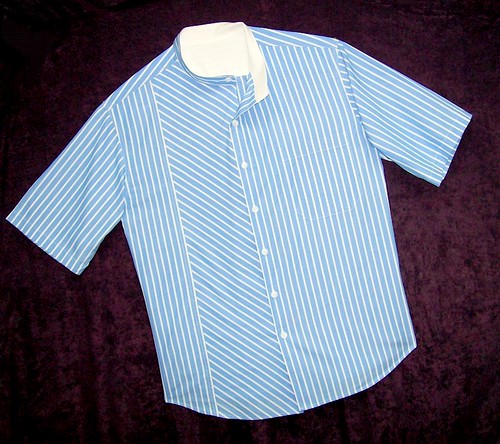
OTC-011 Off The Cuff ~Sewing Style~ <body><script type="text/javascript"> function setAttributeOnload(object, attribute, val) { if(window.addEventListener) { window.addEventListener('load', function(){ object[attribute] = val; }, false); } else { window.attachEvent('onload', function(){ object[attribute] = val; }); } } </script> <div id="navbar-iframe-container"></div> <script type="text/javascript" src="https://apis.google.com/js/platform.js"></script> <script type="text/javascript"> gapi.load("gapi.iframes:gapi.iframes.style.bubble", function() { if (gapi.iframes && gapi.iframes.getContext) { gapi.iframes.getContext().openChild({ url: 'https://www.blogger.com/navbar/10604511?origin\x3dhttp://off-the-cuff-style.blogspot.com', where: document.getElementById("navbar-iframe-container"), id: "navbar-iframe" }); } }); </script>

3/31/2013

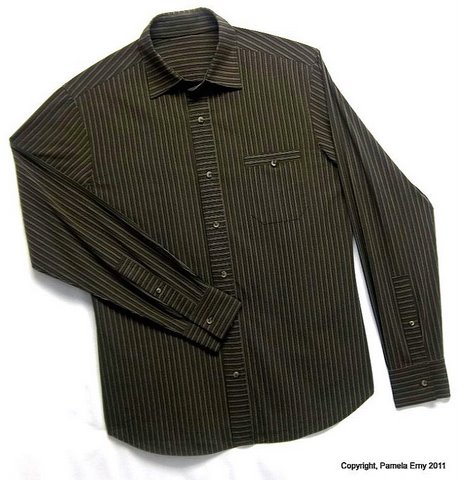
Hot Off The Machine...Shirt with Striped Trim Details


Yep, another shirt....and I've got a stack of  custom-designed shirt orders left to to fill.  I'll have to make this post a quick one so I can get back to machines. But before I start the next client shirt, DH Roger wants one made from this fabric..and that's fine with me.  He deserves it, this fabric was a joy to work with....and I want to try out some new design detail ideas!

SEWING and DESIGN NOTES-- This semi-fitted shirt features grosgrain ribbon details on the right front button band, pockets, and sleeve plackets.  The outer collar and its stand, and the outer cuffs are interfaced with ProWoven Shirt Crisp Fusible, a professional grade Interfacing found exclusively at Fashion Sewing Supply , as are the buttons (from the "Dark Assorted Shirt Buttons By-the-Scoop").  The trim is from my personal stash...source unknown.
The fabric is an amazingly lovely, finely woven soft chambray from Gorgeous Fabrics where I have purchased many wonderful shirting fabrics over the years.  Seriously, this "Blue Belle Chambray" Shirting fabric practically sews itself!  And the ProWoven Shirt-Crisp Interfacing from FSS complemented it perfectly for this menswear shirt style. If using this fabric for a garment for myself, I would have opted to use ProWoven Light-Crisp Interfacing or ProSheer Elegance MEDIUM Interfacing (all interfacing styles from  FSS).


Labels:

What do you think? Please add a comment by clicking here--> 11 comments

4/02/2012

WrapOver Yoke Shirt...take 2

 
This variation of my Wrap-Over Angled Yoke Shirt was cut and sewn in a more casual way than the first. It is less fitted and its slightly rumpled look is intentional.  This shirt features angled cuffs, and a band collar that folds and buttons down on the left side.

SEWING NOTES--  Interfaced with Pro-Woven Shirt Crisp in the new Slate Gray color, from www.FashionSewingSupply.com .  Fabric is an incredibly soft pinpoint cotton shirting that is almost denim-like in appearance but far more luxurious. Click Here to see the fabric details at GorgeousFabrics.com  FYI...the only reason I am giving my source for this amazing cotton fabric is because I have already purchased several yards in both colors :)  I have no affiliation with Gorgeous Fabrics..I just buy a lot of fabric there ;)

So...which of the Wrap-Over Angle Yoke shirts do you like more...this very casual one, or the more fitted version in checked fabric with piping I posted last week (see below)?


Labels: ,

What do you think? Please add a comment by clicking here--> 5 comments

3/23/2012

Finally Finshed! Shirt with Wrap-Over Angled Yoke


Designing and drafting the pattern for this shirt was so much fun, 
and stitching it was even better!

In the post below this one, you will see the pattern and the "muslin" (test garment) for this style.  I only needed to make some very small changes to arrive at the finished shirt, involving the shape of the sleeve cap. It just needed to be a little flatter and a bit longer.

 Balancing details is important when designing menswear that differs from the norm. I did not want this shirt to veer into "western" territory, and of course I did not want it to look like a "blouse".  So I added a traditionally shaped pocket, and carried the piped accents of the yoke to the sleeve and pocket. The addition of a white band collar cut straight at center front (rather than rounded) and traditional white shirt buttons "marching" down the the front placket finish the look.

SEWING NOTES--  Shirting fabric from www.GorgeousFabrics.com, Collar interfaced with Pro-Woven Shirt Crisp Fusible Interfacing from www.FashionSewingSupply.com  Buttons are from the Light Assortment of "Buttons-by-the-Scoop" from www.FashionSewingSupply.com.

Labels:

What do you think? Please add a comment by clicking here--> 13 comments

2/27/2012

Finally had time to sew...a new shirt for Roger!


It's been a long time since I have sewn for Roger...he more than deserved a new shirt. I showed him a shirt made of wool gauze that I had designed for a client, and he really liked the fabric. So yesterday while watching a few old episodes of Nip/Tuck...I found some more wool gauze in my stash and made this new shirt for him.

I am looking at the photograph as I type this, and it appears that the right collar and right sleeve cuff are ever-so-slightly longer than their left counterparts...doesn't it ?!!?!  Please take my word for it, they are the same size!  It must have been the camera angle......sigh.....but I snapped over 40 shots of this garment before my cheap camera got the color right and I am not going to do it all over again (I could use some photography lessons, obviously).  And you'll just have to trust that I would never allow Roger out in public wearing a shirt with a wonky collar and cuffs....I wouldn't even allow it in private :)

Alrighty then...now that those issues are out of the way....

This shirt is of my original design, and is made from washed 100% wool "double-gauze". It features a tall standing collar, a "Cigar Pocket", and a double button treatment near the top of the front placket. Because the fabric is quite lightweight, I used Pro-Sheer Elegance Fusible  to interface the front button plackets, and 2 layers of ProSheer Elegance Fusible to interface the collar, collar stand, and cuffs. The buttons are imported Italian Designer Shirt Buttons, in the "Choco-Toffee" color.   Buttons and Interfacing both from www.FashionSewingSupply.com .

Labels: ,

What do you think? Please add a comment by clicking here--> 22 comments

9/29/2011

Contour Shirt with a "Set-Back" Collar...Design and Drafting Notes


This shirt of my original design, is the latest made for a client who prefers a slim-cut shirt, or what is known to Tailors and Shirt-makers as a "Contour" shirt.  This contour shirt is made from cotton poplin sateen shirting fabric that has a slight ombre effect. It features a banded angle-edge pocket, a cross-cut front button placket, and sleeves with wide cross-cut plackets and an inverted box pleat at the cuffs. Additionally, the cross-cut collar has been designed so that it "sets back" on the stand about 3/4" more than usual.

So...what is a "slim-cut" (contour) shirt?   What it isn't is a precise set of steps and measurements that are set in stone.  The specs of "slim-cut" (contour) will vary depending on the designer and who is doing the drafting.  I start with with my regular shirt block with straight side seams, then I take out some of the fullness by curving the side seams.  I raise the armscye point, then finish by correcting and smoothing the new curve.  When the armscye point is raised, it makes the arm "hole" smaller, so a new sleeve with a smaller-circumference (slimmer cut!) needs to be drafted.  I draft the sleeve with almost no ease. Yes you read that right...I draft the sleeve with no more than 1/2" of ease. It just isn't necessary. Too much ease makes for a messy flat-felled sewn finish.  One other thing...I draft my Contour Shirt Back without a CB pleat.

I have not yet mentioned making slimmer/contoured changes to the shirt Front and Back at the shoulders (the yoke). That is because I already draft my regular shirt block with a natural shoulder slope and length.  My standard shirt block is not loose on the upper chest/shoulder and the sleeve does not drop of the shoulder, so it needs no adjustments when I draft a contour shirt.

You may be wondering why I have not given you precise measurements, like "raise the armscye by 1/2", or "curve the side seams in by 3/4".  I am not being secretive :)  It is because I have no idea what the specs of your existing shirt pattern may be.  You either need to copy a slim-cut shirt that you like, or make a muslin of the shirt pattern that you regularly use, and pinch out the fullness and experiment with raising the armscye point a little bit at a time. 

A good menswear drafting book helps...I highly recommend this one, it  has been my go-to reference since the early 80's-- 
 
Fundamentals of  Men's Fashion Design A Guide To Casual Clothes Edmund B Roberts and Gary Onishenko.  Fairchild Publications.  
 The only book reference number on my copy is: Standard Book Number-- 87005-5143
So if you are interested in this book, a search at your favorite book-seller by Title and Author may be better than using the number.


For more on sleeve cap ease, don't miss this fantastic post by renown clothing industry expert, Kathleen Fasanella.

SEWING NOTES:  Collar and Cuffs interfaced with PRO-WOVEN Shirt-CRISP Interfacing from  Fashion Sewing Supply  Buttons are the 40-count Designer Shirt Button Set in color "Choco-Toffee" from Fashion Sewing Supply.

Labels: , , ,

What do you think? Please add a comment by clicking here--> 16 comments

3/14/2011

Their Favorite Shirt...by the dozen!

This shirt style is one of my original designs, and continues to be the most requested style by my clients.

I have clients who order this "Island Shirt" by the dozen...but this weekend I only made 3, including this one from distressed white linen. It has a nice trim fit, and looks good made from many different fabrics.  I always enjoy making this style...it is my very favorite :)

Labels:

What do you think? Please add a comment by clicking here--> 7 comments

3/13/2011

A Light and Breezy Shirt, on it's way to Belize...


Made from very lightweight Oxford Cloth, this shirt was designed for one of my clients. Since he lives in the tropics and does most of his business poolside, he wanted a shirt that was loose and breezy with "just a little hint of businessman".  That is why I chose the lightweight oxford stripe, but used it in a very casual way. 

I just sent him this photo, and I am happy to say that he likes it !  And he wants a few more in other colors :)

On another note, my husband  Roger saw this shirt and wants a similar one to wear to his daughter's graduation from Florida Gulf Coast University. Good thing he doesn't need it until the end of April...because I have a list of things to sew for myself over the next few weeks :)

Now back to the machines...more shirts for clients to sew...

Labels:

What do you think? Please add a comment by clicking here--> 10 comments

3/12/2011

A Shirt in Pieces...

There actually has been some sewing going on around here :)   
My clients want new custom shirts, ASAP!


Here is what is on the machine right now...please pardon my hasty pinning of the pieces on my photo-wall. Later today it will be a short sleeve shirt with a contrast under-placket, piped pocket, and contrast inner band collar. I designed and drafted the pattern by hand. 

Buttons were quickly placed on the left front of this green striped oxford cloth shirt. Of course they will actually be sewn onto the right contrast under-placket...but I wanted to preview my selection where they will be seen when the shirt is "on the body".  I am quite pleased with the color and style of the buttons I decided to use...one of our new Italian Designer Shirt Button styles, color-Latte, from Fashion Sewing Supply.

So stay tuned for a photo of the finished shirt, I should have it posted here first thing tomorrow :)

Labels: ,

What do you think? Please add a comment by clicking here--> 5 comments

1/08/2011

TUTORIAL- Design and Sew a Shirt with Bias Pleats !

This Distressed denim shirt features deep bias pleats 
on the sleeves and pocket. Variations of this design have become favorites of many of my clients over the past year.  The original blog post about this design detail was among my most popular. So with a few shirt-sew-along's going on at other blogs these days...I thought it was a good time 
to offer it again, with a few revisions.
 
---------------------
SEWING NOTES: This shirt is interfaced with PRO-WEFT Fusible,
a professional quality interfacing found exclusively at
~Fashion Sewing Supply~

____________________________
Adding a pleat to any pattern piece is very easy 
when you use this method:

1.  Using a large piece of any pattern paper you like, make an even fold across it's width (this will be the upper side of the pleat).  Then move the entire folded edge an even distance away from the first, and fold again (this will be the under-side of the pleat). I moved the first fold over by 1.25", to form a 1.25" pleat in the paper. Play with a small  piece of scrap paper, if my written explanation is less than clear ;)  It's easy, all we are doing is folding a pleat in a piece of pattern paper.

2. Next, just place your pattern piece on top of the pleated paper, with the pleat where you want it to be on your garment. In this case, I chose the sleeve piece pattern and placed it so that the pleat (the pre-folded paper) would be on the bias, then I  cut out my "new" sleeve pattern.
3. This is what my sleeve looked like cut from the fabric. I took the photo after the upper pleat fold was pressed, so you could more easily see how the pleat is formed
.
4. This photo (#4) shows the completed pleat, with the folds edge-stitched. In this photo, as viewed from the right side, only the upper fold's edge-stitching is visible. The under-fold (back side) of the pleat is also edge-stitched.  I like to edge-stitch pleats on shirts that I design not only because it is a nice decorative detail, but also because it makes pressing the shirt much easier after it has been laundered.
-------------------------
How to Control a Pleat...Invisibly !

When there is a bias or horizontal pleat on a garment, the weight of the fabric below the pleat will tend to pull it down, and the pleat will sag and gape open. When the pleats are small and/or the fabric is lightweight, this is often not a problem. However, with pleat depths of one inch or more on medium or heavy fabric, this sagging can be quite an ugly problem. But as you can see in the photo of the finished shirt (above), the pleat is not gaping or sagging. That is because the pleats have been "controlled", by span-stitching done on the under-fold  (back side), as shown in this next photo--
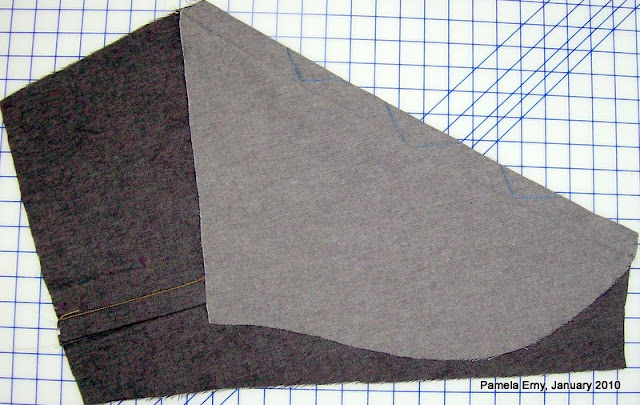
To control this bias pleat, I made a series of  3 wide "V" shaped stitch spans on the under-pleat fold (that I highlighted in blue pencil so that you can more easily see them).  Each extend from the edge of the under-pleat fold to within 1/4" of the upper pleat fold. While it may be a little distracting to understand from the photo alone, if you make up a quick sample of any pleat from scrap fabric, and do this "V" shaped Span Stitching  as shown, it will become clear how it works to control the pleat.
Please note that these pleats are NOT functional pleats..they are decorative only. So restricting how much they are allowed to open will make no functional difference at all. As you can see from the photo of the completed shirt, the pleats still appear to be quite deep. They are just "not allowed" to gape open because of this inner, invisible/hidden stitching.

So the next time you make a shirt, why not try something a little different by adding some of your own interesting design details...like pleats in unexpected places !     

And...if you like these little tutorials of mine, please vote for me by clicking the black/red "Seamingly" Vote box to the left on the side-bar...thanks :)
Labels: , ,

What do you think? Please add a comment by clicking here--> 4 comments

3/08/2010

A Classic Shirt...with Color Contrast Details

This menswear shirt is of my original design, and was so much fun to sew because of its mix of design elements.  This shirt's main design feature are the contrasting front button plackets. As you can see, the left placket is cut on the bias and the right placket is made from solid white fabric.  To complete the 'contrast' design theme of this shirt, the inner yoke, inner cuffs,  and collar stand were also cut from the same solid white fabric used on the right placket. Other design features include Curved Edge Cuffs, Bias Sleeve Plackets,  and a Rounded Pocket.


Before I  get to the sewing notes, let me apologize for the rather poor quality of the photograph. I only had  few minutes to pin the shirt to my photo-wall, snap the pic, then press the shirt again before packing it and getting to the Post Office before it closed :)

SEWING NOTES: Fabric is Swiss Cotton from my personal shirt-making stash,  PRO-WOVEN FUSIBLE INTERFACING and Buttons 
from ~Fashion Sewing Supply~

Oh...just one more thing. If you enjoy my blog, would you please vote for it ?
Just look to the left, and you will see a small black and red box with a place to "click to vote". Thanks in advance for your vote...it will help rank my blog a little higher at Seamingly.com...Thanks again :)


Labels:

What do you think? Please add a comment by clicking here--> 17 comments

3/03/2010

Hot Off the Machine...Newest Shirt Design

This "Striation Stripe" Shirt is my latest original hand-drafted design,  made for one of my favorite clients.  This shirt's design features include a Band Collar, French Front plackets, buttoned "Cigar Pocket", cross-stripe Sleeve Plackets, and Wood buttons.

SEWING NOTES-- Fabric provided by the client. Pro-Woven Fusible Interfacing from ~FASHION SEWING SUPPLY~


Labels:

What do you think? Please add a comment by clicking here--> 18 comments

10/04/2009

The Denim Shirt....Complete !


Mens Denim Shirt_blog
Finally....my client's shirt is complete 
and winging its way to him by Priority Mail !

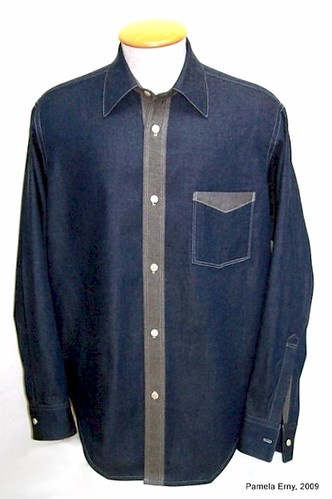
I'd like to mention a few things about some of the details of this shirt.  In previous posts, I was undecided about how to best use the contrast side of the denim. As you can see, I ended up using the contrast for both of the front button plackets, the top of the pocket and  both sides of the collar stand (band). I decided to add a contrast detail to the sleeve, but I wanted it to be very subtle. So I made a 2-piece sleeve placket and used the contrast side of the fabric for the under-lap. You can see it peeking out of the unbuttoned cuff in this photo I hastily snapped just before the shirt was packed and sent on its way.  Oh...one more thing...if you notice that one sleeve appears longer than the other, it is because it was pulled forward for the photo.
Sewing Notes: Shirt is interfaced with Pro-Weft Fusible Interfacing from ~Fashion Sewing Supply~. Fabric is from my shirt-making stash. Tan "faux-marble" buttons from the "light button" assortment at ~Fashion Sewing Supply~

Labels: ,

What do you think? Please add a comment by clicking here--> 17 comments

9/24/2009

Almost a Denim Shirt

Hastily pinned to the form, and still "Under Construction"....but so far I'm satisfied with how this denim shirt is turning out.

Almost ...A Denim Shirt
 It is being made for a favorite client of mine from a  fine cotton denim fabric that has a remarkably smooth reverse side. The reverse side of the fabric is so nice that it was able to utilize it for the front button plackets, collar stand and pocket.  I haven't cut the sleeve plackets  or cuffs yet, and I haven't yet decided to use the face or reverse side of the fabric for them.   

This is one of those shirts that can look "over-designed' or very contrived if too many contrasting elements are used.  So I'll play with scraps and see what happens. I hope to have this shirt finished within a few days.

Labels: ,

What do you think? Please add a comment by clicking here--> 8 comments

5/04/2009

A Shirt...of Soft "Distressed" Linen

I have had this lovely striped linen in my "shirt fabric" stash for quite a while...it's a client favorite. This linen is of beautiful quality, quite thick, but very stiff right off the roll. So in order to make this soft drapey men's shirt...I first had to beat the living daylights out of the fabric!

MensLinenShirt-blog

The linen went into a washing machine full of hot water and about 3 cups of plain vinegar. After running it through 3 complete wash cycles (resetting the machine before the water emptied), I rinsed it thoroughly in cold water. Then the fabric was tossed into the dryer set on high heat. The result was gloriously soft linen, with nicely raised slubs...waiting to be cut and sewn into this loose slouchy shirt.

The style is of my own design and features a collar-on-stand, a French Fold front placket, an angled edge pocket, and a slightly curved hemline. Its slightly rumpled look is entirely intentional.


SEWING NOTES: Distressed Linen Fabric from my stash, Hand-Drafted original design, Collar and stand Interfaced with PRO-WEFT Fusible Interfacing from
~Fashion Sewing Supply~

Labels: , ,

What do you think? Please add a comment by clicking here--> 2 comments

5/03/2009

Batik Bermuda Shirt

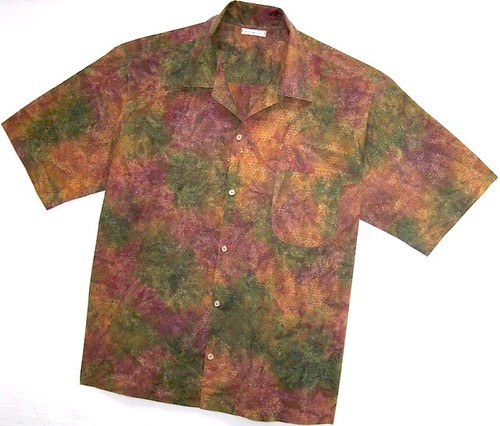
I have a client who spends his time sailing from one Caribbean Island to another. What a nice life, hmm? This very nice "gentleman sailor" contacts me from time to time for a new shirt or two. His recent request was for a casual shirt in "some sort of dark tone print."

How lucky for both of us that I had the perfect cotton batik among my shirt fabrics!


Mens Batik Shirt

This shirt is of my own design, that I call "The Bermuda Shirt". It is a classic "camp shirt" silhouette, with some very subtle shaping of the side seams and a collar that curves, rather than laying flat against the shoulder. The side shaping avoids an overly baggy look, while still providing a loose comfortable fit.
The curved collar elevates this shirt from Off-The-Rack to Just Right...for a night at the nearest island's hottest Tiki Bar :)

"Pool Boy? I'd like a margarita, please....and don't forget the little umbrella ! "


SEWING NOTES: Collar and Facings interfaced with
PRO-WEFT FUSIBLE INTERFACING, from ~Fashion Sewing Supply~

Labels:

What do you think? Please add a comment by clicking here--> 8 comments

8/24/2008

"Folded Band Collar" Shirt with Bias Detail

This may be the last short sleeve shirt that leaves my studio this summer!

"Folded Band Collar" Shirt with Bias Details

An original design by Pamela Erny,
made from lusciously smooth Swiss Cotton.

The design features of this shirt include a "Folded Band Collar",
Front Bias Inset, and an Angle-Edge Pocket.


Sewing Notes: Imported Fabric, Interfaced with Pro-Tricot from Fashion Sewing Supply, Buttons from Fashion Sewing Supply.

Labels: , ,

What do you think? Please add a comment by clicking here--> 9 comments

7/27/2008

Men's Shirt of Cool, Comfortable, Distressed Linen

An original design by Pamela Erny, This slouchy Distressed Linen men's shirt is meant to be "Casually Couture"...its slightly rumpled look is entirely intentional.

Slouchy Linen Men's Shirt by Pamela Erny

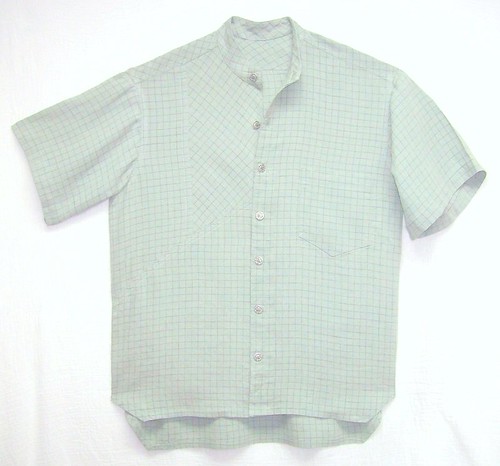
Design features include a Band Collar, Decorative Seaming with bias details, Comfortable Sleeves that drape in soft folds, a Spade Hem, and Metal Buttons.

Sewing notes: Linen Fabric from Gorgeous Fabrics, Collar interfaced with Pro-Weft Fusible from Fashion Sewing Supply, Buttons from Fashion Sewing Supply.

Labels: , ,

What do you think? Please add a comment by clicking here--> 8 comments

4/20/2008

Flying in The Face of Convention!


Who says Men's shirts have to be all buttoned-up with a collar on a stand? Not me!


I designed this casual shirt in 2003...and still continue to make it for clients today.....especially for my clients in very warm climates.


Made from a very lightweight hemp/linen blend, this shirt features modified double breasted styling, sleeves with a single pleat at the cap, and wood buttons.

Labels:

What do you think? Please add a comment by clicking here--> 1 comments

2/12/2008

Two Shirts...One Client

I heard from a favorite client of mine recently. He wanted 2 shirts made, and luckily I still had the fabric he wanted in stock. This very stylish man always has design details in mind, and was quite specific about what he wanted....but as always, left the "fine" details up to me.

My client wanted this blue shirt styled to be worn "tucked in". When drafting the pattern, I lengthened the shirt-tails so that when he moved his arms, the shirt would stay tucked. The drape of this royal blue Swiss cotton is extraordinary, so instead of drafting the sleeves "straight", I bowed (curved) them out slightly to produce a subtle soft drape when worn. Other design details include bias front button stand and bias sleeve plackets.


This Band Collar shirt is made from fabric that is more crisp than the blue shirt above. The characteristics of the fabric dictated my design choices. This shirt is cut with what I call "straight line" details. The sleeves are straight cut, rather than curved like the shirt above, and the sleeve cuffs are angled, as is the "spade" hem.

I am pleased with the way both shirts turned out.....and so is my client, who payed me promptly and added a tip! :)

Sewing Notes: ProWoven Fusible Interfacing used on the blue shirt, ProWeft Fusible Interfacing used on the cream shirt.

Labels: , ,

What do you think? Please add a comment by clicking here--> 11 comments

9/19/2007

Prince Seam Shirt with Bias Details

(Click photo to enlarge and see detail, click browser "back-button" to return to blog)

This "Prince Seam" shirt is made from an unusual corded rayon/cotton blend shirting. The fabric has a slight sheen and was a delight to cut and sew. An Original design, the side panel and sleeve plackets were cut on the bias to highlight the characteristics of the fabric.

Labels: , ,

What do you think? Please add a comment by clicking here--> 9 comments


Site Meter