OTC-011 Off The Cuff ~Sewing Style~ <body><script type="text/javascript"> function setAttributeOnload(object, attribute, val) { if(window.addEventListener) { window.addEventListener('load', function(){ object[attribute] = val; }, false); } else { window.attachEvent('onload', function(){ object[attribute] = val; }); } } </script> <div id="navbar-iframe-container"></div> <script type="text/javascript" src="https://apis.google.com/js/platform.js"></script> <script type="text/javascript"> gapi.load("gapi.iframes:gapi.iframes.style.bubble", function() { if (gapi.iframes && gapi.iframes.getContext) { gapi.iframes.getContext().openChild({ url: 'https://www.blogger.com/navbar/10604511?origin\x3dhttp://off-the-cuff-style.blogspot.com', where: document.getElementById("navbar-iframe-container"), id: "navbar-iframe" }); } }); </script>

7/18/2014

How to Sew a "Better" Elasticated Casing !


The blouse shown above in soft cotton batik is one that I made a few years ago from this now "vintage"  HotPatterns.com design that I tweaked a little bit to have a closer fit.  This exact HP style (shown below) has been re-designed and is now offered as the  HP1169 Classix Nouveau Refined Peasant Blouse...and can be seen here on the HotPatterns website.
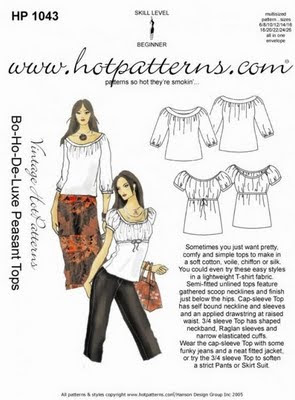
http://hotpatterns.com

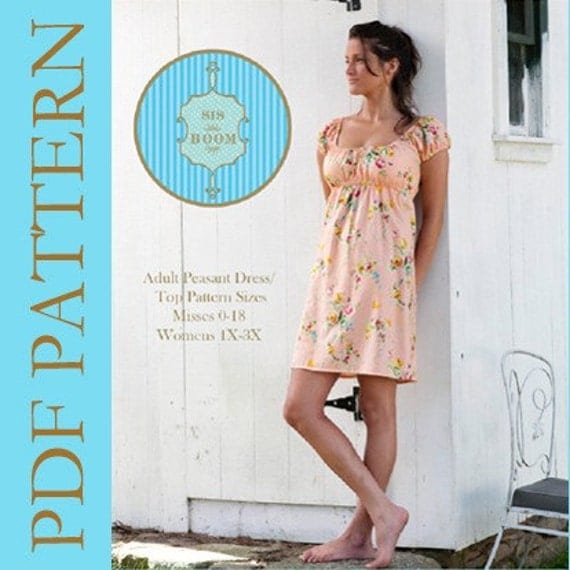
https://www.etsy.com/listing/29558029/womens-peasant-dress-pattern-sis-boom?ref=shop_home_active_9
Another great peasant-style top is this one from Carla Crim, "The Scientific Seamstress" 
 The basic differences between the 2 patterns is that the HotPatterns style has a lovely "couture-like" flowing silhouette, with sophisticated details.  The Meghan Peasant Pattern from "The Scientific Seamstress"   has a silhouette that is both relaxed yet fitted, with pretty sleeve style options, neckline options, and top-tunic-dress length options.  I've made them both, and I like the Hotpatterns style for soft flowing fabrics, and I like the Meghan for fabrics like lightweight cotton and soft washed linen.


OK..we know Elastic is on sale, we've got patterns to choose from...Now about those Elasticated Casings...

Making a casing for elastic is certainly one of our easier sewing tasks. Turn, stitch, insert elastic...done!  Sewn this conventional way, we end up with a perfectly acceptable casing that looks something like the photo below, after the elastic is inserted.  Fine...yet a little "bubbly and wobbly"...but something we have come to accept with elasticated casings.   
   (OK..a word here about "elasticated".  I am old enough to remember when *everyone* just said "elastic casing", then one day I started to hear elasticated this/elasticated that...so...today I choose to use the word, elasticated every so often...with a few plain "elastic casings" thrown in ;)  But yes, this is indeed just our old friend "the elastic casing" fancied up a bit)


By taking one additional construction step, you can achieve a "designer" look to an elastic casing garment. A very simple step that will result in a flat, even-edge casing every time, like the one in the finished garment shown....here is a close-up photo--  


So what's that extra construction step?  Edge-stitching!
After the casing is folded to the wrong side of the garment and stitched along the BOTTOM edge (leaving an opening to later insert the elastic, of course)....All that we need to do next to lend that "designer touch" is to edge-stitch the TOP fold of the casing...all the way around, as shown below--


By taking this one easy extra step, our elasticated casings lose the bubbles, 
and gain some designer panache!


Quick note from Pam....

Thank-you very much for shopping at my store and thank-you for continuing to follow my blog.  I have not blogged for a long time because of illness.  I am dealing with it in every positive way I possibly can, and I look forward to being able to teach you more "tricks of the shirt-making trade" as soon as possible.  Thanks again for continuing to follow me here and on Facebook. I appreciate it more than you know...and and I will be back...I promise  :)

Labels: , ,

What do you think? Please add a comment by clicking here--> 32 comments

10/22/2011

Sewing for ME! ...and a simple Pattern "Up-Sizing" Method.

I already told you about the dreadful state of my wardrobe...it feels so good to be doing something about it!   Last week I made a few pairs of new pants, and this morning I finished this draped cowl Tunic...shown here with a "vintage" necklace that totally hides one of my neck scars :) 

The pattern I used for this top is my absolute favorite cowl pattern, Ottobre Design (Woman) issue 02/09, #5. However,  I have "up-sized" since I last made one of these, so I needed to "up-size" the pattern.  I didn't need to change much in the back, but I needed to add more room in the front. So, since this is a simple pattern for knit fabrics with a cut-on facing...my options for accomplishing this could be much less 'textbook' than if I was making changes to a pattern designed for woven fabrics.

So, here is what I did..to the Front of the tunic only--


I just moved the Center Front about 1" away from the fold of the fabric, and cut straight across at the top edge, and at the hem edge.  That's it!  

Now I had a front garment piece that gave me the 2" of extra room I needed for the "extra" that exists on my front at the moment ;)   Adding that extra width also made the cowl a little deeper...a side-effect I happen to like. 

Doing a "quickie" pattern alteration  like this worked for me because this is a simple knit silhouette.  Standard pattern alteration methods are best when you need to Up-Size a more complicated style, especially when designed for woven fabrics.

SEWING NOTES-- Fabrics shown were purchased at www.GorgeousFabrics.com  Ottobre Patterns can be found at www.OttobreDesign.com

Labels: , ,

What do you think? Please add a comment by clicking here--> 15 comments

1/25/2011

TUTORIAL--- Spot-Fusing vs. Block-Fusing Interfacing, a Modern Tailor's Method

Block Fusing is a method that many modern tailors and home-sewists use to apply interfacing to fashion fabric yardage before the pattern pieces are cut out. Have you ever struggled keeping the interfacing layer from slipping off-grain as you attempt to fuse it to your fabric yardage?  Next time, try this fast, easy, and accurate method that I learned from a Master Tailor, called "SPOT-FUSING"...And it can be done right on your cutting table!
^ STEP 1 ^
First, we need to prepare the surface of the table. The photo above shows my cutting table covered with 2 layers of HEAVY weight muslin (from Gorgeous Fabrics), and one layer of very thick wool (a heavy wool blanket will work as well..I just happen to have felted wool yardage that I use for this technique).  It is VERY important that these layers be smooth and free of wrinkles, so thoroughly smooth them out before proceeding.


 ^ STEP 2 ^
Next, lay out your fashion fabric on top of your "padded" table, WRONG side UP...making SURE it is smooth. What you see in the photo above is 3 yards of 60" wide silk/wool suiting fabric. The cut edge of the fabric is to the left, with the rest of the yardage hanging off the right side of my table. There is no need for weights to hold the fabric in place...the under-layer of wool holds it nicely.  But if you need to, weights can be placed along the top edge (in the above photo, the (top) cut edge is to the left).


^ STEP 3 ^
Now lay your Interfacing FUSIBLE Side DOWN on the (wrong side) of the fashion fabric, making sure it is smooth and on grain. I am using Charcoal-Black Pro-Weft Supreme Light Interfacing, one of my custom-milled professional grade interfacings available exclusively at Fashion Sewing Supply.


^ STEP 4 ^
This is where the Spot-Fusing happens :)   USING a thin PRESS CLOTH, and your steam iron set to a low-wool setting, start moving your iron over the interfacing with an UP and DOWN motion. DO NOT slide the iron, just move it all over the interfacing, pressing with steam for a few seconds, picking up the iron, moving it over an inch or so, and steam pressing again for a few seconds. I start pressing in the middle along one edge, and spot-press to one side until I reach the edge of the yardage, then begin again in the middle and work towards the other edge. I keep repeating this, working my way down and along the yardage, until all the yardage on my table has had the interfacing "tacked" (SPOT FUSED) down. Then I carefully pull the next section of fabric + unfused interfacing so that it covers the table, making sure that all is smooth and on-grain...then repeat the Spot-Fusing process again until all the fashion fabric yardage has been Spot-Fused.  I can Spot Fuse a few yards of 60" fabric in about 5-10 minutes.
Please note that the object here is to just tack the interfacing to the fabric...NOT to fuse it completely..that comes later.


^ STEP 5 ^
After removing the Muslin+Wool "padding" from your cutting surface, carefully lay your Spot-Fused fabric yardage right side up, lay out your pattern pieces and cut them out.


  ^ STEP 6 ^
 NOW is the time when we take our garment pieces to our "official" pressing surface (your Ironing Board or ClamShell Press), and "finish the fuse"...following the complete fusing instructions that come with your interfacing.

And this is why I Spot-Fuse before I Block-Fuse: Why bother spending time and effort completely fusing ALL the yardage, including the scraps that will be thrown in the trash after the pattern pieces are cut ?  By Spot-Fusing, I can ASSURE a perfect fuse and save time by fully pressing/fusing just the actual garment pieces...AFTER the interfacing has first been "tacked down" by the Spot-Fusing :)

Labels: , ,

What do you think? Please add a comment by clicking here--> 21 comments

10/30/2010

Tutorial-- Quick, Easy, Draped Cowl Variations !

With even more draped cowl patterns like this one from McCalls appearing in recent pattern catalogs, this revisit of a popular tutorial I wrote a few years ago is even more relevant today.

So, now I'll show you how quick and easy it is to make countless variations like these shown below from a basic draped cowl neckline...that can be done in mere minutes!


First, start with a drape-front cowl (photo #1 below) already in your wardrobe, or make one with the many patterns that exist for this style.

As shown In photo #2, turn the garment inside out and flip the front facing up to expose the wrong side of front of the top.


Next, for the most basic variation, pinch some fabric near center front, twist it a bit, and hold the “twisted pinched” fabric with a rubber band, as shown in photo #3.  I am showing this with a regular rubber band so it shows up in the photo, however a small clear "ponytail" band works best. Later, if you want to make this design change permanent, the 'twist' can be stitched. Or just remove the band, and you have your original draped cowl back again :)


Now turn down the facing to cover the banded fabric, as shown in photo #4.


As shown in photo #5 below,  when the garment is turned right-side-out, the twisted detail becomes a new interesting design feature of the top.


Where you pinch and band the fabric is totally up to you: higher, lower, to the left or right of center, using 2 or 3 twists, etc. There are infinite possibilities for design variations like these.... Have fun!

Labels: ,

What do you think? Please add a comment by clicking here--> 7 comments

7/13/2010

Perfect Serged Rolled Edges...A Quick Tip !

This is a technique for facilitating a rolled edge using a serger. 

First, set your serger up to do a rolled hem, according to your machine's owner's manual.
Next, as you feed the edge to be rolled...notice how I use my finger to hold the fabric edge taut while also bending the edge slightly so that it is already "persuaded"  to roll.  You will also notice that I keep my serger knife in the upward position when doing a rolled hem. I find that I get a better rolled edge if I start with the "cleanest" straight edge as it feeds into the machine.  In this demonstration I used all four threads...my ultra-cheap serger just does a better rolled hem using 4 threads.

Here is the strip of medium weight cotton with it's rolled hem...look, no "Pokies" (loose whisker threads) !

This strip of fabric being roll-hemmed will be used to make a decorative "Euro-Ruffle" embellishment.
Coming soon....I'll show you my method for making  "Euro" center-stitched and gathered ruffles like the one shown below, without having to pull threads to gather!

Labels:

What do you think? Please add a comment by clicking here--> 12 comments

7/05/2010

Tutorial-- Perfect "Turn-and-Stitch" Curved Edges and Hems


Whether sewing a top or dress for children like the one pictured above, or garments for adults, often  the "turned-and-stitched" concave curved edges, of necklines, armscyes, and shirt hems pucker and twist...no matter how careful we are.

While the pattern for the blouse pictured above had good directions for turning a nice smooth armscye,  most patterns just tell you to turn the fabric edge twice to the wrong side and top-stitch, and skip a crucial step.

Some of you who are experienced sewists no doubt are already familiar with the technique shown below. For those who are not, I'll show you how I sew no-pucker "turn-and-stitch" edges that never fail to look professional. While demonstrated with armscye edges, the same technique can be used on a turn-and-stitched neckline edge, and shirt-tail hems.

Here is an example of a top with turn-and-stitch armscyes.  The fabric I chose for this example is polyester lining, very slippery, with no stretch at all. I chose a difficult fabric to show how this simple technique will work without any "help" from fabric with natural fiber and/or any degree of stretch.


If your pattern calls for 5/8" seam allowances, trim the seam allowance of the edge to be turned to 1/4" or 3/8".
Then turn the edge 1/4" (or 3/8" if that is the seam allowance you are using) to the wrong side of the garment and press.


Now here is the simple step that is missed in many pattern instructions.  However, it is crucial to a professionally turned edge.  What needs to be done next is very easy...just make tiny clips into
the turned edge every 1/2" or so, as shown below.


Then turn the edge again 1/4" (or 3/8" if that is the seam allowance you are using) to the wrong side, encasing the raw clipped edge. Press well.  It should now look like this--

The final step is to secure the folded edge by top-stitching from the right side.  You will then press the edge. Here is my quick sample shown unpressed so you can see how making those tiny clips into the first fold results in a perfectly pucker-free folded edge :)

Labels: ,

What do you think? Please add a comment by clicking here--> 28 comments

5/19/2010

How to Rescue Crumbling BeesWax !

Oh my gosh, isn't it annoying when your once smooth cake of beeswax gets all crumbly, scarred, and difficult to use?  Well here was my poor pitiful cake of beeswax before I fixed it today---

Luckily it is fast and easy to get a cake of beeswax nice and smooth again.  First, lay a piece of baker's parchment paper or aluminum foil on top of your ironing board. Next, place your crumbling beeswax on top of the parchment paper (or foil).  Now with a hot steam iron...hold the iron above that poor pitiful crumbling wax, and give it a few good shots of steam...being careful not to actually touch the wax with your iron.

Here is my nice smooth beeswax cake after steaming. Yes, some of the wax will melt and you will lose a bit...but it sure beats running your thread through a scarred cake of wax and dealing with the crumbs !

(Oops! Did you get some wax on the bottom of your iron? Don't worry, just heat the iron and rub the sole-plate over some scrap 100% cotton fabric. The wax will melt into the fabric :)

If you think this little tip is useful, please take a moment and vote for me by clicking the black and red box (located  to the left)...thanks !

Labels:

What do you think? Please add a comment by clicking here--> 16 comments

1/03/2010

How to Rescue Wrinkled Interfacing...

(Because I STILL have not been able to any sewing, I've decided to share this article with again. It was first written in 2010)

 I think we all have good intentions, and try to keep our interfacing perfectly folded in a drawer or neatly rolled on tubes. But how many times have you reached for a piece of interfacing only to find a wrinkled mess like this...
Like me, probably more than once. 


Luckily there is an easy fix, and it starts at your grocery store. 
Or perhaps you already have it in your pantry... 
Baker's Parchment Paper!


First, roll out a length of  the Parchment Paper onto your ironing board or other pressing surface...and secure it with a few glass-head pins (or other pins that will not melt).


Next, Place your wrinkled interfacing GLUE SIDE DOWN onto the Parchment Paper. Then with your DRY iron set on on a LOW setting, slowly slide the warm iron over the wrinkles.
You will see the wrinkles disappear as you slowly move the iron.
The interfacing does not stick to the slippery Parchment Paper at all. Then move the next section of wrinkled interfacing onto the paper and iron it. Since the iron is set below the  temperature needed to melt the fusible resin, the interfacing is not adversely affected at all. 
 

When you are finished, your once wrinkled interfacing is flat and smooth again, and ready to fuse to your fabric!

You may download a *Free* PDF of this article...by going to the TUTORIALS page at www.FashionSewingSupply.com . 
(It is the 4th tutorial on the page)


Labels: ,

What do you think? Please add a comment by clicking here--> 21 comments

11/30/2009

Gathered Sleeve or Puffed Sleeve? ...it's All About the Seam Allowances


First...Since many wondered what I'd be making with that luscious striped Japanese knit (shown in a previous post) , you'll see it pictured above, made into the HotPatterns Riviera AnnisetteTop. The Riviera Annisette Top has gathered sleeves, but I chose to alter the sleeve pattern and make long plain sleeves instead. Why? I just felt that there was enough interest in the fabric itself, and didn't want to muddy it up with more details.


Now to begin this discussion of gathered sleeve caps, take a look at the blue top, above. It has gathered sleeves that are very subtle. When you make a top, dress or blouse with sleeve cap gathers, you have a choice to make them "puffed" or simply gathered into soft folds. It's all about the way the sleeve cap seam allowances are pressed.


When the seam allowances are pressed towards the sleeve, you have puffy sleeves like the example to the right.  In my opinion, puffy sleeves are usually better suited to the very young...but to each her own :)


Pressing the seam allowances towards the "body" (neckline) of the garment, results in sleeve cap gathers that lay  "flatter", and present more subtle folds.  It's a small detail, but one that is usually kinder to a mature figure.


Directing the seam allowances of gathers one way or the other can make a difference in other areas of a garment. For instance, pressing the seam allowance of a gathered skirt of a dress "up" towards the bodice will encourage the gathers to lay more flat, in smooth folds. Pressing those same gathers "down" (towards the hem) , will encourage the gathers to puff-up.  It's all about the look you prefer...and now you know you have a choice.

Sewing Notes: Yokes on both of the tops shown interfaced with PRO-SHEER ELEGANCE Light Fusible Interfacing from  

Labels: , ,

What do you think? Please add a comment by clicking here--> 9 comments

11/16/2009

How to Add Seam Allowances to Traced Patterns...the Easy Way

There has been some chat on various sewing lists and forums lately about tracing patterns and adding seam allowances to them, so here is a repeat of a tutorial I wrote several months ago that some of you may have missed and may find helpful...


For those of us who draft our own patterns, or trace them from the various pattern magazines, here's an easy way to add seam allowances--


It's very simple...and while not a new concept, I do it a bit differently.

The method is basic:
Add the seam allowance to the pattern by stitching around the pattern using an un-threaded needle the desired distance from the sewing line.

What's different about the way I do it?

Well...I have discovered that by using a large Wing Needle, and a very close stitch (.5-1), the excess pattern paper just peels off. No need to cut out the pattern!

Some more information--

I run the pattern through the machine...the traced stitching line of the pattern on the RIGHT....making sure the stitching line of the pattern is on the seam allowance I want. Thus, the needle holes are punched to the left of the stitching line, adding the seam allowance.

I can see through the pattern paper easily enough to be able to run the marked stitching line exactly on the 1/4", 3/8", or 5/8" inch line that is marked on the bed of my machine. If I can't see through the paper easily, I just use a post-it or piece of blue "painter's tape" along the desired depth of seam allowance I want to add.

After getting a few questions...here are some additional pictures that hopefully will make this process more clear:

1. Mark the desired seam allowance with painter's tape to make it visible under the pattern to which you are adding allowances--


2. The blue line on the paper (shown below) is the traced pattern line. Run it along the desired depth of seam allowance you want to add (see depth of seam allowance pic above), using a wing needle. This punches holes in the pattern paper, adding the seam allowance (the distance from the needle to the blue traced line is the added seam allowance)--

Labels: ,

What do you think? Please add a comment by clicking here--> 39 comments

10/01/2009

A Special Shirt Collar...and its Pattern

Many of my clients remark that the collars of the shirts I design are very comfortable and that they don't have to fuss with them. That's because I specifically design shirt collars to follow the natural curves of the neck and shoulder.

Take a close look at the collar on the denim shirt I am currently making, shown below.  Most (if not all) commercial shirt patterns have collars with top edges that are just straight across or that have one long slight curve.  However, as you can see...I have drafted my collar pattern with curves that follow the natural shape of the body.  SEWING NOTE-This collar has been interfaced with Pro-Weft Fusible Interfacing from ~Fashion Sewing Supply~.

Here is the pattern draft, first shown as a half-pattern, 
then again below as the full draft.

~ Click on photos to enlarge, click browser "Back" button to return to this page ~


Note that the bottom edge of each pattern shown is the neck edge, and that the pattern has been drafted with 3/8" seam allowances. It has been placed on a 1-inch square grid so that you can see the scale.  You are welcome to copy the pattern...however if you use my draft and post a photo of a shirt made with it, please link back to this post, and/or reference it. Thank-you...and I hope that you enjoy using this draft !

I've been asked about the collar stand (band) pattern that I usually use with the collar draft I showed above. Almost any stand can be used with this collar, as long as you draft the collar wide enough to cover the width of the stand (band).
So, here it is...you will notice it is fairly standard. 
It really is the refined shape of the collar (shown above) that allows it to fall so elegantly.
~ Click on photos to enlarge, click browser "Back" button to return to this page ~

Labels: , , ,

What do you think? Please add a comment by clicking here--> 26 comments

9/17/2009

Working with Diagonal Prints...The "Waterfall" Drape Cowl Top

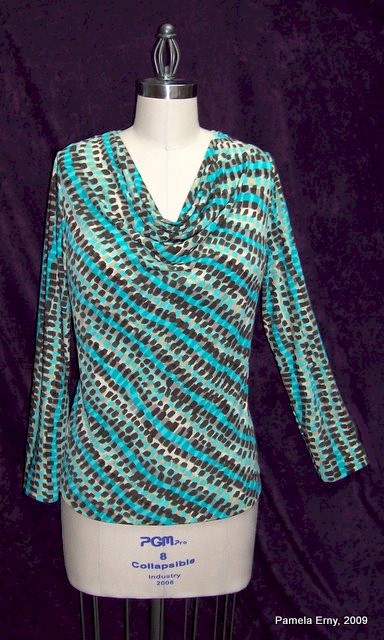
I made this top for myself last night, and I am very pleased with the way it turned out!   It is the "Waterfall" top from Ottobre Woman, 2/2009 Style #5.  Fabric is Poly/Lycra Jersey purchased several months ago from Gorgeous Fabrics.  You can see that the print is diagonal, but after draping it on my dress form, I knew it would work well for this style.

OttobreDrapeCowlTop

However, a little diagonal print goes a long way. So after some thought I decided to cut the front and back on the straight grain, utilizing the diagonal "stripes" for the main body pieces.  That left the sleeves. Cutting the sleeves on the straight grain would have made for a dizzying garment...all those diagonal "stripes"...oy!  So, I cut the sleeves on the bias. That changed the orientation of the print...the "stripes" now straight, not angled. This gives the garment balance....I won't look as if I am leaning to one side, LOL!

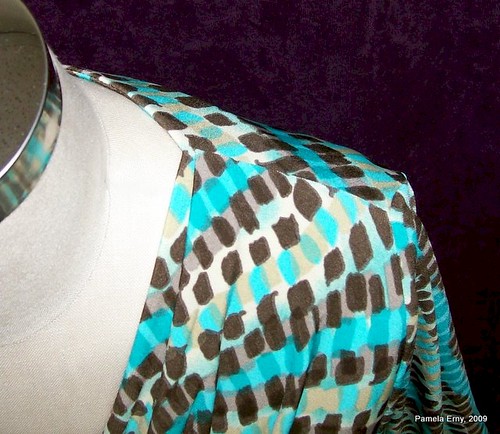
Of course, me being me,  I couldn't just sew this pattern as directed.  The instructions have you gather the front shoulder to meet the back shoulder.  In my experience, this tends to make the front shoulder look "puffy" after it is sewn. So instead of gathers, I formed a pleat in the front shoulder seam, placing it close to the neck edge...as you can see in the photo, below.

NecklinePleatDetail-CowlTop
The way you orient this pleat affects the way the cowl will drape. Placing it close to the neck edge with the pleat folded towards the neck, encourages the cowl to drape into a soft "V".   Placing the pleat in the center of the seam and folding it towards the shoulder will encourage the cowl to drape in a more rounded shape.

So, don't be afraid of diagonal prints!  Changing the grain layout can produce a stylish and flattering garment.

Labels: , ,

What do you think? Please add a comment by clicking here--> 22 comments


Site Meter