OTC-011 Off The Cuff ~Sewing Style~ <body><script type="text/javascript"> function setAttributeOnload(object, attribute, val) { if(window.addEventListener) { window.addEventListener('load', function(){ object[attribute] = val; }, false); } else { window.attachEvent('onload', function(){ object[attribute] = val; }); } } </script> <div id="navbar-iframe-container"></div> <script type="text/javascript" src="https://apis.google.com/js/platform.js"></script> <script type="text/javascript"> gapi.load("gapi.iframes:gapi.iframes.style.bubble", function() { if (gapi.iframes && gapi.iframes.getContext) { gapi.iframes.getContext().openChild({ url: 'https://www.blogger.com/navbar/10604511?origin\x3dhttp://off-the-cuff-style.blogspot.com', where: document.getElementById("navbar-iframe-container"), id: "navbar-iframe" }); } }); </script>

10/30/2011

Tutorial- Angled Ruche Cowl Collar Tunic


This tunic is the latest in the "OMG Pam is Sewing For Herself !" series of garments ;)  It is an original hand-drafted design of mine, and features a classic cowl collar that has been diagonally ruched. 
Here is a close-up of the finished collar...
^ Click to enlarge ^


Even though I drafted the pattern for my tunic, it is very easy to do with any pattern that has an applied cowl collar, like this style from Vogue, #8670.  

From cutting out the pattern pieces to wearing my top out to dinner...took less than 1.5 hours!   I enjoy "almost instant" sewing-gratification, don't you?


Here is how the Angled Ruche Cowl Collar is made...

First, stitch the long seam of the cowl collar. It will look similar to this--


For my tunic, I made the cowl collar "tube" using these measurements:
(20" long) x (the circumference of the neck edge + seam allowance).


< Click to enlarge


Next the collar was turned  WRONG sides together, hiding the seam allowances inside. Note--the seam is the CB of the cowl collar. 
Then a diagonal line was chalked across the Front of the collar at a random angle--

^ Click to enlarge ^


Following the chalked line, loose running stitches (using black thread) were worked through only the front layers of the collar. The stitches are about 1/2" long, and the line of stitching was anchored (knotted) at the bottom edge--
^ Click to enlarge ^

Next, the thread tail at the top of the collar was pulled to make the ruche, as shown below. Then several small stitches were taken and a small knot was made to secure the gathered (ruched) collar--
^ Click to enlarge ^


To attach the collar to the bodice, both the ruched cowl collar and the neck-edge of the bodice were marked at their 4 "quarter points" with pins--
^ Click to enlarge ^


The "Angled Ruche" cowl collar was attached to the neck-edge by matching the quarter-mark points (right side of collar to right side of bodice), then aligning all the edges as they were stitched together.       


All that was left to finish my "Angled Ruche Cowl" was setting the sleeves and stitching the hems :)

I will probably make another of this style soon,  perhaps positioning the ruche to the side (near the shoulder seam point) of the neckline...or maybe running 2 lines of ruching vertically at Center Front...or 2 lines in a \ / shape...or....  Well, the possibilities are endless!

Labels: ,

What do you think? Please add a comment by clicking here--> 17 comments

12/14/2010

TUTORIAL-- Sew an Easy Textured Knit Hem

For adults or children, this a fun way to add some textural interest to a plain hem on any garment made with stretchy knit fabric !


Here is a close-up of the sleeve hem of the knit under-Top pictured above, made for my 4-yr old friend Julianna. 


You can barely see all the decorative stitching on the flat of the hem because the thread matches so well


So I will show you the steps I used to achieve this effect using contrasting colors in the samples below.


These samples have been done on flat pieces of fabric, however it it best to do this treatment "in the round" on an actual garment. 
Using a measurement 1/4" less than you have allowed, turn up the hem and press. In other words, if you allowed for a 1" hem, just turn it up by 3/4".  Then stitch it from the wrong side with a decorative stitch so the the stitching holds down the raw hem edge, as shown below--

Next, make another fold, turning the hemmed edge up about 1" deep to the wrong side and press, as shown below--

Now using a sewing machine or serger, "lettuce" the fold by stretching it while zig-zag stitching or serger-stitching along the fold. It will look something like this after "stretching and stitching."

Now turn back the hem into its normal position, and admire your new Textured Decorative Hem !

In this teaching example the effect looks rather garish because 
I have used highly contrasting colors.                             
When matching thread is used, the effect is far more subtle :)

Labels:

What do you think? Please add a comment by clicking here--> 5 comments

7/19/2010

Gather a "Euro-Ruffle"...Without pulling a Thread !


I enjoy using center-gathered strips to use as a ruffle embellishment (often called a "Euro-Ruffle"). The ruffled strip on the top pictured above is for my little friend Julianna, age 3, but I have used this same technique with narrow ruffles around necklines or sleeves on adult garments. The ways to use this embellishment are limited only by your imagination.

In this tutorial, I will show you how to make a center ruffled strip, without having to pull any gathering threads!

You can click each photo to enlarge it, then click the << BACK button of your browser to return to this page.

First, start with a strip of woven or knit fabric. I have found that any width from 3/4" to 3" works well when using the finished ruffle to embellish a shirt or top, as pictured above.  However, I have seen wider ruffles used by other designers that look very nice...it's up to the look you want. I usually tear my fabric strips on the cross-grain of the fabric when using a woven fabric, or I cut the strips with a rotary-cutter when using a knit fabric.  Sometimes I leave the edges raw, or I finish them as I showed you in THIS POST.

The top pictured above was embellished with  1-3/4" strips of woven fabric that have been finished like this--
Since the strips will be gathered, you may need to start with more than one strip so that it will be long enough. I find that it is easier to join them before gathering, as shown below--
After stitching them together as shown above,  trim off the the excess "triangle", leaving a 1/4" seam allowance. Treat the seam allowance with a product like "Fray Check" to prevent it from raveling, then open up the strip so that it is straight , and press. It should look like this--
Don't be worried if the edges do not meet exactly!  A small mismatch will never be seen after the strip is gathered...trust me :)

Now this is where the "no thread pulling" gathering happens. I found this nifty presser foot....called a "Gathering Foot"  at an online store.  A sewing friend has told me that this foot is also known as a "Shirring Foot".  It was about 10 bucks, and worth every penny in my opinion.  This is what it looks like:
Maybe you already have one among the presser feet that came with your machine.

The key to using the Gathering Foot  is to increase the foot pressure, lengthen your stitch to about 3, and to increase your upper thread tension as high as it will go.  Test a scrap strip of fabric by stitching down the center of the strip. If your test strip gathers up nicely like this one, you are ready to gather the strip you are using for your embellishment--
If your test strip does NOT gather well, like this one....
...there are 2 things you can do.  You can try increasing the UPPER (top) thread tension by wrapping the thread twice though the first threading guide on your machine. This how that looks on  my machine--
Or, you can place your fingers right behind the foot as you sew, preventing the fabric from moving. Once you cannot hold the "bunch" of fabric behind the foot any longer, release, and just place your finger behind the foot again. Repeat until the entire strip is gathered. Here is a photo of this technique--
When you are finished gathering your strip, it will look like a twisted ruffle, like this--
To make it MUCH easier to work with, press the strip as straight and flat as you can, as shown below. Don't worry about crushing it, the strip will ruffle up again after you wash the finished garment...trust me :)
Now the ends of the ruffled strip need to be clean-finished. You can do this before gathering the strip, or after it is gathered. It is just my preference to do it after gathering...I've found that it makes the finished strip look ruffled right to the ends, rather than looking "flat" on the ends.  Just turn about 1/4" twice to the wrong side and stitch, as shown below.
So, now you have a lovely "Euro-Ruffle" that you can easily arrange into any shape, like this one that I've arranged into a simple "S" shape.  
Embellishing your garment with these ruffles is easy.  Just use a narrow zig-zag, and stitch along the center covering the straight gather stitching as you sew it to your garment.  Some designers embellish their garments before assembling them, others apply the ruffles after the garment is finished. For tops, I have found it easier to apply the ruffle after I stitch one shoulder seam, and one side seam. Then I can extend the ruffle easily to the back of the garment while it is flat. I usually arrange mine in a random way like the top pictured at the top of this tutorial, but you can mark a line on your garment and follow it as you attach the ruffle.  It's all up to you how you use your lovely ruffles ! 

But the best thing about this technique is not having to try to gather a long strip by pulling threads, isn't it?

Labels:

What do you think? Please add a comment by clicking here--> 21 comments

4/12/2009

HotPatterns Sunshine Tops...Step by Step

Two SunshineTops !

I have found my "make it 10 times" Summer Top! This pattern fits and flatters so well, that I've already made two. The first, from heather gray Cotton/Lycra Jersey and the other from Cotton/Lycra Jersey print. The print version has an inset neckband made from lightweight Irish Linen.

HotPatterns #1071,
Weekender Sunshine Tops


The HotPatterns team has made 2 terrific descriptive videos about this pattern...here are the links:

SUNSHINE TOP VIDEO, Part 1

SUNSHINE TOP VIDEO, Part 2


Pattern Description from the envelope-

You won’t believe how much mileage you’ll get from these great tops until you make them yourself! These tops are designed for T-shirt or knit fabrics with a little stretch. Try beading the neckband or add beads to the tunic drawstring for a pretty look. Relaxed, scoop-neck Tops are gathered onto a deep neckband at the front ...mix & match lengths & sleeve styles for your perfect top. Tank is sleeveless with a ribbed hip band, T-shirt has cap sleeves and finishes at the lower hip, and Tunic has short sleeves and applied drawstring casing. Try these lovely tops with simple pants, skirts or shorts, under your favorite jackets or cardigans, or team them with your jeans for a great casual outfit.

This a very easy pattern to construct. However, I've seen some questions about it on various sewing forums, so I took pics of the sewing sequence as I constructed the first top:


1. Interface wrong side of one set of the neckbands, then stitch their shoulder seams. You now have a set of neckline bands...The Interfaced Under-Band, and the Upper-Band.


2. Place the bands RIGHT SIDES TOGETHER, and stitch the inner circle. Then clip the curve. Now you have ONE Neckline Band.


3. Under-stitch the the seam allowances to the Interfaced side of the Neckline Band.


4. Match the edges of the Neckline Band, WRONG SIDES TOGETHER, and press.


5. Sew the front bodice pieces Right Sides Together at the shoulder seams. Gather the front neckline between the notches.


6. Match the RIGHT side of the Neck-Band to the RIGHT side of the neck opening, matching the notches and adjusting the gathers as needed. Stitch the Neck-Band to the shirt through all layers.


7. This is what the sewn neckline of the Sunshine Top will look like from the Right Side.
8. The last steps are attaching the sleeves and stitching the side seams and hems as you would with any simple top or T-shirt.

SEWING NOTES: Pattern from HotPatterns, Pro-Sheer Elegance Interfacing from Fashion Sewing Supply, Fabric from my stash.

Labels: , , , ,

What do you think? Please add a comment by clicking here--> 30 comments

4/10/2009

FOLD and FLIP Facings....a Sewing Tutorial


Tops and blouses with draped cowls are among the most flattering neckline silhouettes. However, with many of these styles the shoulder seams tend to slip to the back. Not only that, but the inside can look very messy where the cowl drape facing meets the shoulder seams.


Here is a way to solve both of these problems at the same time ..and works equally well for boat neck tops with cut-on facings too!


In this example, the garment shown is the "Waterfall Blouse" from Ottobre Woman magazine, Issue 02/09 #5.


~ FOLD AND FLIP ENCLOSED FACING TUTORIAL ~

Patterns for draped cowls may have gathered front shoulder seams. If so, gathering the Front shoulder seams is the first step, as shown below--


Step 1


Also, patterns for this style may have a separate Back Facing. If so, attach it.


Step 2


Next, lay the back onto the front, Right Sides Together, matching the front and back shoulder seams, AND also match the edges of the facings, as shown---


Step 3


Now, with the back side up, stitch the shoulder seams together, pivot and continue to stitch the edges of the facings together in one pass, as shown below--


Step 4

This what the stitched shoulder seams/facings will look like from the FRONT


Next, fold the facings down towards the BACK meeting the shoulder seam and matching all edges. Stitch the shoulder seam again, though all layers (when you click on the photo to enlarge it, you will see the stitching line drawn in blue).
Repeat on the other side.


Step 5


Now turn (flip) the facings into position. Look! All those seams (shoulders, front facing, and back facing) are now neatly enclosed, as shown below. Also notice that the seams at the shoulder are now folded toward the Front. This is unusual, as we usually press shoulder seams to the back. But with this style, having the shoulder seams folded to the FRONT helps the cowl fall into beautiful folds, and the tendency of these styles to "slide backwards" is solved!


Step 6

Labels:

What do you think? Please add a comment by clicking here--> 12 comments

3/09/2009

"It's Crowded in Here" ...How to Draft a Better Collar Pattern

Recently I've been asked by several people through email for shirtmaking tips. So here is a short tutorial that I originally wrote way back in 2005, that some may have missed--


~~~~~

It's no wonder some collars have their allowances "all in a bunch" ...there isn't enough room in the point!


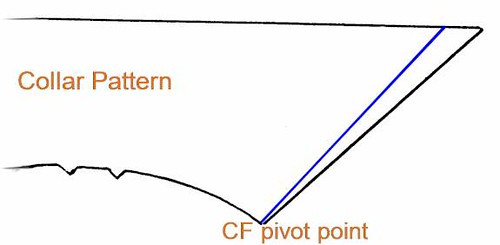
One way to help collar seam allowances have the room they need to stay nice and flat with no lumps is to "open" the point of the collar pattern.


Notice the diagram of the collar pattern shown to the left. The black outline is the original pattern. The blue line shows how to alter the angle of the point.


The method is easy:


  • Trace a copy of the pattern, *without* seam allowances.
  • Locate the neck-edge Center Front. This will be your "pivot point", as shown.
  • Make a mark, 1/8" to 1/4" -IN- from the collar's -TOP- edge point.
  • Draw a line from the neck-edge -CF point- up to the mark made at the collar pattern's TOP edge...shown as the blue line in the diagram.
  • Cut along this newly drawn line to complete the pattern alteration. Don't forget to add seam allowances!


The length and shape of the neck-edge of the pattern has not changed, all the "parts" will stitch together as usual. This simple method will work with any collar, including shirt collars that are attached to a stand. Changing the angle of the point by such a small increment will not affect the collar's "fall". Remember, all that's been done is a very slight change to the angle of the collar point, giving its seam allowances more room to settle flat and smooth when the collar is stitched and turned.


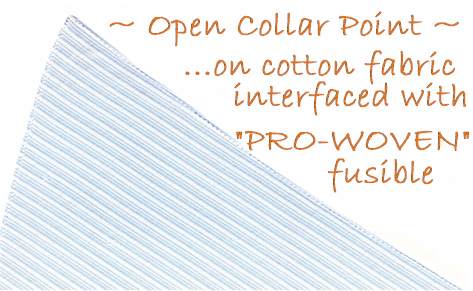
The blue shirt collar shown to the left is an example of how sharp and smooth a collar can be when the angle of the point is opened a bit. Of course, there are other techniques that help a shirt/blouse collar look sharp and professional, but changing the pattern is a good place to start!
SEWING NOTES- Sewn collar shown above is interfaced with Pro-Woven Shirt-Crisp Fusible Interfacing from ~Fashion Sewing Supply~

Labels: ,

What do you think? Please add a comment by clicking here--> 6 comments

11/13/2008

Twisted "Draped Cowl" Tutorial

This is a quick stylish variation on a drape-front (true Cowl) silhouette that can be done in just minutes!

~~~~~~~~~~~~~~~~~~~~~~~~~~~


First, start with a drape-front cowl (photo #1) already in your wardrobe, or make one with the many patterns that exist for this style.

As shown In photo #2, turn the garment inside out and flip the facing up to expose the wrong side of front of the top.


Next, pinch some fabric near center front, twist it a bit, and hold the “pinched” fabric with a rubber band, as shown in photo #3. Later, if you want to make this design change permanent, the 'twist' can be stitched. Or just remove the band, and you have your original draped cowl!
Note: A small clear "ponytail" band works well for this!


Now turn down the facing to cover the banded fabric, as shown in photo #4.


As shown in photo #5, when the garment is turned right-side-out, the twisted detail becomes a new interesting design feature of the top!


Where you pinch and band the fabric is totally up to you: higher, lower, to the left or right of center, etc. There are infinite possibilities for design variations like these.... Have fun!

Labels: , ,

What do you think? Please add a comment by clicking here--> 10 comments


Site Meter