OTC-011 Off The Cuff ~Sewing Style~ <body><script type="text/javascript"> function setAttributeOnload(object, attribute, val) { if(window.addEventListener) { window.addEventListener('load', function(){ object[attribute] = val; }, false); } else { window.attachEvent('onload', function(){ object[attribute] = val; }); } } </script> <div id="navbar-iframe-container"></div> <script type="text/javascript" src="https://apis.google.com/js/platform.js"></script> <script type="text/javascript"> gapi.load("gapi.iframes:gapi.iframes.style.bubble", function() { if (gapi.iframes && gapi.iframes.getContext) { gapi.iframes.getContext().openChild({ url: 'https://www.blogger.com/navbar.g?targetBlogID\x3d10604511\x26blogName\x3dOff+The+Cuff+++++++++~Sewing+Style~\x26publishMode\x3dPUBLISH_MODE_BLOGSPOT\x26navbarType\x3dTAN\x26layoutType\x3dCLASSIC\x26searchRoot\x3dhttps://off-the-cuff-style.blogspot.com/search\x26blogLocale\x3den\x26v\x3d2\x26homepageUrl\x3dhttp://off-the-cuff-style.blogspot.com/\x26vt\x3d-8803809636534965068', where: document.getElementById("navbar-iframe-container"), id: "navbar-iframe", messageHandlersFilter: gapi.iframes.CROSS_ORIGIN_IFRAMES_FILTER, messageHandlers: { 'blogger-ping': function() {} } }); } }); </script>

10/06/2014

Mini-TUTORIAL: Gathered or Puffed? It's all about the Seam Allowances!


The Riviera Annisette Top is one of my favorite styles from HotPatterns, and a perfect style to demonstrate how manipulating the shoulder seam allowances can change the look of a garment with a gathered sleeve.  This is a revised post (with some new information) of one I first published here in 2009...for my newer blog followers or those who may have missed it the first time. This is one of Hotpatterns' earlier styles, and it's on Clearance Sale at www.HotPatterns.com   ...but I am not sure how long it will be on sale or even still available. I am not affiliated, just a big fan.

So...about those seam allowances....

Take a close look at the blue top, above. It has gathered sleeve caps that are subtle. When you make a top, dress or blouse with sleeve cap gathers, you have a choice to make them "puffed" or simply gathered into soft folds. It's all about what direction the sleeve cap seam allowances are pressed. (more detailed close-up photos follow)


When the seam allowances are pressed towards the sleeve, you have puffy sleeves like the example to the right. 


Pressing the seam allowances towards the "body" (neckline) of the garment, results in sleeve cap gathers that lay  "flatter", and present more subtle folds.  It's a small detail, but one that is usually kinder to "women of a certain age."  (smile)


Directing the seam allowances of gathers one way or the other can make a difference in other areas of a garment, as well.  For instance, pressing the seam allowance of a gathered skirt of a dress "up" towards the bodice will encourage the gathers to lay more flat, in smooth folds. Pressing those same gathers "down" (towards the hem) will encourage them to puff-up. The same applies with sleeves gathers at the cuff....pressing the gathered edge towards the cuff will result in a smoother look, while pressing them "up" towards the sleeve will give the gathers a more pronounced puffy look.  It's all about what you want and prefer. So remember...despite what the pattern directions say, you do have a choice!

Sewing Notes: Fabric is a light sweater knit bought many years ago. The Yoke is interfaced with PRO-SHEER Elegance LIGHT Fusible Interfacing from  ~FASHION SEWING SUPPLY~


Labels: ,

What do you think? Please add a comment by clicking here--> 5 comments

7/18/2014

How to Sew a "Better" Elasticated Casing !


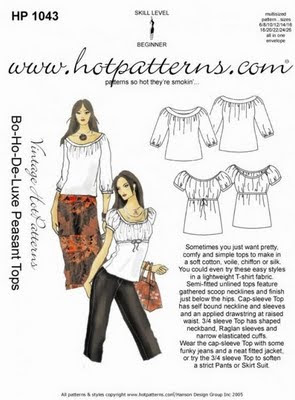
The blouse shown above in soft cotton batik is one that I made a few years ago from this now "vintage"  HotPatterns.com design that I tweaked a little bit to have a closer fit.  This exact HP style (shown below) has been re-designed and is now offered as the  HP1169 Classix Nouveau Refined Peasant Blouse...and can be seen here on the HotPatterns website.

http://hotpatterns.com

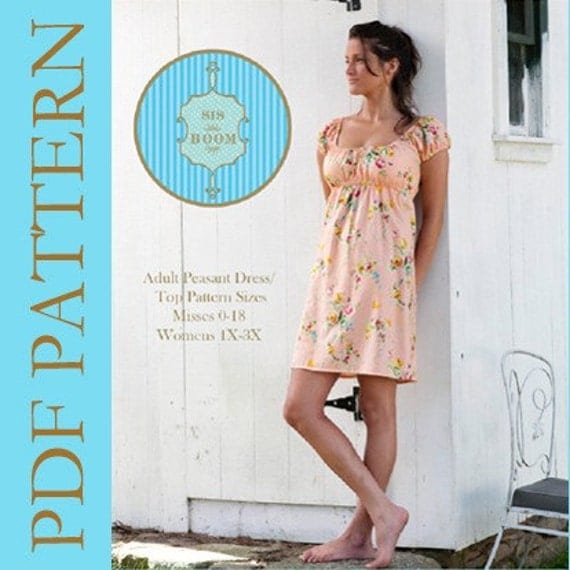
https://www.etsy.com/listing/29558029/womens-peasant-dress-pattern-sis-boom?ref=shop_home_active_9
Another great peasant-style top is this one from Carla Crim, "The Scientific Seamstress" 
 The basic differences between the 2 patterns is that the HotPatterns style has a lovely "couture-like" flowing silhouette, with sophisticated details.  The Meghan Peasant Pattern from "The Scientific Seamstress"   has a silhouette that is both relaxed yet fitted, with pretty sleeve style options, neckline options, and top-tunic-dress length options.  I've made them both, and I like the Hotpatterns style for soft flowing fabrics, and I like the Meghan for fabrics like lightweight cotton and soft washed linen.


OK..we know Elastic is on sale, we've got patterns to choose from...Now about those Elasticated Casings...

Making a casing for elastic is certainly one of our easier sewing tasks. Turn, stitch, insert elastic...done!  Sewn this conventional way, we end up with a perfectly acceptable casing that looks something like the photo below, after the elastic is inserted.  Fine...yet a little "bubbly and wobbly"...but something we have come to accept with elasticated casings.   
   (OK..a word here about "elasticated".  I am old enough to remember when *everyone* just said "elastic casing", then one day I started to hear elasticated this/elasticated that...so...today I choose to use the word, elasticated every so often...with a few plain "elastic casings" thrown in ;)  But yes, this is indeed just our old friend "the elastic casing" fancied up a bit)


By taking one additional construction step, you can achieve a "designer" look to an elastic casing garment. A very simple step that will result in a flat, even-edge casing every time, like the one in the finished garment shown....here is a close-up photo--  


So what's that extra construction step?  Edge-stitching!
After the casing is folded to the wrong side of the garment and stitched along the BOTTOM edge (leaving an opening to later insert the elastic, of course)....All that we need to do next to lend that "designer touch" is to edge-stitch the TOP fold of the casing...all the way around, as shown below--


By taking this one easy extra step, our elasticated casings lose the bubbles, 
and gain some designer panache!


Quick note from Pam....

Thank-you very much for shopping at my store and thank-you for continuing to follow my blog.  I have not blogged for a long time because of illness.  I am dealing with it in every positive way I possibly can, and I look forward to being able to teach you more "tricks of the shirt-making trade" as soon as possible.  Thanks again for continuing to follow me here and on Facebook. I appreciate it more than you know...and and I will be back...I promise  :)

Labels: , ,

What do you think? Please add a comment by clicking here--> 32 comments

1/19/2014

New Tutorial on Pam's Shirtmaking Blog- Professional Sleeve Plackets, step-by-step

Hi there everyone!  I've just posted a New Tutorial 

  
Click this link to read 
The Shirt Sleeve Placket, 
A Professional Custom-Shirtmaking Method and Pattern

Labels:

What do you think? Please add a comment by clicking here-->

9/08/2013

Don't miss my My NEW Shirt-Making blog!

My new Blog, Off The Cuff...From a Shirt-Maker's Studio is now live...with a brand new Tutorial to start it off!

This blog will remain here, but will rarely be updated. I will be making copies of my past tutorials and moving them to my NEW blog, where they will have their own page for easy sharing and future reference.

So if you follow me here....now come and join me at 

What do you think? Please add a comment by clicking here--> 5 comments

4/09/2013

Shark (collar) Attack!

First of all, I Did NOT design and sew the shirts shown below...now moving right along....

Have you noticed this trend in designer shirts?  It's an extremely wide spread collar, now often called a "Shark" Collar (for its resemblance to shark fins).

 <click photo to see detail>

 A wide spread collar is often asked for when  the client wants to wear a tie with a prominent knot with his dress shirt...but these days, as you can see above, designers are adding "shark" collars to casual shirts as well as more formal styles.

But if you go to an experienced Shirt-maker who has been in the trade for more than a minute...and ask for a shark-collar, you are likely to get a quizzical glance complete with raised eyebrows. Why?  Because to Shirt-makers, this is just a wide-spread collar. We'll make a collar for a client with any degree of spread they want. Sure, most of have a 'look book' with a variety of collar styles that have different names..but collar style names often differ between Shirt-makers from different countries. So many of us use actual sewn examples and/or pictures with names or numbers.

Here's a very quickly sketched example of what a "shark" collar pattern draft might look like.  Might?  Yes...keep in mind that the new spread (shown in green) can be even more extreme.  [Please note that only 1/2 of the collar is shown.]  If you change a collar from a typical one to a "Shark" style, the collar's short ends will lean towards the Center Back at an angle from the original draft as shown.  You will also see that I made the new (green) "shark"collar wider as it approached the point...that's because it would be my personal preference (design choice) on this collar that was already very narrow...nothing more than that.


So...what do you think?  Yay or Nay to the Shark Collar?  Do you like it?        Would you or your partner wear a shirt with this collar style?


What do you think? Please add a comment by clicking here--> 28 comments

3/31/2013

Hot Off The Machine...Shirt with Striped Trim Details


Yep, another shirt....and I've got a stack of  custom-designed shirt orders left to to fill.  I'll have to make this post a quick one so I can get back to machines. But before I start the next client shirt, DH Roger wants one made from this fabric..and that's fine with me.  He deserves it, this fabric was a joy to work with....and I want to try out some new design detail ideas!

SEWING and DESIGN NOTES-- This semi-fitted shirt features grosgrain ribbon details on the right front button band, pockets, and sleeve plackets.  The outer collar and its stand, and the outer cuffs are interfaced with ProWoven Shirt Crisp Fusible, a professional grade Interfacing found exclusively at Fashion Sewing Supply , as are the buttons (from the "Dark Assorted Shirt Buttons By-the-Scoop").  The trim is from my personal stash...source unknown.
The fabric is an amazingly lovely, finely woven soft chambray from Gorgeous Fabrics where I have purchased many wonderful shirting fabrics over the years.  Seriously, this "Blue Belle Chambray" Shirting fabric practically sews itself!  And the ProWoven Shirt-Crisp Interfacing from FSS complemented it perfectly for this menswear shirt style. If using this fabric for a garment for myself, I would have opted to use ProWoven Light-Crisp Interfacing or ProSheer Elegance MEDIUM Interfacing (all interfacing styles from  FSS).


Labels:

What do you think? Please add a comment by clicking here--> 11 comments

3/28/2013

Tailored Shirt with Cross-Stripe and Chevron Design Details


This shirt is one of a few I recently made for one of my clients. It is my original design, made from a hand-drafted pattern. Design details include a Front button stand and sleeve plackets cut on the cross-grain, and a Chevron Pocket.

These beautiful fabrics, a yellow shirting stripe and white shirting fabric from GorgeousFabrics.com were especially fun to work with, since I usually do not use stretch wovens for the menswear shirts I design. Why so much fun?  Instead of making my usual flat-fell seams, I used narrow french seams. Maybe it's just me, but I've found traditionally felled seams to be tricky to accomplish with stretch-wovens. So for the  menswear shirts when I've chosen to use a Stretch-Woven, I opt to use french seams. For my own shirts in stretch wovens, I serge and top-stitch.  Oh yes...when you've felled as many miles of seams as I have over my ShirtMaking career...the switch to French Seams is fun. 

[ Side Thought and Note-to-Self-- A black background is not a great choice for a light yellow shirt..especially when the photographer has limited pic skills like me. ]

Stretch woven fabrics naturally lend themselves to "Softly Tailored" shirts. So while this shirt appears to have a very crisp collar and very structured cuffs...they are in fact both crisp and soft.

 Huh? 

Yes, I know that sounds contradictory.  But it all has to do with pairing the correct interfacing with the intended fabric.  In order to have professional results, I needed to use an interfacing that would not fight the natural characteristics of the fabric, but rather, work with them.

  This woven fabric has some stretch...so the interfacing needed to have some stretch.  Not because the collar and cuffs are going to be doing any stretching when worn...but an interfacing with no "give" at all would have rendered the collar and cuffs unnaturally heavy and much too hard.  And a knit interfacing would have had been much too soft. So what would Goldilocks have done in this situation if she was a Shirtmaker?  She would have used a  mid-weight woven interfacing with some "body" and a little "mechanical" cross-wise stretch....just like I did :)

Of course, you know that this GoldenBrowndilocks Shirtmaker had just the right interfacing. In fact, I had thousands of yards of it custom-manufactured a few months ago.  Pro-Sheer Elegance MEDIUM Fusible was exactly the right choice. Not too hard, not too soft, but just right for this shirt fabric and so many other garment and fabrics (stretchy or not).

SEWING NOTES--  ProSheer Elegance Interfacing Light and Medium exclusively available at www.FashionSewingSupply.com, Creme Pearl Italian Designer Buttons from www.FashionSewingSupply.com, Shirting Fabrics from www.GorgeousFabrics.com


What do you think? Please add a comment by clicking here--> 10 comments

2/18/2013

Mens Wool Gauze Shirt with Double Pocket


 I haven't had time to blog for weeks....but I have been sewing!   This is one of the many shirts that I've been making for my clients.  The fabric is a luscious wool gauze...light and airy...and slightly crumpled in a good way.

This design features a bias cut button band and bias cut sleeves with bias sleeves plackets (the plackets made with coordinating wool gauze stripe). I also added a double-pocket.

Working with wool gauze is not difficult, but is usually better suited to designs with more drape than a structured menswear shirt.  The key to making this beautiful fabric "work" for the structured parts (collar, cuffs, front band, and sleeve plackets) was using the right interfacing.  My newest Interfacing style, *ProSheer Elegance MEDIUM Fusible Interfacing* provided the perfect amount of structure plus flexibility needed for a nice crisp collar and cuffs...without "weighing down" the design.

SEWING NOTES-- Interfacing and buttons available at www.FashionSewingSupply.com , Wool Gauze fabric from my personal "shirt-making fabric stash".

A few words about the new men's shirt pattern from Vogue.  It will be a while before time allows me to make that particular shirt.  I still need to finish more custom-drafted shirts for clients before I can indulge in any personal sewing...and the first personal sewing I'll be doing before I evaluate yet another shirt pattern, will be making a few outfits for my Grand-Nieces.
In the meantime, Peter from Male Pattern Boldness has made V8889, and has reviewed it both on PatternReview.com and on his blog. He did not choose to use the interesting undercollar-button detail, so perhaps I'll find the time to a least make the collar+stand to show you what that little detail is all about!


What do you think? Please add a comment by clicking here--> 17 comments

1/14/2013

The "Split Cowl Collar" Tutorial


This is a tutorial about how to add a wide or narrow, short or long, 
or overlapped and asymmetrical collar to any knit top.


First let's talk about the basic garment. The collar I'll be showing you can be added to any basic knit top.  Here are some examples of patterns by Butterick and Vogue that would work with an added collar. Note that the necklines are either "crew" or "jewel" in general shape and depth..in other words..nicely rounded and not particularly deep or wide.


I am going to show you how I added a wide overlapped collar (what I call a ""Split Cowl") to an otherwise simple knit pullover top. The bodice and sleeves are made with Rayon knit Jersey purchased from www.GorgeousFabrics.com several months ago, and the collar is made from gray rayon ribbed knit that I have in my "fabric stash".  ** Please note that all seam allowances used in this tutorial are 1/4-inch---if you start with a pattern that has 5/8" seam allowances, the neckline seam allowance needs to be trimmed to 1/4-inch  **

Here are the bodice pieces shown side by side.  The front neckline is about 5-6 inches deep.  At the end of this tutorial you will see variations that have lower or higher necklines but the construction technique is the same.

The next step is to sew the shoulder seams--


Now the complete neck-edge (the "hole") needs to be measured.  I've found that the easiest way to measure the length of curves is to stand the tape-measure up on its edge, and that is what is shown below- 


Because the collar is going to be overlapped and so therefore "scientifically exact" measurements are Not needed, I am going to say that this neck edge is 21 inches around.  A collar needs to be made that is 21-inches long, plus a generous 3 inches for overlap and to have enough to seam the ends.  So the LENGTH of the over-lapped collar needed to fit this particular neckline is 24"...and I usually add an extra inch to give myself a little more overlap. Now what about the width?  I have made so many of these tops over the years that I know that I like the results best when the cut collar width (flat and single thickness before it is sewn) is 8 inches to 12 inches wide.   As you will see, this is an arbitrary width measurement, and after you make one, you will see the endless design possibilities by changing the width and shape of the collar. 

So I have decided that for this top, my collar will be cut 25 inches LONG and 10 inches WIDE.

WAIT! Before we all go cross-eyed...let's pause a moment and put this into perspective-- Remember...this is an easy technique...you'll see!  It boils down to this--A very basic rectangular collar is  going to be stitched into "the neckline hole" that you see above.  There, that's it in a nutshell!  Now let's continue....

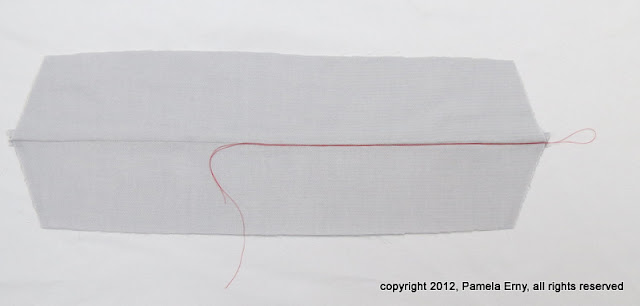
Normally I just go ahead and cut out my collar from the fashion fabric and stitch it in. However, you can make a "test" collar from scrap fabric (that you can use as a pattern later) to see if you've measured correctly and like the width and finished folded depth of your collar.  Below is a piece of scrap fabric that has been cut to my determined 25- inch length and 10-inch width.


Then I quickly folded it in half lengthwise, and sewed the short ends with a 1/4-inch seam allowance--


Next I turned my "test" collar right sides out....and then overlapped it in preparation for it to be sewn to the neck-edge  (the yellow  pin you see is holding the overlapped collar at its raw edge....the folded edge of the collar is toward the bottom of the photo)--

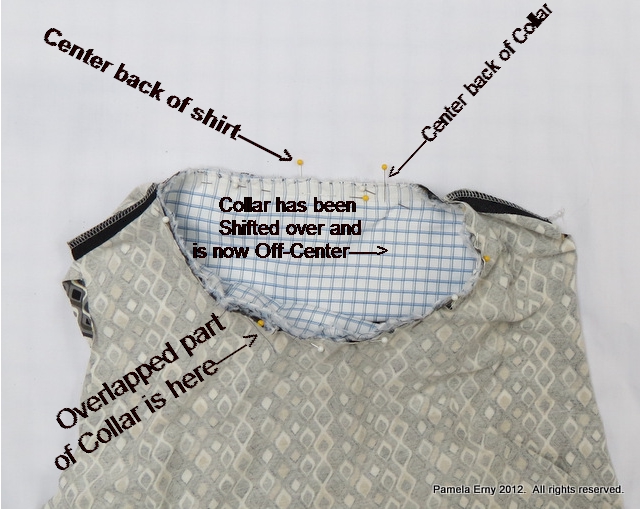
The photo below should make things more clear. The bodice has been turned wrong side out, and the collar is going to be "dropped" inside of the neckline "hole", all the raw edges will be aligned, and the collar will be basted (by hand or by pins) to the neckline...right side of collar to right side of neckline.

Note that a yellow pin has been placed at the center back of the shirt and another at the center back of the collar.   Then...when the collar  is dropped down into the neckline "hole"...

...it is shifted off center before basting, as shown below. The collar as shown below was quickly pin-basted  to the neck-edge in a one-to-one ratio (in other words, the collar is the same length as the neckline, neither one needs to be stretched or eased to fit the other).   If the collar is a little longer or shorter than the neck-edge, just increase or decrease the amount of the overlap.

To check the appearance of the test-collar, turn it right side out, as shown below--

I was satisfied with the appearance of the collar, and decided to use the same measurements for the "real" collar.  If I had wanted to, I could have quickly taken the stitching out and used the test-collar as the pattern for the "real" collar, but I like to just measure and cut simple rectangle shapes with my ruler and rotary cutter, rather than scissors and a pattern. So I did so with grey ribbed knit  The short ends of my ribbed collar were stitched and turned right sides out.....and then I hand basted the raw edges to prevent them from shifting before I stitched the collar into the neckline "hole".

In the photo below, the shirt is folded in half, matching the shoulder seams and the neck-edges. The collar is folded in half as well and compared against the neckline, as a guideline for how much to overlap the collar....and where to place the overlap (which is your choice..it can be placed wherever you want it to be).


 Then, as was done with the "test" collar, the collar is "dropped into the hole" of the neckline...right sides together, all raw edges even.


The collar is stitched to the neckline with a 1/4-inch seam by sewing machine or serger. The seam can be left as is, however I  like to finish the seam so that it lays flat by top-stitching it down from the right side, as shown below.


Below you see the finished collar and bodice from the right side--


As you look at the photograph above...are you wondering how a collar that is the same length on each short side, now looks like one edge is quite a bit longer and...that now, somehow, the collar is asymmetric? Here's why: The upper side of the overlap is exactly that...an OVER-lap. 

Huh??? 

Well...because is has to go up and OVER the other side-edge of the collar, it merely appears to be shorter!  And because the under-lap does not have to do anything but lay there....it merely appears to be longer!  I just love when a straight collar "auto-magically" becomes asymmetrical  just because one side overlaps the other :)

Here are some variations of the design based on the same theme--

This red velour top was made with a more shallow front curve, about 4" deep.  The collar was cut about 9" wide, with No overlap.  The collar was fully interfaced with Pro-Sheer Elegance Fusible Interfacing from www.FashionSewingSupply.com so that it stands up on the neck a bit. Additionally, because the collar was interfaced, the entire  neck-edge and shoulders were reinforced  with a 3/4-inch wide strip of the same interfacing, as shown below.


This version in Aqua stretch velour features a deeper U-shaped neckline, and the collar was cut about 8" wide with No overlap.

This collar was applied to a neckline about as shallow as the Red top, and has about a 4" overlap and is the widest of the examples shown, it's width is approximately 12".


I hope you enjoyed this tutorial and see what a simple technique this is for adding an interesting design feature to any basic knit top!


What do you think? Please add a comment by clicking here--> 59 comments

12/16/2012

I've been sewing for myself!


It is that time of year when client shirt orders have been stitched and sent...and I have time to indulge by sewing some new things for myself.  After a significant weight loss over the past several months, I still have some pattern-tweaking to do, but I am so happy that I've managed to sew several very wearable casual tops for myself, including this one!

Most are quite simple and not "blog-worthy", but I thought you might like to see this one. I started with a basic jewel neck pull-over, and added a self-drafted "Split Cowl Collar".  The fabric is an ancient piece from my stash...a soft stretchy knit with a suede-like nap.  I am not quite down to my normal (goal) weight, so the drag-lines you see come from my attempts to make a larger top look a little better on a smaller form.

Here is a close-up of the Collar. If you would like me to write a Tutorial and show how to make and apply a Split Cowl Collar to any basic pull-over knit top, let me know in "comments"...because I plan to make at least one more of this style and can take photos along the way if there is enough interest.


Labels:

What do you think? Please add a comment by clicking here--> 107 comments

12/05/2012

A Near Miss...


This is a pretty darn good "final muslin" of a nicely detailed shirt...or so I thought.


I was very pleased with the bias details on the right side Front, Cuffs, and Sleeve Plackets. But more than that....this new pattern draft for my DH Roger fit him perfectly, and he really liked the design details!  In fact, even though this shirt was the "final muslin", and only made with serged-then-topstitched  seams...it looks good enough to actually wear, don't you think? [that funky bit at the left shoulder is just from not pinning it perfectly to my photo-wall]  And even more than that...this fabric was a bargain, and I was pleasantly surprised when it arrived to see that it didn't look or feel "cheap".

So, OK then...after I tossed this one into the wash to rinse out the starch I used to stabilize some of the bias details, I was ready to move on to another shirt for Roger, made from the same checked fabric in a different color. 

 I was just finishing the prep work on the final pattern for the second shirt when this blue one was ready to come out of the dryer. I handed it to Roger and he put it on, or rather he tried to put it on.  Despite pre-washing/drying the fabric...this nice blue shirt shrank! Not a little bit...the sleeves and body were 1/2" too short. No big deal on the body-length, very big deal with the sleeves. And it shrank a bit width-wise too.

OMG!  How the hell did this happen!

I may have mentioned this before. I am a compulsive pre-washer...I always, I mean always wash shirting fabric once in hot water/hot dryer, then again in warm water/warm dryer. And I measure the length and width before and after. This fabric passed my obsessive pre-wash evaluation with just a tiny bit of shrinkage. Nothing shrank during the construction, and I always press with plenty of steam. So this extra shrinkage surprise really was a surprise!

The thing is, Roger really likes this checked fabric in the other color. So against my better judgement, I am going to make another shirt for him with this fabric. But this time in addition to my usual pre-wash routine,  I am going to use my hottest wash and dry cycles one extra time, and then for good measure (ha, ha), I'll wet the yardage, spin out the excess water, and dry it on hot one more time. Not (usually) being a foolish woman, I did wash/dry the now-shrunken blue shirt you see here to see if it would shrink again. It didn't.  So I feel only a little anxiety about the other fabric.

What am I going to do with this blue shirt?  I considered pinning it on my wall as a reminder to never again buy cheap shirting fabric from that really huge online fabric store...no matter how nice it looks. But in the end I donated it...it's a nice enough shirt, someone will get use of it.

What did I learn?   To wait until my always reliable online fabric store and wholesale sources of "better" shirt fabrics have what I am looking for, and until then to shop from my considerable stash.

What are those reliable sources for menswear shirting that I use, you ask?
Retail- www.GorgeousFabrics.com
Wholesale- my little secret :)

And one more thing. Before another menswear shirt gets sewn by my hands.....my hands are going to get busy making a few tops and a few pairs of pants for myself. Yay me!      


What do you think? Please add a comment by clicking here--> 19 comments

11/19/2012

Brushed Denim Shirt...Distressed around the Edges


Lately I have been spending all my free time in my studio making Shirts!  This is one of them, a Brushed Denim Shirt, featuring a Double-Pocket with Distressed Edges.   The distressing on the pocket and all the top-stitched seams was done by rubbing them lightly with fine-grit sandpaper.

SEWING NOTES:  Pattern- my original design and hand-draft. Fabric- from my shirt-making stash. Interfacing- ProWoven Shirt Crisp from www.FashionSewingSupply.com


Buttons--  These New smoothly
polished 1/2-inch 4-hole 
COCONUT SHELL Buttons 
from   www.FashionSewingSupply.com


What do you think? Please add a comment by clicking here--> 4 comments

11/11/2012

Menswear Shirt With Shaped Yoke


I had a few moments to snap a pic of this shirt 
just before Fedex was due to pick it up and send it to my client.

It is made from a reversible cotton/rayon blend shirting featuring tiny herringbone checks, that has a soft limp drape...and should be very comfortable to wear during my client's temperate winter climate.  As you can see, I used the predominantly green side for most of the shirt pieces, and chose to cut the shaped yoke, button and front plackets and pocket accents from the reverse side.

SEWING NOTES--  Pattern is my own hand-draft. Fabric is from my wholesale supplier. Interfacing used is ProWoven Light-Crisp Fusible from www.FashionSewingSupply.com
 

What do you think? Please add a comment by clicking here--> 9 comments

10/08/2012

Perfect Collar Points...A Shirtmaker's "Secret" Technique

"Secret" in this case meaning that after all these years
I am finally sharing one of the ways I achieve
 "As close to perfect as possible" Collar Points
on the shirts that I design and sew for my clients.
(Extreme close-up of a Collar point)


This amazingly simple Collar Point technique is used by many Custom Shirtmakers all over the world.  Like many of the techniques I use, it was learned during my Tailoring and ShirtMaking Apprenticeship.

There are certain techniques that Custom-ShirtMakers use to get professional results, and this is one of them.  Before I get to the tutorial, please note that there are a few things that (almost all) Custom ShirtMakers "Always do", and "Never do".  We TURN collars, we do NOT "poke" them out with pointy objects, or any other object, template or gadget. Also, when we want a Point, we SEW a Point...we do NOT pivot taking 2 stitches. And we NEVER sew a collar with a 5/8-inch seam allowance, because it wastes time and fabric.

That said...if you Pivot and Poke and use 5/8-inch seams,  and are happy with your results.....I am NOT the self-appointed "Point Police Officer"!   So carry on...and disregard what follows.   :)

If you want your collar points to be perfect every time, with very little effort....here is the method that most of my professional ShirtMaking colleagues and I use with great success...even on the thickest shirt fabrics. In fact, the fabric shown in this demonstration is a thicker than usual, double-weave wool/cotton herringbone shirting fabric.

The first step to a great collar is to reduce the seam allowance of your collar pattern piece to 1/4-inch (Please note that you will also have to change the shirt-body neck edge seam allowances to 1/4-inch).  

 Then cut 2 collar pieces, and Interface one of them as shown below. Generally, the top collar is interfaced. For a softer look, interface the bottom collar or interface both for a very crisp collar. The interfacing shown here is Pro-Woven Light Crisp Fusible Interfacing, from www.FashionSewingSupply.com.) I will elaborate about interfacing techniques another time....today it is all about The Point.   

So to continue, shown below are 2 collar pieces with 1/4-inch seam allowances--

 (All photos may be "clicked" to enlarge)


Next, Place the collar pieces right-sides-together (RST), and stitch the long top seam completely from one edge to the other,  as shown--


Press the seam flat, then press it open. Then turn the piece so that the Right Side is facing up, as shown--

-----------------------

 The following steps will be done on both sides, for each collar point, when making a collar. 

However, just one side will be shown here to demonstrate the technique.

-----------------------


STEP 1--   Cut a piece of thread about 15-20" long and fold it so there is a loop on one end, as shown-- 


STEP 2--  Lay the folded thread exactly in the "well" of the seam, with a generous portion of the LOOPED side going off the edge, as shown--


STEP 3-- Fold the collar Right Sides Together, matching the short side seams of the collar, and "trapping" the folded thread INSIDE, snugged-up against the line of stitching. (The looped side sticks out beyond the edges), as shown--


 STEP 4-- Move it to the machine...but before any stitching is done, lift up one layer of the collar and make sure that piece of thread is still right against the seam, as shown below. If it isn't, use your fingernail to nudge it into place.


Now carefully match the short edges of the collar, and stitch the seam. IMPORTANT-- Because the thread loop must be secured when this seam is sewn..Stitch the First Inch of This Seam with VERY SMALL/Short /Tiny  STITCHES.   (I use 22 stitches per inch, the number 1 stitch length setting on my machine) ...then change back to your regular stitch length, and finish sewing the short end of the collar.  Notice that the looped side of the thread is still sticking out beyond the edges--


STEP 5-- After the side of the collar is stitched, carefully trim the seam allowances as shown below. (Make Sure NOT to Cut THE THREAD LOOP!  Repeat...Move that loop out of the way before trimming!)   
Yes, this is all the "point trimming" that is needed...trust me.


----- REPEAT Steps 1-5 on the Other Side of the Collar -----

Here is the really fun "OH My Gosh !" Step---

Do this separately for each Point....

Reach INSIDE the collar and grasp BOTH of the 2 thread TAILS.
 (NO! NOT the loop! Grab BOTH of the loose threads inside!)


 Keep Pulling BOTH of those 2 thread tails....
Gently keep Pulling BOTH of those thread tails....

And keep pulling BOTH of those 2 thread tails until the collar point is turned out completely--


WOOT !  LOOK AT THAT POINT !

Now to get rid of the thread...Just pull ONE of the thread tails....until the last of it slips through and out.


Here is an extreme close-up of the collar Point....BEFORE is has even been pressed and edge-stitched... No Humps, No Lumps, No unsightly Bumps!  Once turned, the 1/4-inch seam allowances "fit and fill" the point...stopping the "Tip Flip" so often seen in "made-at-home" Collars.


So...do you think you might give this fast and easy method a try when making a collar?    If you do, I suggest making a quick "mock-up" with scrap fabric (you can skip the interfacing)  to practice the thread-loop technique.


Labels: , ,

What do you think? Please add a comment by clicking here--> 136 comments


Site Meter