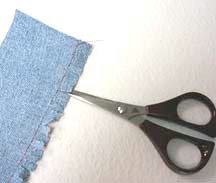
To "CHIP FRINGE", edge-stitch the desired depth of finished fringe, then clip to stitching line at quarter-inch intervals. In this case I wanted to fringe a denim applique to put on a child's sweatshirt. So after I embroidered the square, I stitched about 1/2" from the edge around 4 sides. After clipping, the applique was attached to the shirt following the stitching lines. After washing, the fabric "chips" away, leaving a fashionable soft fringed edge. This technique is especially useful when you are not sure the fabric is perfectly 'on-grain'. "Chipping" the fringe rather than raveling the edge assures the fringe depth will be straight and even!

Labels: Tips / Techniques


10 Comments:
Pam you are so clever!!! Your instructions are clear and I will be trying this technique. One question is there any fabric this would NOT work on?
Hi Tracy...
Thanx for your comment. This will work on most any fabric...knits will "curl" on the cross-grain rather than fringe...which can be fun along a T-shirt hem! The finer the thread count (smoother fabric tightly woven), the more "soft and fuzzy" the after-washed fringe will be. Always try a scrap piece...fringe/wash/dry to see if you like the effect.
Pam
I really want to try this, Pam. Thanks so much for the info.
Billie
Very cute idea, and very practical! Great instructional photos too.
Very cute idea. I have seen block fringing on fleece and this reminds me of that but I never would have thought of using this idea on a fabric that would ravel and then washing it to get the fringe. You are such a font of great ideas! Great instructions and photos also.
Pam, I think this would be really cute on the edge of a pair childs shorts. Also on the sleeve edges, and bottom of a top, possibly even at the neckline. I am going to experiment with this one. Thanks for the great idea.
Gloria H.
Dear Pam,
I read your idea, liked it, and then realized when reading another person's question that I have used this technique myself. I had a very tightly woven poly which I wanted to fringe, but it became a real pain - I clipped it and pulled on the clips, etc. and got the look I wanted without tearing my hair out!
Thanks for bringing this to my attention again!
LOVE your BLOG!!
Marsha from SewZine :-)
Thanks for the tip.
Pam: As usual, your knowledge and generosity has given us all another great tip. Thanks for sharing. :) i
Great tip Pam. Something to remember, I appreciate it.
Post a Comment
<< Home