OTC-011 Off The Cuff ~Sewing Style~: June 2005 <body><script type="text/javascript"> function setAttributeOnload(object, attribute, val) { if(window.addEventListener) { window.addEventListener('load', function(){ object[attribute] = val; }, false); } else { window.attachEvent('onload', function(){ object[attribute] = val; }); } } </script> <div id="navbar-iframe-container"></div> <script type="text/javascript" src="https://apis.google.com/js/platform.js"></script> <script type="text/javascript"> gapi.load("gapi.iframes:gapi.iframes.style.bubble", function() { if (gapi.iframes && gapi.iframes.getContext) { gapi.iframes.getContext().openChild({ url: 'https://www.blogger.com/navbar/10604511?origin\x3dhttp://off-the-cuff-style.blogspot.com', where: document.getElementById("navbar-iframe-container"), id: "navbar-iframe" }); } }); </script>

6/30/2005

BACHELOR PLEAT (TM)...Revisited

MORE ABOUT the BACHELOR PLEAT (TM)...

Recently I've had some additional questions about the shirt detail I call the "Bachelor Pleat".

"Is the name trademarked, or the actual pleat?"

...Just the name.

"Isn't this just an inverted box-pleat with an insert?"

...Well, not "just" a box pleat. What differentiates this pleat is how it is finessed. Please note the photograph below. The back of a Bachelor Pleat shirt is shown, along with a close-up of the area where the Back meets the Yoke (click on the photo to see detail, use "back button" to return).
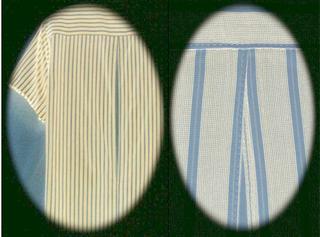


First, note the pleat folds. Both the inner and outer folds are edge-stitched along their entire length before the pleat is stitched to the yoke. Now look closely at the area right where the pleat joins the yoke. See the slight overlap? It's very tiny, but one side of the pleat overlaps the other by a miniscule amount. Why? It helps the pleat lay smoothly when the shirt is worn, and strengthens the pleat where it meets the yoke.

"Why is it called a Bachelor Pleat?"

...I first introduced shirts with this pleat detail during the 1980's. One of my clients told me how convenient this design is for bachelors like himself, because he could just take the shirt out of the clothes-dryer and put it on....with no ironing! I've called this design detail The Bachelor Pleat (TM) ever since.


Labels: ,

What do you think? Please add a comment by clicking here--> 4 comments

6/27/2005

The Question: WHAT'S THE POINT?


The Answer: One of the most frustrating aspects of constructing a collar.

The white collar point shown here has a very narrow point. A collar with a such a sharp angle can be very challenging.

This is my "Shirtmaker's Formula" for achieving a crisp sharp point with no lumps or bumps:

A Good Pattern + Plenty of Practice + Good Interfacing = A Professional Collar every time!

Labels: , , ,

What do you think? Please add a comment by clicking here--> 2 comments

6/05/2005


What Your Mama Never Told You About Sewing...

How To Pre-Wash Fabric!

Most modern sewists know the importance of washing fabric before cutting a pattern and constructing a garment. A pre-wash will rid fabric of mill sizing chemicals and any excess dye, and perhaps most importantly it will reduce the chances of the finished garment shrinking.

What is the best way to pre-wash fabric? Does it matter what soap is used? How hot the water is? You bet it does! I have found that the following methods give me consistent results every time:

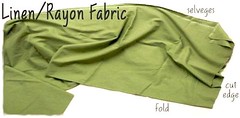
For Denim, Linen, Hemp and their blends, I wash the raw yardage as ruthlessly as I can, even if I will be more gentle with the finished garment. Hot water, plus a soap like Synthrapol will both soften the fiber and keep any excess dye suspended so that it goes down the drain rather than settle back into the fabric.

Additionally, I splash about 8 ounces of plain vinegar into the wash water along with the soap. I like the way the acidity softens the fabric and seems to help stave off future wrinkles.

It's a good idea to always test a scrap before preparing the entire length of fabric for the complete pre-wash...because while these methods have always worked very well for me, your mileage may vary!

Labels:

What do you think? Please add a comment by clicking here--> 21 comments

Fabric Takes the Plunge


There are some easy extra steps to take before your fashion fabric takes the plunge. A little preparation now will help keep the fabric from twisting and pulling as it goes through the wash cycle:

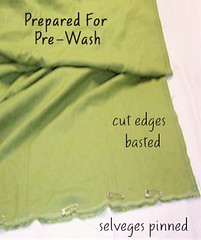
Open up the fabric to its full width. Next, fold the fabric opposite of the way it came off the bolt, matching up the full width of both cut edges. At the sewing machine, baste these edges together. Back at your table, smooth out the fabric, and align the selveges. Now, pin the selveges together with safety pins. Your fabric will now be open, folded in half, stitched together at one end, and pinned together on each side.


Essentially what you have done is reduce the length of fabric that will be manipulated in the wash. It will be far less likely to twist, allowing all of the fabric to be thoroughly washed and most importantly, rinsed of all soap.

Labels:

What do you think? Please add a comment by clicking here--> 8 comments


Site Meter