OTC-011 Off The Cuff ~Sewing Style~ <body><script type="text/javascript"> function setAttributeOnload(object, attribute, val) { if(window.addEventListener) { window.addEventListener('load', function(){ object[attribute] = val; }, false); } else { window.attachEvent('onload', function(){ object[attribute] = val; }); } } </script> <div id="navbar-iframe-container"></div> <script type="text/javascript" src="https://apis.google.com/js/platform.js"></script> <script type="text/javascript"> gapi.load("gapi.iframes:gapi.iframes.style.bubble", function() { if (gapi.iframes && gapi.iframes.getContext) { gapi.iframes.getContext().openChild({ url: 'https://www.blogger.com/navbar/10604511?origin\x3dhttp://off-the-cuff-style.blogspot.com', where: document.getElementById("navbar-iframe-container"), id: "navbar-iframe" }); } }); </script>

10/08/2012

Perfect Collar Points...A Shirtmaker's "Secret" Technique

"Secret" in this case meaning that after all these years
I am finally sharing one of the ways I achieve
 "As close to perfect as possible" Collar Points
on the shirts that I design and sew for my clients.
(Extreme close-up of a Collar point)


This amazingly simple Collar Point technique is used by many Custom Shirtmakers all over the world.  Like many of the techniques I use, it was learned during my Tailoring and ShirtMaking Apprenticeship.

There are certain techniques that Custom-ShirtMakers use to get professional results, and this is one of them.  Before I get to the tutorial, please note that there are a few things that (almost all) Custom ShirtMakers "Always do", and "Never do".  We TURN collars, we do NOT "poke" them out with pointy objects, or any other object, template or gadget. Also, when we want a Point, we SEW a Point...we do NOT pivot taking 2 stitches. And we NEVER sew a collar with a 5/8-inch seam allowance, because it wastes time and fabric.

That said...if you Pivot and Poke and use 5/8-inch seams,  and are happy with your results.....I am NOT the self-appointed "Point Police Officer"!   So carry on...and disregard what follows.   :)

If you want your collar points to be perfect every time, with very little effort....here is the method that most of my professional ShirtMaking colleagues and I use with great success...even on the thickest shirt fabrics. In fact, the fabric shown in this demonstration is a thicker than usual, double-weave wool/cotton herringbone shirting fabric.

The first step to a great collar is to reduce the seam allowance of your collar pattern piece to 1/4-inch (Please note that you will also have to change the shirt-body neck edge seam allowances to 1/4-inch).  

 Then cut 2 collar pieces, and Interface one of them as shown below. Generally, the top collar is interfaced. For a softer look, interface the bottom collar or interface both for a very crisp collar. The interfacing shown here is Pro-Woven Light Crisp Fusible Interfacing, from www.FashionSewingSupply.com.) I will elaborate about interfacing techniques another time....today it is all about The Point.   

So to continue, shown below are 2 collar pieces with 1/4-inch seam allowances--

 (All photos may be "clicked" to enlarge)


Next, Place the collar pieces right-sides-together (RST), and stitch the long top seam completely from one edge to the other,  as shown--


Press the seam flat, then press it open. Then turn the piece so that the Right Side is facing up, as shown--

-----------------------

 The following steps will be done on both sides, for each collar point, when making a collar. 

However, just one side will be shown here to demonstrate the technique.

-----------------------


STEP 1--   Cut a piece of thread about 15-20" long and fold it so there is a loop on one end, as shown-- 


STEP 2--  Lay the folded thread exactly in the "well" of the seam, with a generous portion of the LOOPED side going off the edge, as shown--


STEP 3-- Fold the collar Right Sides Together, matching the short side seams of the collar, and "trapping" the folded thread INSIDE, snugged-up against the line of stitching. (The looped side sticks out beyond the edges), as shown--


 STEP 4-- Move it to the machine...but before any stitching is done, lift up one layer of the collar and make sure that piece of thread is still right against the seam, as shown below. If it isn't, use your fingernail to nudge it into place.


Now carefully match the short edges of the collar, and stitch the seam. IMPORTANT-- Because the thread loop must be secured when this seam is sewn..Stitch the First Inch of This Seam with VERY SMALL/Short /Tiny  STITCHES.   (I use 22 stitches per inch, the number 1 stitch length setting on my machine) ...then change back to your regular stitch length, and finish sewing the short end of the collar.  Notice that the looped side of the thread is still sticking out beyond the edges--


STEP 5-- After the side of the collar is stitched, carefully trim the seam allowances as shown below. (Make Sure NOT to Cut THE THREAD LOOP!  Repeat...Move that loop out of the way before trimming!)   
Yes, this is all the "point trimming" that is needed...trust me.


----- REPEAT Steps 1-5 on the Other Side of the Collar -----

Here is the really fun "OH My Gosh !" Step---

Do this separately for each Point....

Reach INSIDE the collar and grasp BOTH of the 2 thread TAILS.
 (NO! NOT the loop! Grab BOTH of the loose threads inside!)


 Keep Pulling BOTH of those 2 thread tails....
Gently keep Pulling BOTH of those thread tails....

And keep pulling BOTH of those 2 thread tails until the collar point is turned out completely--


WOOT !  LOOK AT THAT POINT !

Now to get rid of the thread...Just pull ONE of the thread tails....until the last of it slips through and out.


Here is an extreme close-up of the collar Point....BEFORE is has even been pressed and edge-stitched... No Humps, No Lumps, No unsightly Bumps!  Once turned, the 1/4-inch seam allowances "fit and fill" the point...stopping the "Tip Flip" so often seen in "made-at-home" Collars.


So...do you think you might give this fast and easy method a try when making a collar?    If you do, I suggest making a quick "mock-up" with scrap fabric (you can skip the interfacing)  to practice the thread-loop technique.


Labels: , ,

What do you think? Please add a comment by clicking here--> 136 comments

10/01/2009

A Special Shirt Collar...and its Pattern

Many of my clients remark that the collars of the shirts I design are very comfortable and that they don't have to fuss with them. That's because I specifically design shirt collars to follow the natural curves of the neck and shoulder.

Take a close look at the collar on the denim shirt I am currently making, shown below.  Most (if not all) commercial shirt patterns have collars with top edges that are just straight across or that have one long slight curve.  However, as you can see...I have drafted my collar pattern with curves that follow the natural shape of the body.  SEWING NOTE-This collar has been interfaced with Pro-Weft Fusible Interfacing from ~Fashion Sewing Supply~.

Here is the pattern draft, first shown as a half-pattern, 
then again below as the full draft.

~ Click on photos to enlarge, click browser "Back" button to return to this page ~


Note that the bottom edge of each pattern shown is the neck edge, and that the pattern has been drafted with 3/8" seam allowances. It has been placed on a 1-inch square grid so that you can see the scale.  You are welcome to copy the pattern...however if you use my draft and post a photo of a shirt made with it, please link back to this post, and/or reference it. Thank-you...and I hope that you enjoy using this draft !

I've been asked about the collar stand (band) pattern that I usually use with the collar draft I showed above. Almost any stand can be used with this collar, as long as you draft the collar wide enough to cover the width of the stand (band).
So, here it is...you will notice it is fairly standard. 
It really is the refined shape of the collar (shown above) that allows it to fall so elegantly.
~ Click on photos to enlarge, click browser "Back" button to return to this page ~

Labels: , , ,

What do you think? Please add a comment by clicking here--> 26 comments

6/19/2009

Vintage Shirt....So Far, So Good!

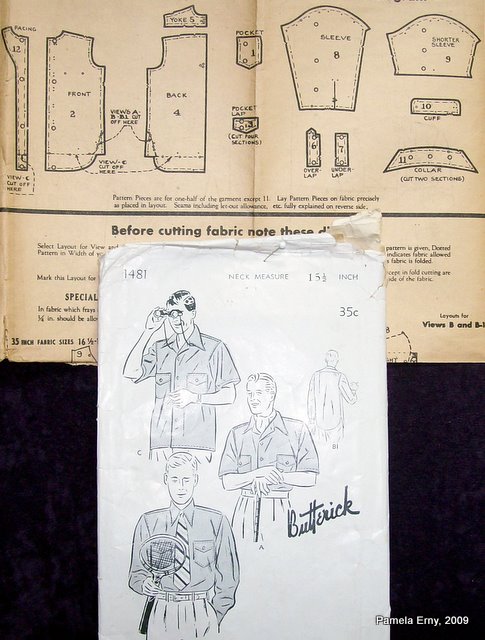
I am very pleased with the way the vintage mens shirt pattern I chose to make for part of DH Roger's Birthday present is coming along. Although his birthday was yesterday....age is just a number, right? :)

So..here is what I have completed so far: Pockets attached, Back Yoke and Shoulder seams sewn, Collar made and attached and the Facings attached.

Below are 2 "looks". The collar is laid flat in the first photo, and in the second photo, the collar is "rolled". Please bear in mind as you look at these photos, that this is a "work in progress" and hasn't yet had a final press. Yes, the collar is the same length on both sides...it appears longer on one side because the point of the collar is right against the black of the print fabric.

So which look do like the most? The flat collar, or the one with a roll?


SEWING NOTES : Pockets cut on Bias, Collar and Facings interfaced with PRO-SHEER ELEGANCE Fusible Interfacing from ~Fashion Sewing Supply~

Amy asked an interesting question:

"...I like both collars, but I think I favor the rolled. Is there a difference in the way they will be sewn or can he choose which way he wants to wear it?"

If he decides he likes the rolled look, all it will take is a few stitches. But not at the place you might expect. :) Unlike a "button down shirt" where small buttons hold the collar roll, this type of collar is secured at center back to "hold the roll".

Here's why and how: When a convertible collar like this one lays flat, it sits slightly below the seam that attaches it to the neckline of the shirt-back. To hold a roll in a convertible collar, a ShirtMaker (this time little ole me, lol) matches the bottom edge of the collar to the stitching line EXACTLY where the "well" of the seam that attaches the collar to the back neck is located (at center back). Then from the wrong side of the shirt, a few stitches are taken to hold it there. And that's all it takes to "hold the roll."


Karla also asked a thoughtful question:

"...if one were to conceal a tiny snap at the CB of the collar, with the other side of the snap at the seamline on the shirt, would that have the same effect as taking those few stitches? Another possibility - thread loop concealed in the collar seam and a tiny hook on the underside of the collar? The advantages (IMO) would be leaving the collar style up to the wearer and allowing the collar to be ironed while it was flattened - and I am all about making ironing easier."

Sure Karla...that can be done. I'd probably go with a very small snap, rather than a thread loop/hook/eye...I think it would be more stable. Of course, care would have to be taken when pressing the shirt and collar so that an imprint of the snap would not be transferred to the collar.
If Roger decides he likes the roll collar...I'll make sure to take it out of the dryer as soon as it's dry. Then I'll put the shirt on a hangar, button the top button, and shoot some steam into the rolled collar and immediately smooth it with my hands.

Labels: , ,

What do you think? Please add a comment by clicking here--> 17 comments

6/11/2009

The BETTER Pattern...and Why

This is the pattern I chose for Roger's shirt.

Winning Pattern

And here's why....

It is the most "elegant" draft among the group of patterns shown in yesterday's post (below). What do I mean by "elegant" ? It has to do with the shape of the pattern pieces.

The separate facing piece gives me the option of using a contrast fabric.

The yoke is curved enough to flow smoothly against the body, but not so much to "ripple" when it is joined to the back.

Now take a close look at the yoke piece (#5). Do you see the very subtle curve of the shoulder line? When joined to the straight front shoulder, it will raise the back of the shirt ever-so-slightly, allowing it to flow smoothly over the body's shoulder-blades.

Next, the sleeves...those beautifully drafted sleeves! A nice slope down in front, and just enough of a rounded shape along the back 2/3 of the cap. Why does this matter? For the short sleeve shirt I plan to make, this higher cap will mitigate a short sleeve's tendency to "wing out". With the coarse cotton fabric I've chosen to use for this shirt, this is very important because I cannot count on the drape of the fabric to help the sleeves fall in soft folds.

Finally, the collar. Notice its delicious curves! It will lay smoothly against the body's neck and collar-bone...and eliminate the tendency that some shirt collars have to "stack" (ride up on the neck).


Contrast the "elegant" draft above to this draft,
which is OK...but just OK.


Not Chosen

The main reason this shirt pattern was not chosen, is because it is "flat".
Flat yoke, flat sleeve cap, flat collar. In my opinion, the first shirt pattern is superior. While there is nothing really "wrong" with this pattern, the first one shown is just more "elegantly" drafted.
---------------------------------------------------------------------------------

I was asked, "
Pam, If we take a "flat" pattern and add the little refinements you mentioned - curved front yoke seam, curved shirt back, more sleeve cap height - will we improve an ordinary pattern, or just make a serious mess of it?"

While you can make changes to a pattern that is already drafted, you need to be careful.
"LESS IS MORE." Small changes, like very gently curving the back seam (where it joins the yoke) can be done successfully. Bear in mind that this particular change will lengthen that part of the seam, and you will need to ease it to the yoke, or take up a bit more in the back pleat so that it fits the yoke. Adding height to the sleeve cap is possible, again if done with restraint. If drastic changes are made to the shape of the sleeve cap, changes need to be made to the armscye...and that's where making refinements to patterns can quickly get out of hand. Lastly, curving in the shoulder seam of the back yoke can be done, again, with restraint....it needs to be a very shallow (no more than 3/16") "scoop"...otherwise the back will pull up oddly from the underarm point to the shoulder after the shirt is completely sewn.

Labels: ,

What do you think? Please add a comment by clicking here--> 21 comments

4/12/2009

HotPatterns Sunshine Tops...Step by Step

Two SunshineTops !

I have found my "make it 10 times" Summer Top! This pattern fits and flatters so well, that I've already made two. The first, from heather gray Cotton/Lycra Jersey and the other from Cotton/Lycra Jersey print. The print version has an inset neckband made from lightweight Irish Linen.

HotPatterns #1071,
Weekender Sunshine Tops


The HotPatterns team has made 2 terrific descriptive videos about this pattern...here are the links:

SUNSHINE TOP VIDEO, Part 1

SUNSHINE TOP VIDEO, Part 2


Pattern Description from the envelope-

You won’t believe how much mileage you’ll get from these great tops until you make them yourself! These tops are designed for T-shirt or knit fabrics with a little stretch. Try beading the neckband or add beads to the tunic drawstring for a pretty look. Relaxed, scoop-neck Tops are gathered onto a deep neckband at the front ...mix & match lengths & sleeve styles for your perfect top. Tank is sleeveless with a ribbed hip band, T-shirt has cap sleeves and finishes at the lower hip, and Tunic has short sleeves and applied drawstring casing. Try these lovely tops with simple pants, skirts or shorts, under your favorite jackets or cardigans, or team them with your jeans for a great casual outfit.

This a very easy pattern to construct. However, I've seen some questions about it on various sewing forums, so I took pics of the sewing sequence as I constructed the first top:


1. Interface wrong side of one set of the neckbands, then stitch their shoulder seams. You now have a set of neckline bands...The Interfaced Under-Band, and the Upper-Band.


2. Place the bands RIGHT SIDES TOGETHER, and stitch the inner circle. Then clip the curve. Now you have ONE Neckline Band.


3. Under-stitch the the seam allowances to the Interfaced side of the Neckline Band.


4. Match the edges of the Neckline Band, WRONG SIDES TOGETHER, and press.


5. Sew the front bodice pieces Right Sides Together at the shoulder seams. Gather the front neckline between the notches.


6. Match the RIGHT side of the Neck-Band to the RIGHT side of the neck opening, matching the notches and adjusting the gathers as needed. Stitch the Neck-Band to the shirt through all layers.


7. This is what the sewn neckline of the Sunshine Top will look like from the Right Side.
8. The last steps are attaching the sleeves and stitching the side seams and hems as you would with any simple top or T-shirt.

SEWING NOTES: Pattern from HotPatterns, Pro-Sheer Elegance Interfacing from Fashion Sewing Supply, Fabric from my stash.

Labels: , , , ,

What do you think? Please add a comment by clicking here--> 30 comments

3/09/2009

"It's Crowded in Here" ...How to Draft a Better Collar Pattern

Recently I've been asked by several people through email for shirtmaking tips. So here is a short tutorial that I originally wrote way back in 2005, that some may have missed--


~~~~~

It's no wonder some collars have their allowances "all in a bunch" ...there isn't enough room in the point!


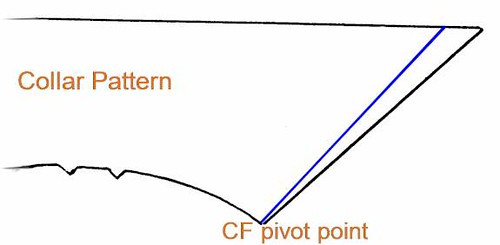
One way to help collar seam allowances have the room they need to stay nice and flat with no lumps is to "open" the point of the collar pattern.


Notice the diagram of the collar pattern shown to the left. The black outline is the original pattern. The blue line shows how to alter the angle of the point.


The method is easy:


  • Trace a copy of the pattern, *without* seam allowances.
  • Locate the neck-edge Center Front. This will be your "pivot point", as shown.
  • Make a mark, 1/8" to 1/4" -IN- from the collar's -TOP- edge point.
  • Draw a line from the neck-edge -CF point- up to the mark made at the collar pattern's TOP edge...shown as the blue line in the diagram.
  • Cut along this newly drawn line to complete the pattern alteration. Don't forget to add seam allowances!


The length and shape of the neck-edge of the pattern has not changed, all the "parts" will stitch together as usual. This simple method will work with any collar, including shirt collars that are attached to a stand. Changing the angle of the point by such a small increment will not affect the collar's "fall". Remember, all that's been done is a very slight change to the angle of the collar point, giving its seam allowances more room to settle flat and smooth when the collar is stitched and turned.


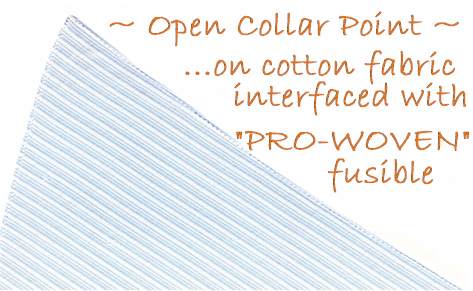
The blue shirt collar shown to the left is an example of how sharp and smooth a collar can be when the angle of the point is opened a bit. Of course, there are other techniques that help a shirt/blouse collar look sharp and professional, but changing the pattern is a good place to start!
SEWING NOTES- Sewn collar shown above is interfaced with Pro-Woven Shirt-Crisp Fusible Interfacing from ~Fashion Sewing Supply~

Labels: ,

What do you think? Please add a comment by clicking here--> 6 comments

2/11/2009

How to Sew a One Piece "Collar Plus Stand"


This shirt has a collar pattern that combines both the collar and stand as one pattern piece.

While I would normally redraft the pattern to separate the stand from the collar, this time I decided to sew it "as is"....since it seems to be making a come-back in many shirt and blouse patterns.


While this "combined" collar rarely rolls nicely and tends not to hold its shape well...there are some ways to make it work.


Here's how:

First, fuse Pro-Woven Shirt Crisp Fusible Interfacing, cut on the BIAS to the UNDER Collar. Notice that the seam allowances have been trimmed from the interfacing. Cutting the interfacing on the bias will "encourage" the collar to roll smoothly.


Next, Fuse a strip of Pro-Woven Shirt Crisp Fusible Interfacing, cut on the STRAIGHT grain, to the "false" collar stand area of the UNDER Collar, as shown below. Fuse it right on top of the first Interfacing.


Now, on the UPPER collar piece...fuse a strip of ProWoven Shirt Crisp Fusible, cut on the STRAIGHT grain to the "false" collar stand portion of the piece, shown below. ONLY the "stand" is interfaced on the UPPER collar.


When the collar is stitched, the extra strips of  ProWoven Shirt Crisp Fusible Interfacing that were fused to the "false" stands, add extra body to the area, and act like a "hinge".


This encourages the collar to roll into position as naturally as possible with this kind of "all-in-one" collar plus stand draft.

Labels: , ,

What do you think? Please add a comment by clicking here--> 10 comments

11/13/2008

Twisted "Draped Cowl" Tutorial

This is a quick stylish variation on a drape-front (true Cowl) silhouette that can be done in just minutes!

~~~~~~~~~~~~~~~~~~~~~~~~~~~


First, start with a drape-front cowl (photo #1) already in your wardrobe, or make one with the many patterns that exist for this style.

As shown In photo #2, turn the garment inside out and flip the facing up to expose the wrong side of front of the top.


Next, pinch some fabric near center front, twist it a bit, and hold the “pinched” fabric with a rubber band, as shown in photo #3. Later, if you want to make this design change permanent, the 'twist' can be stitched. Or just remove the band, and you have your original draped cowl!
Note: A small clear "ponytail" band works well for this!


Now turn down the facing to cover the banded fabric, as shown in photo #4.


As shown in photo #5, when the garment is turned right-side-out, the twisted detail becomes a new interesting design feature of the top!


Where you pinch and band the fabric is totally up to you: higher, lower, to the left or right of center, etc. There are infinite possibilities for design variations like these.... Have fun!

Labels: , ,

What do you think? Please add a comment by clicking here--> 10 comments

7/25/2008

How to use The Collar Turning Clamp Tool To Make Perfect Collar Points


There are 2 ways that I use the Collar Clamp Tool to turn perfect collar points.

The method you choose will depend on the size of your collar, your fabric, and what you prefer and works best for you after trying both methods.


~
Method One ~


First, from the wrong side (obviously), fold both "point" seam allowances together, toward the collar and pinch them down with the Collar Clamp Tool. The jaws of the Collar Clamp Tool "click and lock" so the seam allowances are held securely and will not shift.


Next, simply lift one layer of the collar and turn it "up and over" the
Collar Clamp Tool.


After turning one side of the collar over the
Collar Clamp Tool, the tool is now inside the collar, still holding the seam allowances....and forming a perfect point. Simply "jiggle" the handle of the Collar Clamp Tool to open and release. Remove the tool and press your perfect collar!


Notice how nice and sharp the point of this stretch poplin collar is...even before pressing, and with the tool still inside!


~~~~~~~~~


~ Method Two ~


First, from the wrong side (obviously), fold up about an inch on the under-collar, then insert one "jaw" of the open Collar Clamp Tool inside the collar as shown below.


Next, push the Collar Clamp Tool up inside the collar, with the inside "jaw" as far into the point as it will go.


Then fold the collar point seam allowances towards the collar, and pinch them down with the visible "jaw" of the Collar Clamp Tool.


Now, turn the collar right sides out, up and over the Collar Clamp Tool as shown below.


This is how your collar will look after turning it right side out over the
Collar Clamp Tool. Release the clamp by gently "jiggling" the handles, remove the tool and press your perfect collar!


Notice how nice and sharp the collar point is, even with the tool still inside!


The
Collar Turning Clamp Tool is available at ~Fashion Sewing Supply~.
Description: Custom Manufactured especially for sewing uses, the Collar Clamp Tool tool is 6" in total length. The serrated "jaws" are 1.75" long, and the tips are very small...about 2 tiny millimeters. The tool is solid stainless steel and has 3 graduated "clamping pressures" that lock, holding the fabric securely, until you are ready to release the "jaws."

Labels: , ,

What do you think? Please add a comment by clicking here--> 10 comments


Site Meter