OTC-011 Off The Cuff ~Sewing Style~: September 2009 <body><script type="text/javascript"> function setAttributeOnload(object, attribute, val) { if(window.addEventListener) { window.addEventListener('load', function(){ object[attribute] = val; }, false); } else { window.attachEvent('onload', function(){ object[attribute] = val; }); } } </script> <div id="navbar-iframe-container"></div> <script type="text/javascript" src="https://apis.google.com/js/platform.js"></script> <script type="text/javascript"> gapi.load("gapi.iframes:gapi.iframes.style.bubble", function() { if (gapi.iframes && gapi.iframes.getContext) { gapi.iframes.getContext().openChild({ url: 'https://www.blogger.com/navbar.g?targetBlogID\x3d10604511\x26blogName\x3dOff+The+Cuff+++++++++~Sewing+Style~\x26publishMode\x3dPUBLISH_MODE_BLOGSPOT\x26navbarType\x3dTAN\x26layoutType\x3dCLASSIC\x26searchRoot\x3dhttps://off-the-cuff-style.blogspot.com/search\x26blogLocale\x3den\x26v\x3d2\x26homepageUrl\x3dhttp://off-the-cuff-style.blogspot.com/\x26vt\x3d-8803809636534965068', where: document.getElementById("navbar-iframe-container"), id: "navbar-iframe" }); } }); </script>

9/26/2009

Slow Going...

Some, but not much progress on this denim shirt!
Denim Shirt Back
Here is the shirt back, right off the bed of the machine and hastily pinned to my photo-wall.  It features an inverted top-stitched box pleat. The pleat is open for only about 14 inches. This will allow the shirt to be worn "out", but it will also look neat (and not lumpy) should my client decide to tuck the shirt in.  You'll also notice that I've added a loop at CB.  
 

My plan is to attach the yoke tonight, and apply the plackets to the sleeves. If I feel really productive, the fronts will be attached, along with the collar unit. But then again, there's always tomorrow...

What do you think? Please add a comment by clicking here--> 4 comments

9/24/2009

Almost a Denim Shirt

Hastily pinned to the form, and still "Under Construction"....but so far I'm satisfied with how this denim shirt is turning out.

Almost ...A Denim Shirt
 It is being made for a favorite client of mine from a  fine cotton denim fabric that has a remarkably smooth reverse side. The reverse side of the fabric is so nice that it was able to utilize it for the front button plackets, collar stand and pocket.  I haven't cut the sleeve plackets  or cuffs yet, and I haven't yet decided to use the face or reverse side of the fabric for them.   

This is one of those shirts that can look "over-designed' or very contrived if too many contrasting elements are used.  So I'll play with scraps and see what happens. I hope to have this shirt finished within a few days.

Labels: ,

What do you think? Please add a comment by clicking here--> 8 comments

9/22/2009

The Waterfall Cowl Revisited...Changing the Pleat Position.

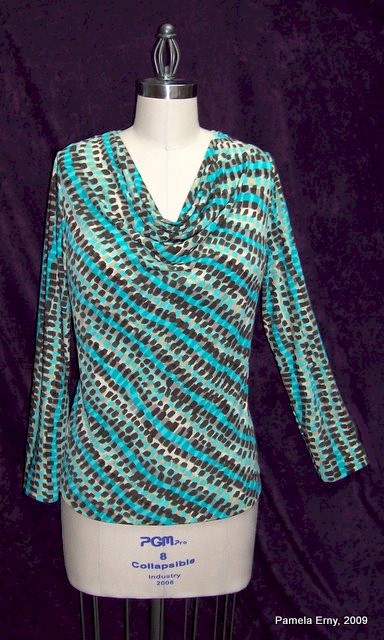
Here is another interpretation of Ottobre Woman Issue 2/2009, #5 ...the "Waterfall Blouse"
Ottobe "Waterfall" Drape Cowl

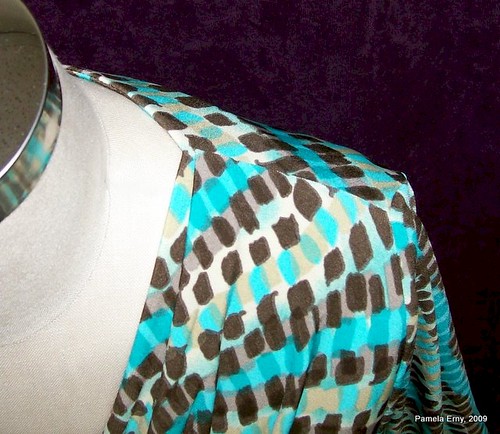
I always change the front shoulder gathers into a pleat when I make this style. On this newest top, I positioned the pleat near the shoulder point with the fold toward the shoulder seam. Orienting the pleat in this way results in a rounded drape...which I think suits the print of the fabric.


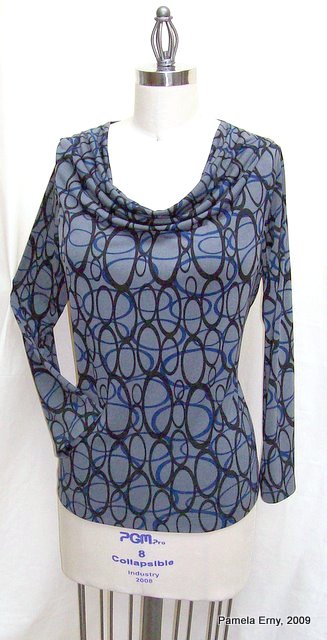
When I place the pleat near the neck edge , the drape folds form more of a V shape, as shown to the left (and in more detail further down the main page of the blog).


Both of these tops are welcome additions to my fall wardrobe.

Labels: ,

What do you think? Please add a comment by clicking here--> 16 comments

9/17/2009

Working with Diagonal Prints...The "Waterfall" Drape Cowl Top

I made this top for myself last night, and I am very pleased with the way it turned out!   It is the "Waterfall" top from Ottobre Woman, 2/2009 Style #5.  Fabric is Poly/Lycra Jersey purchased several months ago from Gorgeous Fabrics.  You can see that the print is diagonal, but after draping it on my dress form, I knew it would work well for this style.

OttobreDrapeCowlTop

However, a little diagonal print goes a long way. So after some thought I decided to cut the front and back on the straight grain, utilizing the diagonal "stripes" for the main body pieces.  That left the sleeves. Cutting the sleeves on the straight grain would have made for a dizzying garment...all those diagonal "stripes"...oy!  So, I cut the sleeves on the bias. That changed the orientation of the print...the "stripes" now straight, not angled. This gives the garment balance....I won't look as if I am leaning to one side, LOL!

Of course, me being me,  I couldn't just sew this pattern as directed.  The instructions have you gather the front shoulder to meet the back shoulder.  In my experience, this tends to make the front shoulder look "puffy" after it is sewn. So instead of gathers, I formed a pleat in the front shoulder seam, placing it close to the neck edge...as you can see in the photo, below.

NecklinePleatDetail-CowlTop
The way you orient this pleat affects the way the cowl will drape. Placing it close to the neck edge with the pleat folded towards the neck, encourages the cowl to drape into a soft "V".   Placing the pleat in the center of the seam and folding it towards the shoulder will encourage the cowl to drape in a more rounded shape.

So, don't be afraid of diagonal prints!  Changing the grain layout can produce a stylish and flattering garment.

Labels: , ,

What do you think? Please add a comment by clicking here--> 22 comments

9/14/2009

ProTailor Deluxe...A VERY special NEW Interfacing


“Pro-Tailor Deluxe” Fusible Interfacing
  comes to us from the very finest and Famous New York City Fashion Design workrooms. 
~Pro-Tailor Deluxe~ is a unique WARP-insertion Woven Fusible Interfacing that is made for tailoring applications like waistbands, collars, lapels, and all other traditional tailoring needs. It is almost like a blend of hair canvas and weft...It is slightly crisp, yet it's special weave gives it a very fluid hand..so hard to describe but simply devine!  Use it on wools,  suit-weight silks, medium linen, suit-weight microfiber, denim, gabardine, and more.
This medium weight Very drapey, Very special interfacing is stable and it Does Not Shrink.It is washable (delicate cycle) and may also be dry-cleaned.
 

This Medium weight VERY special Interfacing is stable and it DOES NOT SHRINK. It is washable (delicate cycle) and may also be dry-cleaned.
*** WIDE-WIDTH SAVINGS ***
Pro-TAILOR Deluxe FUSIBLE Interfacing
30% Stable Rayon, 70% Polyester -- 66" wide !

COLOR-- Dark Gray or Natural
Please Visit ~FASHION SEWING SUPPLY~ for more information.

Labels: ,

What do you think? Please add a comment by clicking here--> 0 comments

9/08/2009

Sneaky Sewing

I managed to sneak away to sew (YAY!) even though I should have been doing other things...

Willow's Rose top

This top for my 10 yr old niece Willow started with a basic t-shirt pattern that I changed to arrive at this design. In addition to curving the hem, I added double sleeves and solid pink curved bodice insets to both the front and back. All the edges were left raw, then just stretched and zig-zagged to "lettuce" (ruffle) them.

Labels:

What do you think? Please add a comment by clicking here--> 8 comments

9/07/2009

How To Pre-Shrink Wool... Fast and Easy at Home !

Many of us are ready to sew our fall wardrobes....me too!
So I thought you might be interested to know of an easy yet professional method that I use to pre-shrink wool yardage. It is one of many that I learned during my Tailor Apprenticeship.


First...the fabric! This luscious yardage is from my stash. One of the pieces was purchased from Gorgeous Fabrics several months ago. The green check yardage is 100% tropical wool crepe, the gray check yardage is a blend of wool and silk.

Why pay big bucks to take this fabric to the dry-cleaner to steam shrink it,
when we can do it easily at home?

Wool Yardage
Now the method:

  • Serge or zig-zag the raw cut edges of the fabric.
  • Next, wet some clean thick towels with HOT water until they are wet but not  dripping.
  • Now toss the hot wet towels and the fabric into your clothes dryer.
  • Set the dryer on HIGH heat, and tumble the fabric and hot wet towels for 30-40 minutes.
  • Take the yardage out of the dryer and lay it flat until it is cool.
Align CenterThat's it! Your wool yardage is now ready for the needle!
The appropriate interfacing for this fabric is PRO-WEFT Supreme Fusible Light.

Wool Yardage After SteamingAlign Center
As you can see above, this "Machine Shrink" method did not visibly change the fabric at all, and it's hand is still soft and smooth. However it did shrink. Each piece was 60" wide and 2 yards long before steam-shrinking. After, the green 100% wool piece measured 59.5" wide and is 2.5" shorter in length. The gray wool/silk blend is still 60" wide but 1.75" shorter in length.

Labels: ,

What do you think? Please add a comment by clicking here--> 58 comments


Site Meter