TUTORIAL- Design and Sew a Shirt with Bias Pleats !
This Distressed denim shirt features deep bias pleats
on the sleeves and pocket. Variations of this design have become favorites of many of my clients over the past year. The original blog post about this design detail was among my most popular. So with a few shirt-sew-along's going on at other blogs these days...I thought it was a good time
to offer it again, with a few revisions.
SEWING NOTES: This shirt is interfaced with PRO-WEFT Fusible,
a professional quality interfacing found exclusively at
~Fashion Sewing Supply~
a professional quality interfacing found exclusively at
~Fashion Sewing Supply~
____________________________
Adding a pleat to any pattern piece is very easy
when you use this method:
when you use this method:
1. Using a large piece of any pattern paper you like, make an even fold across it's width (this will be the upper side of the pleat). Then move the entire folded edge an even distance away from the first, and fold again (this will be the under-side of the pleat). I moved the first fold over by 1.25", to form a 1.25" pleat in the paper. Play with a small piece of scrap paper, if my written explanation is less than clear ;) It's easy, all we are doing is folding a pleat in a piece of pattern paper.
2. Next, just place your pattern piece on top of the pleated paper, with the pleat where you want it to be on your garment. In this case, I chose the sleeve piece pattern and placed it so that the pleat (the pre-folded paper) would be on the bias, then I cut out my "new" sleeve pattern.
3. This is what my sleeve looked like cut from the fabric. I took the photo after the upper pleat fold was pressed, so you could more easily see how the pleat is formed
.
.
4. This photo (#4) shows the completed pleat, with the folds edge-stitched. In this photo, as viewed from the right side, only the upper fold's edge-stitching is visible. The under-fold (back side) of the pleat is also edge-stitched. I like to edge-stitch pleats on shirts that I design not only because it is a nice decorative detail, but also because it makes pressing the shirt much easier after it has been laundered.
-------------------------
How to Control a Pleat...Invisibly !
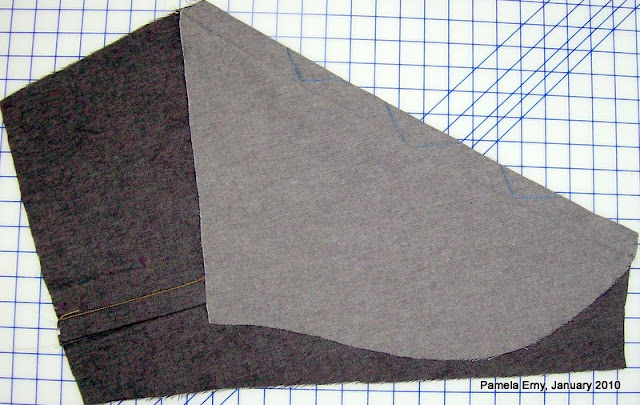
When there is a bias or horizontal pleat on a garment, the weight of the fabric below the pleat will tend to pull it down, and the pleat will sag and gape open. When the pleats are small and/or the fabric is lightweight, this is often not a problem. However, with pleat depths of one inch or more on medium or heavy fabric, this sagging can be quite an ugly problem. But as you can see in the photo of the finished shirt (above), the pleat is not gaping or sagging. That is because the pleats have been "controlled", by span-stitching done on the under-fold (back side), as shown in this next photo--
To control this bias pleat, I made a series of 3 wide "V" shaped stitch spans on the under-pleat fold (that I highlighted in blue pencil so that you can more easily see them). Each extend from the edge of the under-pleat fold to within 1/4" of the upper pleat fold. While it may be a little distracting to understand from the photo alone, if you make up a quick sample of any pleat from scrap fabric, and do this "V" shaped Span Stitching as shown, it will become clear how it works to control the pleat.
Please note that these pleats are NOT functional pleats..they are decorative only. So restricting how much they are allowed to open will make no functional difference at all. As you can see from the photo of the completed shirt, the pleats still appear to be quite deep. They are just "not allowed" to gape open because of this inner, invisible/hidden stitching.
So the next time you make a shirt, why not try something a little different by adding some of your own interesting design details...like pleats in unexpected places !
And...if you like these little tutorials of mine, please vote for me by clicking the black/red "Seamingly" Vote box to the left on the side-bar...thanks :)
Please note that these pleats are NOT functional pleats..they are decorative only. So restricting how much they are allowed to open will make no functional difference at all. As you can see from the photo of the completed shirt, the pleats still appear to be quite deep. They are just "not allowed" to gape open because of this inner, invisible/hidden stitching.
So the next time you make a shirt, why not try something a little different by adding some of your own interesting design details...like pleats in unexpected places !
Labels: Professional Sewing Supplies, Shirt Designs, SHIRT Sewing Tutorials


4 Comments:
Pam, this is fabulous! I'm going to use it on my next shirt. Thank you!
Wow! Brilliant! I can't wait to use this technique. Thanks, so much, Pam.
That is so cool!! My mind is spinning with the possibilities!!
I linked to your tutorial over at Craft Gossip Sewing:
http://sewing.craftgossip.com/tutorial-decorative-diagonal-pleats/2011/01/09/
--Anne
How sweet! When I look at the side view it reminds me of a caplet, love it!
Post a Comment
<< Home