OTC-011 Off The Cuff ~Sewing Style~: September 2011 <body><script type="text/javascript"> function setAttributeOnload(object, attribute, val) { if(window.addEventListener) { window.addEventListener('load', function(){ object[attribute] = val; }, false); } else { window.attachEvent('onload', function(){ object[attribute] = val; }); } } </script> <div id="navbar-iframe-container"></div> <script type="text/javascript" src="https://apis.google.com/js/platform.js"></script> <script type="text/javascript"> gapi.load("gapi.iframes:gapi.iframes.style.bubble", function() { if (gapi.iframes && gapi.iframes.getContext) { gapi.iframes.getContext().openChild({ url: 'https://www.blogger.com/navbar/10604511?origin\x3dhttp://off-the-cuff-style.blogspot.com', where: document.getElementById("navbar-iframe-container"), id: "navbar-iframe" }); } }); </script>

9/29/2011

Contour Shirt with a "Set-Back" Collar...Design and Drafting Notes


This shirt of my original design, is the latest made for a client who prefers a slim-cut shirt, or what is known to Tailors and Shirt-makers as a "Contour" shirt.  This contour shirt is made from cotton poplin sateen shirting fabric that has a slight ombre effect. It features a banded angle-edge pocket, a cross-cut front button placket, and sleeves with wide cross-cut plackets and an inverted box pleat at the cuffs. Additionally, the cross-cut collar has been designed so that it "sets back" on the stand about 3/4" more than usual.

So...what is a "slim-cut" (contour) shirt?   What it isn't is a precise set of steps and measurements that are set in stone.  The specs of "slim-cut" (contour) will vary depending on the designer and who is doing the drafting.  I start with with my regular shirt block with straight side seams, then I take out some of the fullness by curving the side seams.  I raise the armscye point, then finish by correcting and smoothing the new curve.  When the armscye point is raised, it makes the arm "hole" smaller, so a new sleeve with a smaller-circumference (slimmer cut!) needs to be drafted.  I draft the sleeve with almost no ease. Yes you read that right...I draft the sleeve with no more than 1/2" of ease. It just isn't necessary. Too much ease makes for a messy flat-felled sewn finish.  One other thing...I draft my Contour Shirt Back without a CB pleat.

I have not yet mentioned making slimmer/contoured changes to the shirt Front and Back at the shoulders (the yoke). That is because I already draft my regular shirt block with a natural shoulder slope and length.  My standard shirt block is not loose on the upper chest/shoulder and the sleeve does not drop of the shoulder, so it needs no adjustments when I draft a contour shirt.

You may be wondering why I have not given you precise measurements, like "raise the armscye by 1/2", or "curve the side seams in by 3/4".  I am not being secretive :)  It is because I have no idea what the specs of your existing shirt pattern may be.  You either need to copy a slim-cut shirt that you like, or make a muslin of the shirt pattern that you regularly use, and pinch out the fullness and experiment with raising the armscye point a little bit at a time. 

A good menswear drafting book helps...I highly recommend this one, it  has been my go-to reference since the early 80's-- 
 
Fundamentals of  Men's Fashion Design A Guide To Casual Clothes Edmund B Roberts and Gary Onishenko.  Fairchild Publications.  
 The only book reference number on my copy is: Standard Book Number-- 87005-5143
So if you are interested in this book, a search at your favorite book-seller by Title and Author may be better than using the number.


For more on sleeve cap ease, don't miss this fantastic post by renown clothing industry expert, Kathleen Fasanella.

SEWING NOTES:  Collar and Cuffs interfaced with PRO-WOVEN Shirt-CRISP Interfacing from  Fashion Sewing Supply  Buttons are the 40-count Designer Shirt Button Set in color "Choco-Toffee" from Fashion Sewing Supply.

Labels: , , ,

What do you think? Please add a comment by clicking here--> 16 comments

9/23/2011

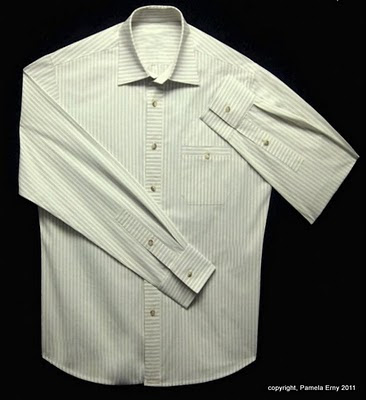
Shirt with Cross-Cut Collar


 I just had a few moments to slap attempt to carefully pin this new shirt design onto my photo-wall and snap a pic before we needed to box it up for the mail-carrier who was very patiently waiting for us to get our act together ;)
So...please forgive the wrinkles ?

As crummy as the photograph is, I am very happy with this shirt. It is an original design for a very special client and features design details that I think work together nicely.  The collar is cut on the cross-grain, and is shaped so that the collar stripes intersect at a right-angle with the stripes on the shirt front.  The left front button placket is also cut on the cross-grain. I mirrored this detail on the extra-wide sleeve plackets and the banded pocket.

Now that this shirt is on its way to my client...it's on to the next.  But I think I'll finally take some time to sew for myself this weekend! I desperately need new pants and some tops. Client work can wait until Monday, don't you think?

SEWING NOTES:  Collar and Cuffs interfaced with "Pro-Woven Shirt Crisp Fusible", and "Latte" Color Designer Shirt Buttons both from www.FashionSewingSupply.com  Cotton Poplin shirt fabric is from my shirting stash.

Labels:

What do you think? Please add a comment by clicking here--> 14 comments

9/19/2011

Shirt Collar Construction, a Quick Tutorial for Better Collar Points...

Over the years I've found that I get the sharpest and strongest Collar points if I seal the point "area" before and after it is sewn. It not only helps to have sealed fabric when I turn the collar...my clients get a shirt collar that is far less likely to fray over time.  Here's what we do in my ~Off The Cuff~ ShirtMaking studio when making collars from Cotton or Linen fabrics:

After the collar is interfaced with Pro-Woven Shirt Crisp, I saturate all 4 of the point "areas"  (two each, upper and under collar) with seam sealant. Then...and this is important...to prevent any darkening or shadows from the sealant, I dry the wet sealed areas right away by pressing with a very warm iron.  (Note-- Make sure the seam sealant will NOT change the color of your fabric by testing on a scrap piece before applying to your collar pieces!)

Then, after the collar is stitched...one more drop of seam sealant is applied to just the area where the stitching intersects (at the very points of the collar)...to seal the stitches. And again, it is dried quickly with a warm iron.  Note-- This sealing procedure is also done on the Shirt Cuffs.

Now the collar is ready to be turned and then attached to the stand...with collar points that will endure even the harshest commercial laundry!

SEWING NOTES: Collar Interfaced with Pro-Woven Shirt Crisp Interfacing from  Fashion Sewing Supply.

Labels:

What do you think? Please add a comment by clicking here--> 11 comments

9/18/2011

New distresing technique? Umm...No....

I was looking forward to finishing this shirt this morning, photographing it for you to see, and sending it to my client tomorrow bright and early tomorrow morning.   
And then....


...As I was standing there looking at it, my hand cramped (from dystonia..a nasty side-effect from medication), and OMG I dropped my coffee cup !
This shirt is a total loss, and I have to start from the beginning with new fabric...sigh.
Oh well, it could have been worse...I could have spilled coffee on my hand-drafted paper pattern, or my hand might have cramped as I was walking near the sewing machines.   But oh what a beautiful shirt this wudda-cudda-shudda been !

What do you think? Please add a comment by clicking here--> 20 comments

9/09/2011

I Love Brown Boxes, don't you?

Well...I love them when they are filled with gorgeous fabrics! 

And they literally are GorgeousFabrics.com fabrics: the solids are bottom weight for pants, and the amazing knit prints will make  beautiful new tops and tunics for me to wear this fall and winter.  I'm really psyched to sew!    
Of course the sewing will have to wait until all the interfacing orders piled on my desk are shipped...but sewing sure is a great incentive to work long days and get my work done!

Labels:

What do you think? Please add a comment by clicking here--> 4 comments

9/04/2011

A New W-M-Distraction!

The newest addition to my "Weapons of Much Distraction"
 It's a Kenmore 158-2142, a sweet power-house of a machine from my late Mother-in-law's estate. It's a very heavy all-metal machine that runs beautifully...and has the manual, all the cams, and lots of accessories. It's one of the low-shank Kenmores, so specialty feet will be easy to come by.   I just love new toys...don't you?

What do you think? Please add a comment by clicking here--> 8 comments


Site Meter