Perfect Collar Points...A Shirtmaker's "Secret" Technique
This amazingly simple Collar Point technique is used by many Custom Shirtmakers all over the world. Like many of the techniques I use, it was learned during my Tailoring and ShirtMaking Apprenticeship.
There are certain techniques that Custom-ShirtMakers use to get professional results, and this is one of them. Before I get to the tutorial, please note that there are a few things that (almost all) Custom ShirtMakers "Always do", and "Never do". We TURN collars, we do NOT "poke" them out with pointy objects, or any other object, template or gadget. Also, when we want a Point, we SEW a Point...we do NOT pivot taking 2 stitches. And we NEVER sew a collar with a 5/8-inch seam allowance, because it wastes time and fabric.
That said...if you Pivot and Poke and use 5/8-inch seams, and are happy with your results.....I am NOT the self-appointed "Point Police Officer"! So carry on...and disregard what follows. :)
If you want your collar points to be perfect every time, with very little effort....here is the method that most of my professional ShirtMaking colleagues and I use with great success...even on the thickest shirt fabrics. In fact, the fabric shown in this demonstration is a thicker than usual, double-weave wool/cotton herringbone shirting fabric.
The first step to a great collar is to reduce the seam allowance of your collar pattern piece to 1/4-inch (Please note that you will also have to change the shirt-body neck edge seam allowances to 1/4-inch).
Then cut 2 collar pieces, and Interface one of them as shown below. Generally, the top collar is interfaced. For a softer look, interface the bottom collar or interface both for a very crisp collar. The interfacing shown here is Pro-Woven Light Crisp Fusible Interfacing, from www.FashionSewingSupply.com.) I will elaborate about interfacing techniques another time....today it is all about The Point.
So to continue, shown below are 2 collar pieces with 1/4-inch seam allowances--
Next, Place the collar pieces right-sides-together (RST), and stitch the long top seam completely from one edge to the other, as shown--
Press the seam flat, then press it open. Then turn the piece so that the Right Side is facing up, as shown--
The following steps will be done on both sides, for each collar point, when making a collar.
However, just one side will be shown here to demonstrate the technique.
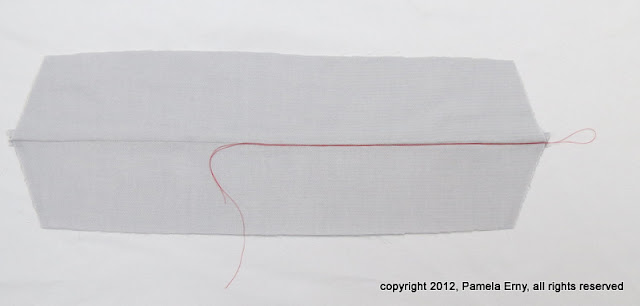
STEP 1-- Cut a piece of thread about 15-20" long and fold it so there is a loop on one end, as shown--
STEP 2-- Lay the folded thread exactly in the "well" of the seam, with a generous portion of the LOOPED side going off the edge, as shown--
STEP 3-- Fold the collar Right Sides Together, matching the short side seams of the collar, and "trapping" the folded thread INSIDE, snugged-up against the line of stitching. (The looped side sticks out beyond the edges), as shown--
STEP 4-- Move it to the machine...but before any stitching is done, lift up one layer of the collar and make sure that piece of thread is still right against the seam, as shown below. If it isn't, use your fingernail to nudge it into place.
Now carefully match the short edges of the collar, and stitch the seam. IMPORTANT-- Because the thread loop must be secured when this seam is sewn..Stitch the First Inch of This Seam with VERY SMALL/Short /Tiny STITCHES. (I use 22 stitches per inch, the number 1 stitch length setting on my machine) ...then change back to your regular stitch length, and finish sewing the short end of the collar. Notice that the looped side of the thread is still sticking out beyond the edges--
STEP 5-- After the side of the collar is stitched, carefully trim the seam allowances as shown below. (Make Sure NOT to Cut THE THREAD LOOP! Repeat...Move that loop out of the way before trimming!)
Yes, this is all the "point trimming" that is needed...trust me.
----- REPEAT Steps 1-5 on the Other Side of the Collar -----
Labels: Collars, SHIRT Sewing Tutorials, Shirtmaking Tips


