OTC-011 Off The Cuff ~Sewing Style~ <body><script type="text/javascript"> function setAttributeOnload(object, attribute, val) { if(window.addEventListener) { window.addEventListener('load', function(){ object[attribute] = val; }, false); } else { window.attachEvent('onload', function(){ object[attribute] = val; }); } } </script> <div id="navbar-iframe-container"></div> <script type="text/javascript" src="https://apis.google.com/js/platform.js"></script> <script type="text/javascript"> gapi.load("gapi.iframes:gapi.iframes.style.bubble", function() { if (gapi.iframes && gapi.iframes.getContext) { gapi.iframes.getContext().openChild({ url: 'https://www.blogger.com/navbar/10604511?origin\x3dhttp://off-the-cuff-style.blogspot.com', where: document.getElementById("navbar-iframe-container"), id: "navbar-iframe" }); } }); </script>

10/06/2014

Mini-TUTORIAL: Gathered or Puffed? It's all about the Seam Allowances!


The Riviera Annisette Top is one of my favorite styles from HotPatterns, and a perfect style to demonstrate how manipulating the shoulder seam allowances can change the look of a garment with a gathered sleeve.  This is a revised post (with some new information) of one I first published here in 2009...for my newer blog followers or those who may have missed it the first time. This is one of Hotpatterns' earlier styles, and it's on Clearance Sale at www.HotPatterns.com   ...but I am not sure how long it will be on sale or even still available. I am not affiliated, just a big fan.

So...about those seam allowances....

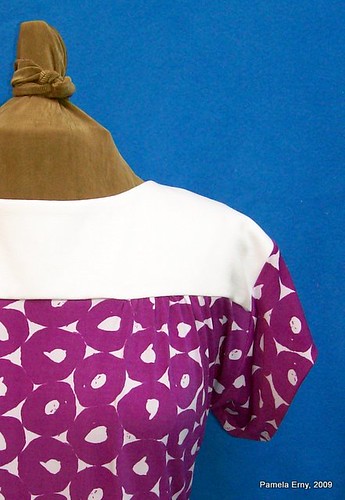
Take a close look at the blue top, above. It has gathered sleeve caps that are subtle. When you make a top, dress or blouse with sleeve cap gathers, you have a choice to make them "puffed" or simply gathered into soft folds. It's all about what direction the sleeve cap seam allowances are pressed. (more detailed close-up photos follow)


When the seam allowances are pressed towards the sleeve, you have puffy sleeves like the example to the right. 


Pressing the seam allowances towards the "body" (neckline) of the garment, results in sleeve cap gathers that lay  "flatter", and present more subtle folds.  It's a small detail, but one that is usually kinder to "women of a certain age."  (smile)


Directing the seam allowances of gathers one way or the other can make a difference in other areas of a garment, as well.  For instance, pressing the seam allowance of a gathered skirt of a dress "up" towards the bodice will encourage the gathers to lay more flat, in smooth folds. Pressing those same gathers "down" (towards the hem) will encourage them to puff-up. The same applies with sleeves gathers at the cuff....pressing the gathered edge towards the cuff will result in a smoother look, while pressing them "up" towards the sleeve will give the gathers a more pronounced puffy look.  It's all about what you want and prefer. So remember...despite what the pattern directions say, you do have a choice!

Sewing Notes: Fabric is a light sweater knit bought many years ago. The Yoke is interfaced with PRO-SHEER Elegance LIGHT Fusible Interfacing from  ~FASHION SEWING SUPPLY~


Labels: ,

What do you think? Please add a comment by clicking here--> 5 comments

7/18/2014

How to Sew a "Better" Elasticated Casing !


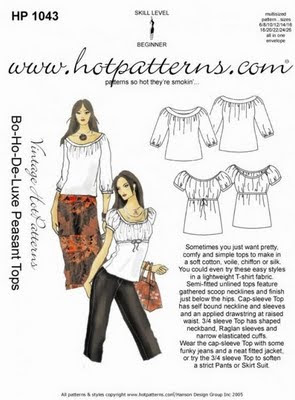
The blouse shown above in soft cotton batik is one that I made a few years ago from this now "vintage"  HotPatterns.com design that I tweaked a little bit to have a closer fit.  This exact HP style (shown below) has been re-designed and is now offered as the  HP1169 Classix Nouveau Refined Peasant Blouse...and can be seen here on the HotPatterns website.

http://hotpatterns.com

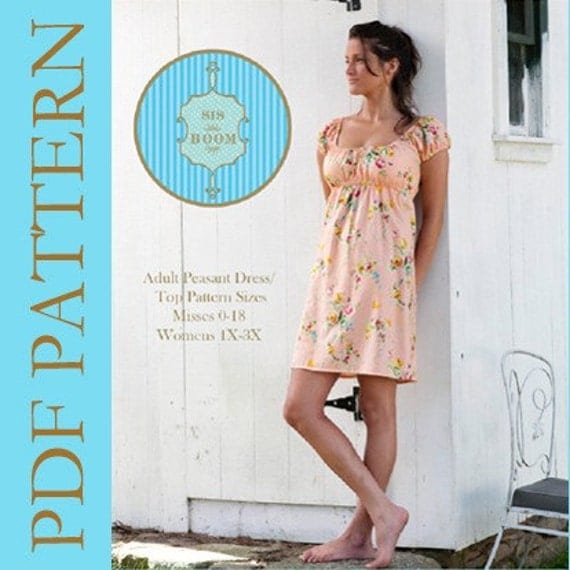
https://www.etsy.com/listing/29558029/womens-peasant-dress-pattern-sis-boom?ref=shop_home_active_9
Another great peasant-style top is this one from Carla Crim, "The Scientific Seamstress" 
 The basic differences between the 2 patterns is that the HotPatterns style has a lovely "couture-like" flowing silhouette, with sophisticated details.  The Meghan Peasant Pattern from "The Scientific Seamstress"   has a silhouette that is both relaxed yet fitted, with pretty sleeve style options, neckline options, and top-tunic-dress length options.  I've made them both, and I like the Hotpatterns style for soft flowing fabrics, and I like the Meghan for fabrics like lightweight cotton and soft washed linen.


OK..we know Elastic is on sale, we've got patterns to choose from...Now about those Elasticated Casings...

Making a casing for elastic is certainly one of our easier sewing tasks. Turn, stitch, insert elastic...done!  Sewn this conventional way, we end up with a perfectly acceptable casing that looks something like the photo below, after the elastic is inserted.  Fine...yet a little "bubbly and wobbly"...but something we have come to accept with elasticated casings.   
   (OK..a word here about "elasticated".  I am old enough to remember when *everyone* just said "elastic casing", then one day I started to hear elasticated this/elasticated that...so...today I choose to use the word, elasticated every so often...with a few plain "elastic casings" thrown in ;)  But yes, this is indeed just our old friend "the elastic casing" fancied up a bit)


By taking one additional construction step, you can achieve a "designer" look to an elastic casing garment. A very simple step that will result in a flat, even-edge casing every time, like the one in the finished garment shown....here is a close-up photo--  


So what's that extra construction step?  Edge-stitching!
After the casing is folded to the wrong side of the garment and stitched along the BOTTOM edge (leaving an opening to later insert the elastic, of course)....All that we need to do next to lend that "designer touch" is to edge-stitch the TOP fold of the casing...all the way around, as shown below--


By taking this one easy extra step, our elasticated casings lose the bubbles, 
and gain some designer panache!


Quick note from Pam....

Thank-you very much for shopping at my store and thank-you for continuing to follow my blog.  I have not blogged for a long time because of illness.  I am dealing with it in every positive way I possibly can, and I look forward to being able to teach you more "tricks of the shirt-making trade" as soon as possible.  Thanks again for continuing to follow me here and on Facebook. I appreciate it more than you know...and and I will be back...I promise  :)

Labels: , ,

What do you think? Please add a comment by clicking here--> 32 comments

2/10/2010

HotPatterns Princess Shirt, revisited in wool tweed.

This is my first version of the up-dated draft of  HotPatterns' Plain and Simple Princess Shirt.
It was designed for shirting-weight fabrics, but because I wanted to make a simple "shirt jacket", I used a lightweight wool tweed instead. And since I plan to wear this over another top, I added 1/4" of ease to each side seam and the sleeve seams. I wanted to add pockets to this shirt jacket, but unfortunately did not have enough fabric.

This pattern is a re-draft of one of  HotPatterns' first styles.  When comparing the original draft to this new one I was happy to discover that the changes were minor but ones that improved the fit, in my opinion. The most noticeable changes are a slightly lowered armscye, a slightly wider sleeve and the addition of a back neck facing.  Subtle but effective changes that I think I will really appreciate when I make this style in lightweight fabrics...and I will be making this style again. It is one of those great patterns from which you can get a lot of "style mileage".

Sewing notes: Facing and Collar interfaced with PRO-WEFT FUSIBLE from ~Fashion Sewing Supply~.

Labels:

What do you think? Please add a comment by clicking here--> 24 comments

11/30/2009

Gathered Sleeve or Puffed Sleeve? ...it's All About the Seam Allowances


First...Since many wondered what I'd be making with that luscious striped Japanese knit (shown in a previous post) , you'll see it pictured above, made into the HotPatterns Riviera AnnisetteTop. The Riviera Annisette Top has gathered sleeves, but I chose to alter the sleeve pattern and make long plain sleeves instead. Why? I just felt that there was enough interest in the fabric itself, and didn't want to muddy it up with more details.


Now to begin this discussion of gathered sleeve caps, take a look at the blue top, above. It has gathered sleeves that are very subtle. When you make a top, dress or blouse with sleeve cap gathers, you have a choice to make them "puffed" or simply gathered into soft folds. It's all about the way the sleeve cap seam allowances are pressed.


When the seam allowances are pressed towards the sleeve, you have puffy sleeves like the example to the right.  In my opinion, puffy sleeves are usually better suited to the very young...but to each her own :)


Pressing the seam allowances towards the "body" (neckline) of the garment, results in sleeve cap gathers that lay  "flatter", and present more subtle folds.  It's a small detail, but one that is usually kinder to a mature figure.


Directing the seam allowances of gathers one way or the other can make a difference in other areas of a garment. For instance, pressing the seam allowance of a gathered skirt of a dress "up" towards the bodice will encourage the gathers to lay more flat, in smooth folds. Pressing those same gathers "down" (towards the hem) , will encourage the gathers to puff-up.  It's all about the look you prefer...and now you know you have a choice.

Sewing Notes: Yokes on both of the tops shown interfaced with PRO-SHEER ELEGANCE Light Fusible Interfacing from  

Labels: , ,

What do you think? Please add a comment by clicking here--> 9 comments

11/22/2009

Empty Closet = Sewing New Tops


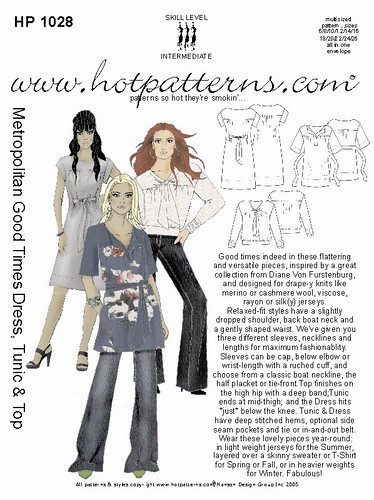
Prompted by the fact that I have almost nothing "nice" to wear this season, I managed to get some sewing done this week. Since I can only stand for limited amounts of time because of my injury, tracing new patterns is not an option for me for a while. So I used 2 of my tried and true patterns, HotPatterns Weekender Sunshine Top, and HotPatterns Metropolitan GoodTimes Top.
The gray Weekender Sunshine Top, shown above, is made from a luscious wool/cashmere blend sweater knit. I made the neckband a little wider and lengthened the short sleeves to full length. I am thrilled with the way it turned out..it feels so luxurious! If you have this pattern, do try it with long sleeves for the fall/winter. If you don't have this pattern, it's really worth a try. It's so flattering..makes your waist look tiny and that's always a good thing!   I made this style several times last spring, and wrote a step-by-step tutorial about how to sew it. It can be found HERE.

Earlier in the week, I made 2 versions of the Metropolitan GoodTimes Top. The olive green version is made from a wool/cashmere blend sweater knit. The blue print version is made from cotton/lycra jersey, and features shirred sleeves.  I am so happy to have some nice new tops...now I just have to muster up enough energy to sew a few more tops, some slacks, and I'll be all set for this season...maybe :)  
Sewing Notes: The band and yokes on all the tops are interfaced with Pro-Sheer Elegance Fusible Interfacing. The Sweater Knit yardage has been in my 'stash' for a long time, it was from 
Baer Fabrics, now out of business. 
The Cotton/Lycra Jersey is from Fabric.com.


Labels: ,

What do you think? Please add a comment by clicking here--> 22 comments

5/17/2009

Sewing Green....Literally


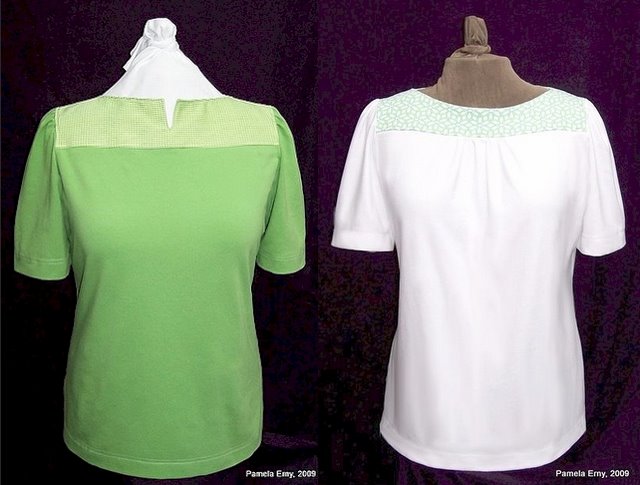
I love the color green. So much so that I have to watch that everything in my wardrobe isn't in some lovely shade of that color. But I hadn't yet made anything green this season. So I traced off the HotPatterns Riviera Annisette Top, and made two...one very green, the other with just a touch of green print on the yoke.

This top exceptionally well drafted,
with a nice neckline, and subtle shaping of the side seams.


Two HotPatterns AnnisetteTops

As usual, I couldn't stop myself from
adding some of my own design details:

The top on the left features a yoke made of silk dupionni with the body of the top in cotton/lycra jersey knit. I raised the neckline of this version, and added a CF slit. I wish I could say it was an intended "brilliant" design detail, LOL, but I can't. Because after raising the neckline and making the yoke from a woven fabric (when it was designed for knits) I needed to add a slit to get it over my head ! But I like the way it turned out...something a little different.

The top on the right was made entirely of cotton lycra knit. I added gathers at the CF. Why ? Just because I felt like it...
{ BIG GRIN }

SEWING NOTES: Yokes interfaced with PRO-SHEER ELEGANCE Fusible Interfacing from ~Fashion Sewing Supply~, Shoulder Seams pressed towards the body, so that the sleeve gathers would lay flat (rather than "puff up").

Labels: ,

What do you think? Please add a comment by clicking here--> 8 comments

5/05/2009

Hot Patterns "Metropolitan Good Times" Dress, Top, Tunic

Hot Patterns Metropolitan Goodtimes (Dress, Tunic, Top)

The "verdict" on this style from HotPatterns is that it's a winner!

But I must admit I had my doubts as I was tracing this pattern, because at first glance it looks like a collection of big rectangles. That is until I looked more closely to see the subtle shaping of the pieces. And it is this clever drafting that saves this top from being a "potato sack", like so many similar styles from the "Big 4" pattern companies.
Again, Trudy has used her talents to give true fashion panache to a simple style.


HP1028-METROPOLITAN GoodTimes

This pattern has many length, neckline, and sleeve variations. I chose to make the most simple variation...partly because I was using a bright busy print, and quite frankly I just wanted to sew something last night that would be quick to make!

This photo shows the front bodice gather detail....that is hard to see in the first photograph.

Hot Patterns Metropolitan Goodtimes (Dress, Tunic, Top)

I look forward to using this pattern again to make the tie-front style..then I'll have yet another nice top to wear this season !

SEWING NOTES: Poly/Lycra Jersey fabric from Gorgeous Fabrics, Yoke interfaced with
PRO-SHEER ELEGANCE Fusible Interfacing from ~Fashion Sewing Supply~

Labels: ,

What do you think? Please add a comment by clicking here--> 11 comments

4/12/2009

HotPatterns Sunshine Tops...Step by Step

Two SunshineTops !

I have found my "make it 10 times" Summer Top! This pattern fits and flatters so well, that I've already made two. The first, from heather gray Cotton/Lycra Jersey and the other from Cotton/Lycra Jersey print. The print version has an inset neckband made from lightweight Irish Linen.

HotPatterns #1071,
Weekender Sunshine Tops


The HotPatterns team has made 2 terrific descriptive videos about this pattern...here are the links:

SUNSHINE TOP VIDEO, Part 1

SUNSHINE TOP VIDEO, Part 2


Pattern Description from the envelope-

You won’t believe how much mileage you’ll get from these great tops until you make them yourself! These tops are designed for T-shirt or knit fabrics with a little stretch. Try beading the neckband or add beads to the tunic drawstring for a pretty look. Relaxed, scoop-neck Tops are gathered onto a deep neckband at the front ...mix & match lengths & sleeve styles for your perfect top. Tank is sleeveless with a ribbed hip band, T-shirt has cap sleeves and finishes at the lower hip, and Tunic has short sleeves and applied drawstring casing. Try these lovely tops with simple pants, skirts or shorts, under your favorite jackets or cardigans, or team them with your jeans for a great casual outfit.

This a very easy pattern to construct. However, I've seen some questions about it on various sewing forums, so I took pics of the sewing sequence as I constructed the first top:


1. Interface wrong side of one set of the neckbands, then stitch their shoulder seams. You now have a set of neckline bands...The Interfaced Under-Band, and the Upper-Band.


2. Place the bands RIGHT SIDES TOGETHER, and stitch the inner circle. Then clip the curve. Now you have ONE Neckline Band.


3. Under-stitch the the seam allowances to the Interfaced side of the Neckline Band.


4. Match the edges of the Neckline Band, WRONG SIDES TOGETHER, and press.


5. Sew the front bodice pieces Right Sides Together at the shoulder seams. Gather the front neckline between the notches.


6. Match the RIGHT side of the Neck-Band to the RIGHT side of the neck opening, matching the notches and adjusting the gathers as needed. Stitch the Neck-Band to the shirt through all layers.


7. This is what the sewn neckline of the Sunshine Top will look like from the Right Side.
8. The last steps are attaching the sleeves and stitching the side seams and hems as you would with any simple top or T-shirt.

SEWING NOTES: Pattern from HotPatterns, Pro-Sheer Elegance Interfacing from Fashion Sewing Supply, Fabric from my stash.

Labels: , , , ,

What do you think? Please add a comment by clicking here--> 30 comments

4/04/2009

A Super-Fantastic Pattern!

HotPatterns SuperFantastic Shirt_blog

Pattern Description:

"The Plain and Simple SuperFantastic Shirt", HotPatterns #1029

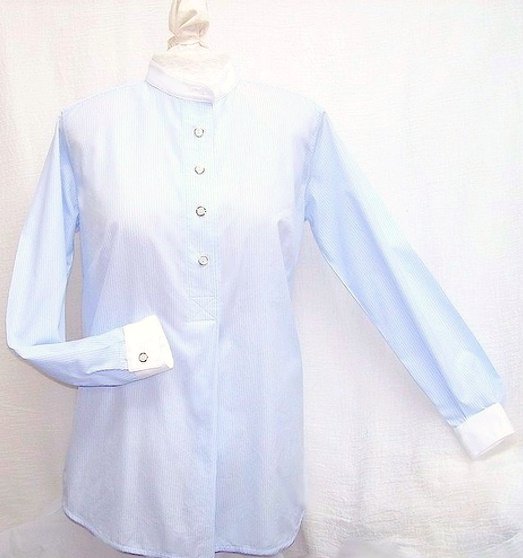
This style from HotPatterns is a relaxed-fit Shirt that has a classic yoke, slightly dropped shoulders and long sleeves with cuff and placket. The Shirt features a front half placket and pleat, and finishes at the lower hip with a curved shirt tail. You can choose the classic shirt collar and stand, or use the stand by itself for a funky Nehru collar.

Pattern Sizing:

Multisize 6-26


Were the instructions easy to follow?

Yes...Though basic, the instructions were very clear and easy to follow. You need to cut the across the top of one of the pattern sheets to separate the instructions from the main page, but it does not in any way interfere with the pattern pieces. In fact, I found it quite handy to have them available this way.


What did I particularly like about the pattern?

I really like this style and will be making it again in a few different fabrics with different collars and sleeve lengths. It is a wonderful wardrobe-building shirt that has a nice feminine drape because of bust darts, subtle side-seam shaping, and the lovely way the placket forms a body-skimming front pleat.

Fabric Used:
Very fine and delicate Swiss cotton shirting


Pattern Alterations or any design changes made:

I needed to make all my usual alterations because I am petite...barely 5' tall. I raised the darts, shortened the torso a little bit but left it at Tunic length, and shortened the sleeves.

Would I sew it again?

I will indeed sew it again... I
am especially looking forward to making this style with washed Silk Dupionni .

Conclusion:

This is a lovely modern and feminine shirt that is easy to sew, and is very figure-flattering. A nice bonus are the 3 videos about this style that the pattern designer made. They can be found on YouTube.com


YouTube Links For the SuperFantastic Shirt:


SuperFantastic Shirt, Part 1
SuperFantasticShirt, Part 2
SuperFantastic Shirt, Part 3


SEWING NOTES: Fabric from stash, Pro-Woven Fusible Interfacing and Buttons from ~Fashion Sewing Supply~

Labels: , ,

What do you think? Please add a comment by clicking here--> 15 comments

2/12/2009

A Fabulous TDF Designer Detail !

WOW...I can't wait to try this fabulous embellishment technique from Trudy, The Designer of HotPatterns !

The video below is the third in a series about the
HotPatterns Cabana T Shirt. Yes, you can view this one first
...as it is a demo of an embellishment technique.


But don't miss Part One and Part Two...where Trudy gives tips about the do's and dont's of wearing T-shirts, demonstrates using different colorways, and shows high-end "right off the runway" designer variations!


So have a look at Trudy's cool designer detail...
while I dash over to the HotPatterns site
and buy this pattern!

Labels: , ,

What do you think? Please add a comment by clicking here--> 4 comments

5/10/2008

How to Sew a Classic SHIRT COLLAR- 2) Attaching the collar-unit to the neck-edge.

Continuing with the construction of the shirt...it's time to attach the "Collar Unit" to the neck-edge.

PLEASE NOTE I AM DEMONSTRATING JUST ONE METHOD I UTILIZE TO SEW COLLARS TO SHIRTS. THERE ARE OTHER METHODS, THIS IS BUT ONE OF MANY.....


After gathering the fronts to fit the back shoulder (yoke)...the front, back, and yoke are completed and ready for the collar.


Match the center-back of the raw edge of the collar stand to the center-back of the garment's neck edge. Pin to hold.


Next, Match the center-front edges of the stand and blouse
EXACTLY.


Now, begin to stitch them together. Start at the edge and continue to stitch towards the center back, only for about ONE INCH. Then check to make sure the CF edges are still exactly even. It's much easier to remove one inch of stitching and re-align the edges now, rather than discover they are not even after the entire collar-band is stitched to the neckline!

Repeat on the other CF edge, then stitch the entire stand to the neckline.


Then tuck the seam allowances up and under the folded edge of the collar stand
.


Continue to tuck the seam allowances under the folded edge of the collar stand, just barely covering the stitching line. You may find that using a glue-stick is helpful to hold the folded edge in position.


Next at the machine, with the outside (right side) of the shirt facing up, begin to edge-stitch the band (collar stand) starting at center back as shown. Then continue to edge-stitch completely around the entire stand, ending where you began.


Now admire how nice your finished collar looks..inside and out!


( Interfaced with PRO-WOVEN Light Crisp FUSIBLE INTERFACING from www.Fashion Sewing Supply.com )

Labels: , ,

What do you think? Please add a comment by clicking here--> 13 comments

5/05/2008

How to Sew a Classic SHIRT COLLAR 1) Assembling the Collar Unit.

I usually sew the stand to the collar before attaching the complete "collar unit" to the neck-edge of the blouse. Please note that all collar seam allowances, the stand seam allowances, and the neck-edge seam allowances have been trimmed to 1/4" for ease of construction.


 Apply interfacing to  just one of the long collar stands.


Here is one piece of the collar-stand...the one that is not interfaced.  I have pressed up 1/4" on the straight edge of the stand as shown:


Next, I took an extra step and quickly basted this piece to the "UP-side / TOP side/ Right side / Public side" of the collar. This stand piece will be the "inner band" when the shirt is complete.


Then, I made a "collar sandwich"....with both the interfaced stand and the stand without interfacing matched right-sides-together, and the collar between them. I stitched them together along my previous line of stitching...using very small stitches when sewing the curved edges.


Here is a close-up of one end of
the stitched collar unit
ready to be turned and pressed.


After turning and pressing, here is the finished "Collar Unit"....ready to be sewn to the neck-edge of the blouse!


( Interfaced with PRO-WOVEN Light Crisp FUSIBLE INTERFACING from www.FashionSewingSupply.com )

Labels: , ,

What do you think? Please add a comment by clicking here--> 4 comments

4/26/2008

HotPatterns Plain and Simple Boxy Blouse, Let's Start!

As mentioned in a previous post, I am choosing to make the HotPatterns Boxy Blouse as the demonstration garment during my time as "Cheerleader" for the Yahoo Groups Creative Machine's "Shirt Challenge".

The fabric has been chosen...a fabulous shirting fabric from Gorgeous Fabrics (purchased quite a while ago). A navy, white, and peach stripe for the body and sleeves, with white collars and cuffs.


The fabric is pre-washed...all ready to go!

However after talking to the friend for whom I am making this shirt...she told me she would rather not have bust darts. That's just as well as I do not see her often enough to make dart fitting changes. So I turned the side bust dart into shoulder gathers with a very quick and easy method...a simple rotation of the side dart to the shoulder seam.

1. I traced a copy of the shirt-front.


2. Next, I marked a line from mid-shoulder to the dart tip.


3. The line was slashed to the tip of the dart.


4. Next the side bust dart was folded-out..."Auto-magically" transferring the fullness to the shoulder seam.


5. A scrap of paper was placed under the open shoulder wedge, and then the new shoulder-line was drawn.


6. The scrap paper was taped to the pattern, and the excess trimmed...to reveal the new shirt front. Now the pattern has gathers at the shoulder, rather than a bust dart.


Tonight I will cut out the pattern, and begin to sew!

Labels: ,

What do you think? Please add a comment by clicking here--> 1 comments


Site Meter