OTC-011 Off The Cuff ~Sewing Style~ <body><script type="text/javascript"> function setAttributeOnload(object, attribute, val) { if(window.addEventListener) { window.addEventListener('load', function(){ object[attribute] = val; }, false); } else { window.attachEvent('onload', function(){ object[attribute] = val; }); } } </script> <div id="navbar-iframe-container"></div> <script type="text/javascript" src="https://apis.google.com/js/platform.js"></script> <script type="text/javascript"> gapi.load("gapi.iframes:gapi.iframes.style.bubble", function() { if (gapi.iframes && gapi.iframes.getContext) { gapi.iframes.getContext().openChild({ url: 'https://www.blogger.com/navbar/10604511?origin\x3dhttp://off-the-cuff-style.blogspot.com', where: document.getElementById("navbar-iframe-container"), id: "navbar-iframe" }); } }); </script>

11/05/2011

Tutorial- The "Spiral" Cowl Collar


As promised, here is a tutorial for making a cowl collar that has been "Spiraled" so that it drapes in lovely gentle folds that hide the neckline seam, rather than just "flopping down" in the front.  On a recent garment, I showed you the Spiral Cowl Collar on a drapey Rayon knit fabric...this blue one is made from heavy cotton/lycra knit Velour.

There may be other ways to make a Spiral Cowl...this is how I do it...
(Click on any Photo to enlarge)


Start with any basic knit top garment that has a Jewel neckline, and sew the shoulder seams. You may then choose to lower the Front Neckline a little bit more like I did here. This is not an exact science. A rule of thumb is that the thinner the fabric, the higher the neckline can be...when a thicker knit fabric is used, It is best to scoop the neckline a little lower (unless you want a wide, high collar). When I make this cowl, I just scoop the neckline a random amount...different every time ;)


Next, cut a cowl collar that measures 12"-20" Long x the Neckline Circumference + Seam Allowance.        The stretch of the knit should run the WIDTH of the collar.
WIDTH = NECKLINE CIRCUMFERENCE  Then fold it Right Sides Together so that it looks like this photo --->
and stitch the long edges together, forming a "tube".


Then turn the tube right sides out, folding it in half to enclose the seam allowances. It will look like this, a "regular" cowl collar that we have all seen before :)   The seam is the Center Back of the Collar, and it has 2 layers..the inner layer and outer layer.


Next we will start to "Spiral" the Cowl Collar, by sliding the INNER CB seam and the OUTER CB seam APART  by 3"-6"   


Now just ignore that the Center Back seam allowances are no longer laying on top of each other, and match and join the cut edges of the collar together. Match them all the way around, ignoring the way that the folded edge of the Collar will  "Spiral"  :)  You can join the edges by pinning them, or as I usually do, by running a quick line of basting.


Now that we have "Spiraled" our Cowl Collar, we need to mark it's new Center Back, 
by placing a pin 1/2 way between the seams that were spread apart, as shown below. 


To attach the Spiraled Cowl Collar to the neckline of your top, start by marking both the collar and the neckline edge at their 4  "quarter-points" with pins.

Then drop the Collar inside the Neckline edge,  Right Sides Together, matching the center back point of the Spiral Cowl Collar to the center back of the Neckline.  Then match the center fronts, and lastly the side points.  Stitch the collar to the neckline.


Turn the bodice right-sides-out, and finish sewing the rest of your top. Your collar will look something like this from the front (depending on how you arrange the folds).


And something like this from the back...


I hope you all enjoy creating your own "Spiraled Cowl" !

Labels: ,

What do you think? Please add a comment by clicking here--> 25 comments

10/31/2011

A classic...The Spiral Cowl Collar


 Yes, I sewed for myself again!  Yes, it's yet another Cowl-neck tunic!
But before you think I am being redundant please remember:
  1. It's autumn, and I live near Buffalo....brrrr
  2. I have more than one ugly neck scar to hide.
This version features a applied cowl collar that has been "spiraled" before being sewn to the neckline. I love how a Spiral Cowl always drapes in nice even folds and covers the neck seam...rather than just "flopping down".  

Do we all know how to "spiral" a cowl ?  If you would like a quick tutorial, let me know in 'comments'...I'd be happy to snap some pics when I make another of this style in Stretch Velour ;)

Labels:

What do you think? Please add a comment by clicking here--> 39 comments

10/30/2011

Tutorial- Angled Ruche Cowl Collar Tunic


This tunic is the latest in the "OMG Pam is Sewing For Herself !" series of garments ;)  It is an original hand-drafted design of mine, and features a classic cowl collar that has been diagonally ruched. 
Here is a close-up of the finished collar...
^ Click to enlarge ^


Even though I drafted the pattern for my tunic, it is very easy to do with any pattern that has an applied cowl collar, like this style from Vogue, #8670.  

From cutting out the pattern pieces to wearing my top out to dinner...took less than 1.5 hours!   I enjoy "almost instant" sewing-gratification, don't you?


Here is how the Angled Ruche Cowl Collar is made...

First, stitch the long seam of the cowl collar. It will look similar to this--


For my tunic, I made the cowl collar "tube" using these measurements:
(20" long) x (the circumference of the neck edge + seam allowance).


< Click to enlarge


Next the collar was turned  WRONG sides together, hiding the seam allowances inside. Note--the seam is the CB of the cowl collar. 
Then a diagonal line was chalked across the Front of the collar at a random angle--

^ Click to enlarge ^


Following the chalked line, loose running stitches (using black thread) were worked through only the front layers of the collar. The stitches are about 1/2" long, and the line of stitching was anchored (knotted) at the bottom edge--
^ Click to enlarge ^

Next, the thread tail at the top of the collar was pulled to make the ruche, as shown below. Then several small stitches were taken and a small knot was made to secure the gathered (ruched) collar--
^ Click to enlarge ^


To attach the collar to the bodice, both the ruched cowl collar and the neck-edge of the bodice were marked at their 4 "quarter points" with pins--
^ Click to enlarge ^


The "Angled Ruche" cowl collar was attached to the neck-edge by matching the quarter-mark points (right side of collar to right side of bodice), then aligning all the edges as they were stitched together.       


All that was left to finish my "Angled Ruche Cowl" was setting the sleeves and stitching the hems :)

I will probably make another of this style soon,  perhaps positioning the ruche to the side (near the shoulder seam point) of the neckline...or maybe running 2 lines of ruching vertically at Center Front...or 2 lines in a \ / shape...or....  Well, the possibilities are endless!

Labels: ,

What do you think? Please add a comment by clicking here--> 17 comments

11/30/2009

Gathered Sleeve or Puffed Sleeve? ...it's All About the Seam Allowances


First...Since many wondered what I'd be making with that luscious striped Japanese knit (shown in a previous post) , you'll see it pictured above, made into the HotPatterns Riviera AnnisetteTop. The Riviera Annisette Top has gathered sleeves, but I chose to alter the sleeve pattern and make long plain sleeves instead. Why? I just felt that there was enough interest in the fabric itself, and didn't want to muddy it up with more details.


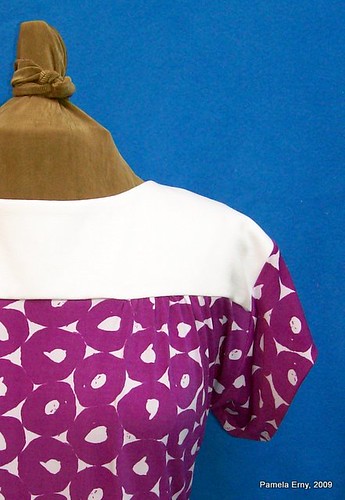
Now to begin this discussion of gathered sleeve caps, take a look at the blue top, above. It has gathered sleeves that are very subtle. When you make a top, dress or blouse with sleeve cap gathers, you have a choice to make them "puffed" or simply gathered into soft folds. It's all about the way the sleeve cap seam allowances are pressed.


When the seam allowances are pressed towards the sleeve, you have puffy sleeves like the example to the right.  In my opinion, puffy sleeves are usually better suited to the very young...but to each her own :)


Pressing the seam allowances towards the "body" (neckline) of the garment, results in sleeve cap gathers that lay  "flatter", and present more subtle folds.  It's a small detail, but one that is usually kinder to a mature figure.


Directing the seam allowances of gathers one way or the other can make a difference in other areas of a garment. For instance, pressing the seam allowance of a gathered skirt of a dress "up" towards the bodice will encourage the gathers to lay more flat, in smooth folds. Pressing those same gathers "down" (towards the hem) , will encourage the gathers to puff-up.  It's all about the look you prefer...and now you know you have a choice.

Sewing Notes: Yokes on both of the tops shown interfaced with PRO-SHEER ELEGANCE Light Fusible Interfacing from  

Labels: , ,

What do you think? Please add a comment by clicking here--> 9 comments

6/01/2009

A Shirt for Me ! ...with Release Tucks

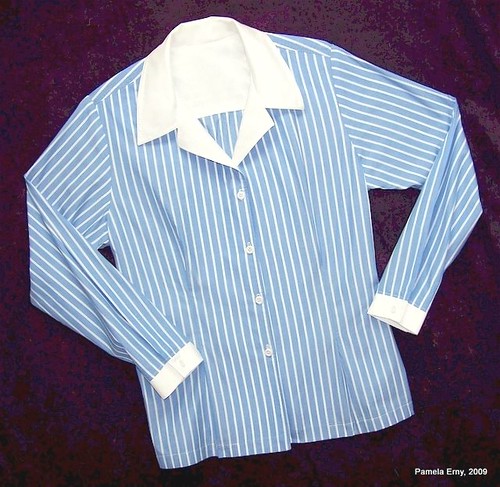
Pam's Blue Stripe Shirt with front "Release Tucks"

OK, I promise...
This is my last version of the Brensan Sew Simple Shirt...for a while.

On this shirt I added cuffs to the sleeves, and instead of sewing the vertical darts, I made "Release Tucks". Making release tucks is very easy to do...even on a shirt or blouse that does not have marked darts. And it can be done after the shirt is completely finished!

Just try the shirt on...inside out. Now pinch out about a 1/2-3/4 inch "tuck" near the waist area on each shirt front, and pin it vertically. Turn the shirt right side out and try it on, making adjustments if necessary. Next, from the wrong side stitch each tuck, with a simple straight line of stitching that is about 2-4 inches long.

Here's a quick photo of the shirt from the wrong side, showing one tuck sewn and pressed towards the center front.


SEWING NOTES: Collar, Cuffs, and Front Facing
interfaced with
PRO-SHEER ELEGANCE Fusible Interfacing from ~Fashion Sewing Supply~, Italian Cotton Shirting Fabric from my stash, Buttons from ~Fashion Sewing Supply~.

Labels: , ,

What do you think? Please add a comment by clicking here--> 15 comments

5/30/2009

Can you have too many white shirts ?

...I don't think so!

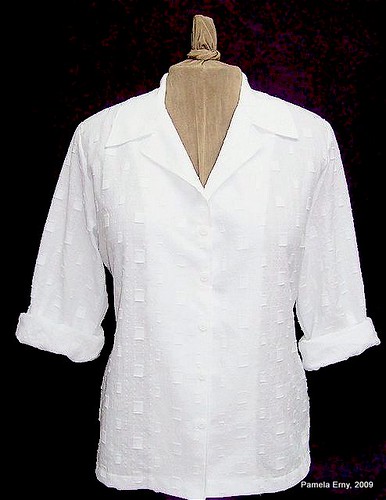
Pam's White Blouse

This is another version of the Brensan "Sew Simple Shirt"....this time with long sleeves, from a very soft, almost gauze-like novelty cotton fabric. The sleeves were made exactly per the pattern specifications, and are wide enough at the hemline to be able to roll up to elbow length. I plan to wear this blouse open over a white tank top, with jeans and white strappy sandals...for a breezy casual look.

I have yet another shirt cut from this pattern, a long sleeve version with sleeve cuffs from a beautiful Swiss cotton shirting. Then I will tear myself away from this pattern and move on to other things. Next up are 2 tailored linen jackets among the many sewing projects I have planned for June.

SEWING NOTES: I did make changes to this version of this blouse: I lengthened the collar by about 1/2" and did not sew the darts. Interfaced with ProSheer Elegance Fusible Interfacing from ~Fashion Sewing Supply~. Buttons from ~Fashion Sewing Supply~.

I've been asked some questions about this shirt--

When you say "lengthened the collar" - what do you mean?


On the first version of this shirt, the collar appeared a little short...it was wide enough, it just didn't appear long enough (just purely my perception). So this time I split the collar pattern at CB and added 1/2". Now it extends along the neckline a little further...1/4" on each side. It's really fine as drafted, I just wanted to make a little change.

Is the notch lower than it is on your first version?


I didn't change anything but the length of the collar. Although now the turnback facing ("lapel", "revers") is now shorter, because the collar is longer :) ....am I making sense? LOL

And when you plan to roll the sleeves, how do you do the seams -French seams? Flat-felled?


This time I did flat fell seams. Because the fabric is so light I was able to just turn both seam allowances and stitch them down, without first trimming one of them.

Labels: ,

What do you think? Please add a comment by clicking here--> 17 comments

5/17/2009

Sewing Green....Literally


I love the color green. So much so that I have to watch that everything in my wardrobe isn't in some lovely shade of that color. But I hadn't yet made anything green this season. So I traced off the HotPatterns Riviera Annisette Top, and made two...one very green, the other with just a touch of green print on the yoke.

This top exceptionally well drafted,
with a nice neckline, and subtle shaping of the side seams.


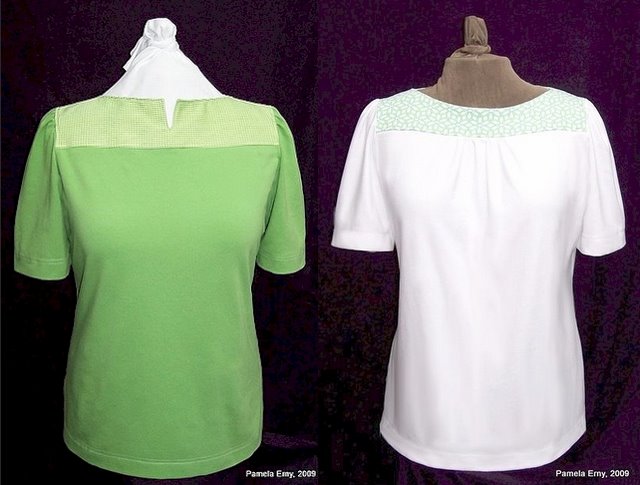
Two HotPatterns AnnisetteTops

As usual, I couldn't stop myself from
adding some of my own design details:

The top on the left features a yoke made of silk dupionni with the body of the top in cotton/lycra jersey knit. I raised the neckline of this version, and added a CF slit. I wish I could say it was an intended "brilliant" design detail, LOL, but I can't. Because after raising the neckline and making the yoke from a woven fabric (when it was designed for knits) I needed to add a slit to get it over my head ! But I like the way it turned out...something a little different.

The top on the right was made entirely of cotton lycra knit. I added gathers at the CF. Why ? Just because I felt like it...
{ BIG GRIN }

SEWING NOTES: Yokes interfaced with PRO-SHEER ELEGANCE Fusible Interfacing from ~Fashion Sewing Supply~, Shoulder Seams pressed towards the body, so that the sleeve gathers would lay flat (rather than "puff up").

Labels: ,

What do you think? Please add a comment by clicking here--> 8 comments

5/08/2009

Brensan Patterns "Sew Simple" Shirt


I needed a fast-to-make "Camp Shirt" pattern...now I have one!

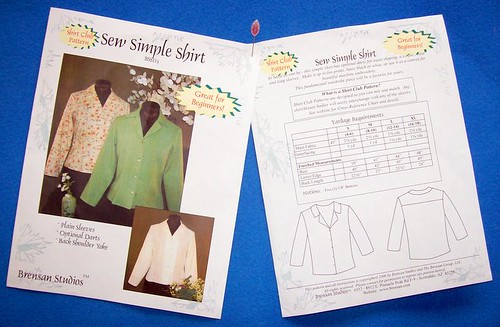
Brensan "Sew Simple" BlousePattern
The line drawing does not show the optional front and back darts.

I continue to be impressed by Brensan Studios patterns. While this draft is very basic, it is very well executed with optional front and back "fish-eye" darts and nice side-seam shaping. Simple yes...very simple...but well suited to adding your own details. For instance, the sleeves just beg for cuffs.

This version of the "Sew Simple" blouse was my test garment for this style. I'll be making it again in nicer fabric...this fabric was a cheap find (emphasis on the cheap)...but this shirt will be fine for everyday wear.
It fits exceptionally well.


Brensan Designs "Sew Simple" Blouse

You'll notice that the sleeves seem quite wide. That's because the pattern is drafted for long sleeves, and I decided to make short sleeves after the long ones were sewn.

Hah! You should have seen me in this fabric with long sleeves...I looked like a little tree..one that needed pruning, fast! So in order to narrow the newly hacked-off sleeves, I "pinched" out an inch and formed pleats. Then I secured them with slightly larger sized M-O-P buttons than those used on the shirt front. On future garments, I'll narrow the sleeve and raise the cap slightly...easy pattern alterations.


Brensan Designs "Sew Simple" Blouse-Sleeve

SEWING NOTES: In my opinion, when using cotton fabric for a style like this you need to affect the hand of the fabric as little as possible. I used PRO-SHEER ELEGANCE Fusible Interfacing from ~Fashion Sewing Supply~ because it is so exceptionally silky and soft.
Fabric is from the close-out section at JoAnn Fabrics, Mother-of-Pearl Buttons are from my stash.

Labels: , ,

What do you think? Please add a comment by clicking here--> 14 comments

5/05/2009

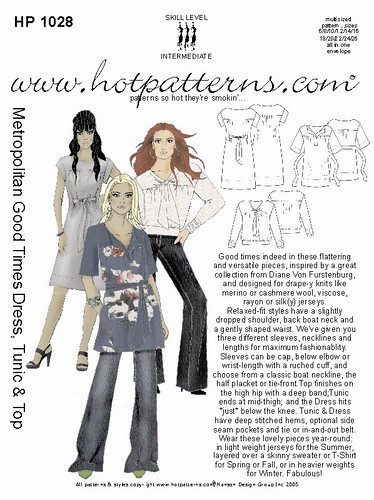
Hot Patterns "Metropolitan Good Times" Dress, Top, Tunic

Hot Patterns Metropolitan Goodtimes (Dress, Tunic, Top)

The "verdict" on this style from HotPatterns is that it's a winner!

But I must admit I had my doubts as I was tracing this pattern, because at first glance it looks like a collection of big rectangles. That is until I looked more closely to see the subtle shaping of the pieces. And it is this clever drafting that saves this top from being a "potato sack", like so many similar styles from the "Big 4" pattern companies.
Again, Trudy has used her talents to give true fashion panache to a simple style.


HP1028-METROPOLITAN GoodTimes

This pattern has many length, neckline, and sleeve variations. I chose to make the most simple variation...partly because I was using a bright busy print, and quite frankly I just wanted to sew something last night that would be quick to make!

This photo shows the front bodice gather detail....that is hard to see in the first photograph.

Hot Patterns Metropolitan Goodtimes (Dress, Tunic, Top)

I look forward to using this pattern again to make the tie-front style..then I'll have yet another nice top to wear this season !

SEWING NOTES: Poly/Lycra Jersey fabric from Gorgeous Fabrics, Yoke interfaced with
PRO-SHEER ELEGANCE Fusible Interfacing from ~Fashion Sewing Supply~

Labels: ,

What do you think? Please add a comment by clicking here--> 11 comments

4/27/2009

Brensan Patterns and the "Barcelona Blouse"

This is my first experience with Brensan Studio Patterns, and my first impression is a very good one! While these patterns seem marketed to the "wearable art /quilting cotton" arena, I think many of the silhouettes will work quite well when made from classic fashion fabrics.

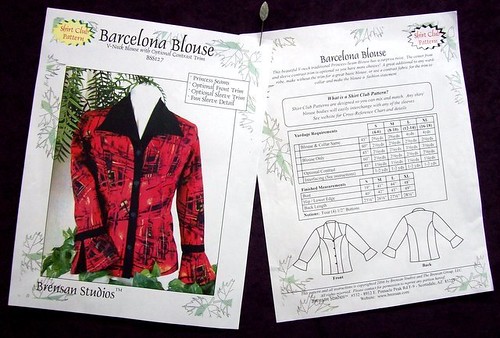
Below is a photo of the Barcelona Blouse Pattern Front and Back. Look past the rather garish red fabric, and notice the classic Princess blouse silhouette, with it's wing collar and split cuffs.


Brensan Barcelona Shirt Pattern

I chose to make mine from a white medium weight jacquard woven cotton/lycra blend fabric from Gorgeous Fabrics. While the garment looks a bit clumsy on my ancient dress form, the fit on me is perfect. I can see making a couple more of this style, utilizing the design options given in the pattern instruction sheets...a contrast bias cut front band and contrast collar. Silk Dupionni would work with this style, and perhaps I'll make another with short sleeves in Linen.

Brensan Barcelona Blouse

Please note that you are not seeing puckers...well you are, LOL, but they are the jacquard "highs and lows" of the fabric...not my sewing....really.

SEWING NOTES: Pattern Alterations- very few. I shortened the shoulders by 1/2" and the sleeves by 3/4". Shirt Collar and Cuffs interfaced with Pro-Sheer Elegance Fusible Interfacing, the back panel and fronts were faced with Pro-Woven Light Standard Sew-in Interfacing, both from ~Fashion Sewing Supply~. Buttons from ~Fashion Sewing Supply~.
Fashion fabric from Gorgeous Fabrics.

Labels: ,

What do you think? Please add a comment by clicking here--> 17 comments

10/01/2006

HOT PATTERNS Princess Shirt


This is my version of the Hot Patterns "Plain And Simple Princess Shirt", fashioned from buttery soft Ultra Suede. This garment is interfaced with Pro-Weft Fusible Interfacing.


While this shirt has basic princess style lines, the pattern is drafted in a sophisticated manner. Rather than the usual Convertible Collar/facing combo that is "supposed" to look like a lapel...this pattern is drafted with a classic tailored collar and lapel. This makes for a very smooth flat revers and a collar/lapel that rolls into perfect position and stays there!

~Click Photos To Enlarge~

I have made this style many times, in fabrics from denim, to silk, to the eggplant Ultra Suede pictured here. I highly recommend this pattern, and will continue to use it myself again and again because of the many style variations that are possible. Piped seams, slot seams, felled seams, bias cut, and contrasting color collar/lapels all represent interesting design opportunities!

Labels: , , ,

What do you think? Please add a comment by clicking here--> 9 comments


Site Meter