OTC-011 Off The Cuff ~Sewing Style~: April 2009 <body><script type="text/javascript"> function setAttributeOnload(object, attribute, val) { if(window.addEventListener) { window.addEventListener('load', function(){ object[attribute] = val; }, false); } else { window.attachEvent('onload', function(){ object[attribute] = val; }); } } </script> <div id="navbar-iframe-container"></div> <script type="text/javascript" src="https://apis.google.com/js/platform.js"></script> <script type="text/javascript"> gapi.load("gapi.iframes:gapi.iframes.style.bubble", function() { if (gapi.iframes && gapi.iframes.getContext) { gapi.iframes.getContext().openChild({ url: 'https://www.blogger.com/navbar/10604511?origin\x3dhttp://off-the-cuff-style.blogspot.com', where: document.getElementById("navbar-iframe-container"), id: "navbar-iframe" }); } }); </script>

4/27/2009

Brensan Patterns and the "Barcelona Blouse"

This is my first experience with Brensan Studio Patterns, and my first impression is a very good one! While these patterns seem marketed to the "wearable art /quilting cotton" arena, I think many of the silhouettes will work quite well when made from classic fashion fabrics.

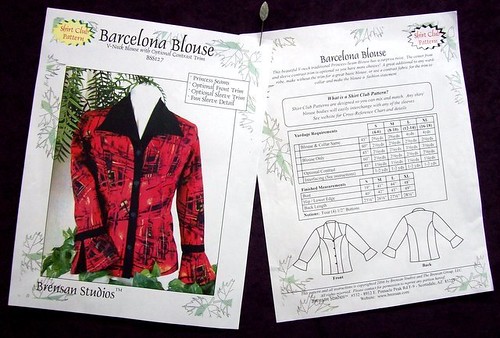
Below is a photo of the Barcelona Blouse Pattern Front and Back. Look past the rather garish red fabric, and notice the classic Princess blouse silhouette, with it's wing collar and split cuffs.


Brensan Barcelona Shirt Pattern

I chose to make mine from a white medium weight jacquard woven cotton/lycra blend fabric from Gorgeous Fabrics. While the garment looks a bit clumsy on my ancient dress form, the fit on me is perfect. I can see making a couple more of this style, utilizing the design options given in the pattern instruction sheets...a contrast bias cut front band and contrast collar. Silk Dupionni would work with this style, and perhaps I'll make another with short sleeves in Linen.

Brensan Barcelona Blouse

Please note that you are not seeing puckers...well you are, LOL, but they are the jacquard "highs and lows" of the fabric...not my sewing....really.

SEWING NOTES: Pattern Alterations- very few. I shortened the shoulders by 1/2" and the sleeves by 3/4". Shirt Collar and Cuffs interfaced with Pro-Sheer Elegance Fusible Interfacing, the back panel and fronts were faced with Pro-Woven Light Standard Sew-in Interfacing, both from ~Fashion Sewing Supply~. Buttons from ~Fashion Sewing Supply~.
Fashion fabric from Gorgeous Fabrics.

Labels: ,

What do you think? Please add a comment by clicking here--> 17 comments

4/12/2009

HotPatterns Sunshine Tops...Step by Step

Two SunshineTops !

I have found my "make it 10 times" Summer Top! This pattern fits and flatters so well, that I've already made two. The first, from heather gray Cotton/Lycra Jersey and the other from Cotton/Lycra Jersey print. The print version has an inset neckband made from lightweight Irish Linen.

HotPatterns #1071,
Weekender Sunshine Tops


The HotPatterns team has made 2 terrific descriptive videos about this pattern...here are the links:

SUNSHINE TOP VIDEO, Part 1

SUNSHINE TOP VIDEO, Part 2


Pattern Description from the envelope-

You won’t believe how much mileage you’ll get from these great tops until you make them yourself! These tops are designed for T-shirt or knit fabrics with a little stretch. Try beading the neckband or add beads to the tunic drawstring for a pretty look. Relaxed, scoop-neck Tops are gathered onto a deep neckband at the front ...mix & match lengths & sleeve styles for your perfect top. Tank is sleeveless with a ribbed hip band, T-shirt has cap sleeves and finishes at the lower hip, and Tunic has short sleeves and applied drawstring casing. Try these lovely tops with simple pants, skirts or shorts, under your favorite jackets or cardigans, or team them with your jeans for a great casual outfit.

This a very easy pattern to construct. However, I've seen some questions about it on various sewing forums, so I took pics of the sewing sequence as I constructed the first top:


1. Interface wrong side of one set of the neckbands, then stitch their shoulder seams. You now have a set of neckline bands...The Interfaced Under-Band, and the Upper-Band.


2. Place the bands RIGHT SIDES TOGETHER, and stitch the inner circle. Then clip the curve. Now you have ONE Neckline Band.


3. Under-stitch the the seam allowances to the Interfaced side of the Neckline Band.


4. Match the edges of the Neckline Band, WRONG SIDES TOGETHER, and press.


5. Sew the front bodice pieces Right Sides Together at the shoulder seams. Gather the front neckline between the notches.


6. Match the RIGHT side of the Neck-Band to the RIGHT side of the neck opening, matching the notches and adjusting the gathers as needed. Stitch the Neck-Band to the shirt through all layers.


7. This is what the sewn neckline of the Sunshine Top will look like from the Right Side.
8. The last steps are attaching the sleeves and stitching the side seams and hems as you would with any simple top or T-shirt.

SEWING NOTES: Pattern from HotPatterns, Pro-Sheer Elegance Interfacing from Fashion Sewing Supply, Fabric from my stash.

Labels: , , , ,

What do you think? Please add a comment by clicking here--> 30 comments

4/10/2009

FOLD and FLIP Facings....a Sewing Tutorial


Tops and blouses with draped cowls are among the most flattering neckline silhouettes. However, with many of these styles the shoulder seams tend to slip to the back. Not only that, but the inside can look very messy where the cowl drape facing meets the shoulder seams.


Here is a way to solve both of these problems at the same time ..and works equally well for boat neck tops with cut-on facings too!


In this example, the garment shown is the "Waterfall Blouse" from Ottobre Woman magazine, Issue 02/09 #5.


~ FOLD AND FLIP ENCLOSED FACING TUTORIAL ~

Patterns for draped cowls may have gathered front shoulder seams. If so, gathering the Front shoulder seams is the first step, as shown below--


Step 1


Also, patterns for this style may have a separate Back Facing. If so, attach it.


Step 2


Next, lay the back onto the front, Right Sides Together, matching the front and back shoulder seams, AND also match the edges of the facings, as shown---


Step 3


Now, with the back side up, stitch the shoulder seams together, pivot and continue to stitch the edges of the facings together in one pass, as shown below--


Step 4

This what the stitched shoulder seams/facings will look like from the FRONT


Next, fold the facings down towards the BACK meeting the shoulder seam and matching all edges. Stitch the shoulder seam again, though all layers (when you click on the photo to enlarge it, you will see the stitching line drawn in blue).
Repeat on the other side.


Step 5


Now turn (flip) the facings into position. Look! All those seams (shoulders, front facing, and back facing) are now neatly enclosed, as shown below. Also notice that the seams at the shoulder are now folded toward the Front. This is unusual, as we usually press shoulder seams to the back. But with this style, having the shoulder seams folded to the FRONT helps the cowl fall into beautiful folds, and the tendency of these styles to "slide backwards" is solved!


Step 6

Labels:

What do you think? Please add a comment by clicking here--> 12 comments

4/08/2009

The Waterfall Blouse, an Ottobre Woman Pattern

How much do I like this Top ? A Lot !

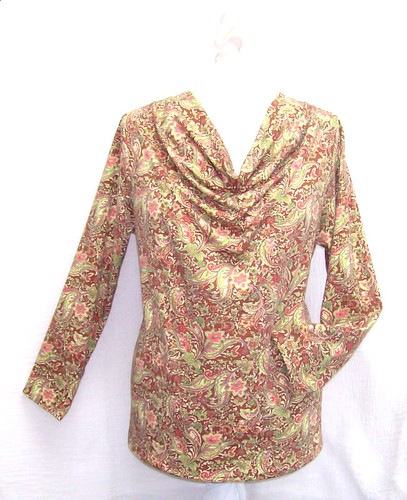
Ottobre Waterfall Top
Ottobre Woman, Issue 02/2009, #5

This top was made from a medium weight cotton/lyca knit without much drape...yet the neckline drapes beautifully. You can arrange the neckline folds in a "V" like I have shown here, or into a more rounded shape.

Please see the tutorial above, showing a way to neatly enclose all the facing/shoulder seams and encourage the neckline to fall into these nice folds.

Labels:

What do you think? Please add a comment by clicking here--> 9 comments

4/04/2009

A Super-Fantastic Pattern!

HotPatterns SuperFantastic Shirt_blog

Pattern Description:

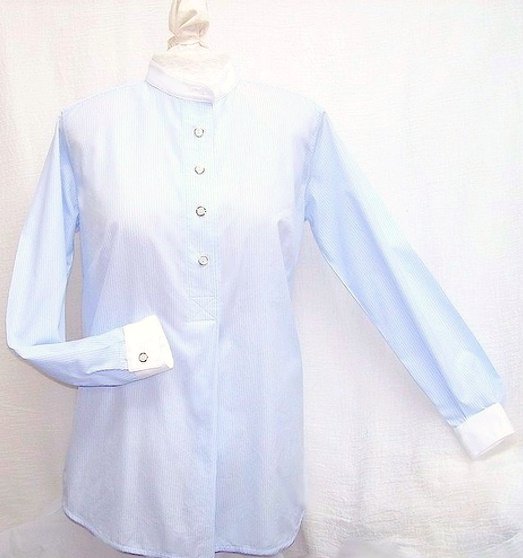
"The Plain and Simple SuperFantastic Shirt", HotPatterns #1029

This style from HotPatterns is a relaxed-fit Shirt that has a classic yoke, slightly dropped shoulders and long sleeves with cuff and placket. The Shirt features a front half placket and pleat, and finishes at the lower hip with a curved shirt tail. You can choose the classic shirt collar and stand, or use the stand by itself for a funky Nehru collar.

Pattern Sizing:

Multisize 6-26


Were the instructions easy to follow?

Yes...Though basic, the instructions were very clear and easy to follow. You need to cut the across the top of one of the pattern sheets to separate the instructions from the main page, but it does not in any way interfere with the pattern pieces. In fact, I found it quite handy to have them available this way.


What did I particularly like about the pattern?

I really like this style and will be making it again in a few different fabrics with different collars and sleeve lengths. It is a wonderful wardrobe-building shirt that has a nice feminine drape because of bust darts, subtle side-seam shaping, and the lovely way the placket forms a body-skimming front pleat.

Fabric Used:
Very fine and delicate Swiss cotton shirting


Pattern Alterations or any design changes made:

I needed to make all my usual alterations because I am petite...barely 5' tall. I raised the darts, shortened the torso a little bit but left it at Tunic length, and shortened the sleeves.

Would I sew it again?

I will indeed sew it again... I
am especially looking forward to making this style with washed Silk Dupionni .

Conclusion:

This is a lovely modern and feminine shirt that is easy to sew, and is very figure-flattering. A nice bonus are the 3 videos about this style that the pattern designer made. They can be found on YouTube.com


YouTube Links For the SuperFantastic Shirt:


SuperFantastic Shirt, Part 1
SuperFantasticShirt, Part 2
SuperFantastic Shirt, Part 3


SEWING NOTES: Fabric from stash, Pro-Woven Fusible Interfacing and Buttons from ~Fashion Sewing Supply~

Labels: , ,

What do you think? Please add a comment by clicking here--> 15 comments


Site Meter